|
#1
 21-06-14, 02:09
|
|||
|
|||
|
Hi All
My `41 Pattern 12 C60L has been a long term project it has been on the road for a number of years. But the nose frame on the truck has always been bent despite using a porta-power the bend meant that things didn't fit correctly, and the right fender had been badly crushed. A number of years ago, Bob brought a straight cab frame and front fender down to the Weare Rally. Well I finally decided it was time to swap out the cab frame and replace the front fender, the side of the originally cab frame was so bent that a good fender could not be mounted. The other part of this project is to try and solve a chronic engine overheating problem. Which I think is being caused by crud in the engine water jacket, despite repeated flushing. This engine was a running replacement that can work all day at low gear with no problem. But try to drive it over the road at air temperatures above 70F / 22C and it would start boiling. I've had a freshly rebuilt 235 sitting on the engine stand so with the nose all disassembled seems like this is the time to swap the engines out. Here are a series of photos from the first day of work.
__________________
Phil Waterman `41 C60L Pattern 12 `42 C60S Radio Pattern 13 `45 HUP http://canadianmilitarypattern.com/ New e-mail Philip@canadianmilitarypattern.com 
|
|
#2
21-06-14, 02:15
|
|||
|
|||
|
New Cab Frame in place
Bringing the 235 down on the elevator from the loft of the barn 235 Hanging on the leveling bar getting it ready to lift up to put in on an engine test stand. If you have any questions about how something is mounted on a Pattern 12 Chev now is the time to ask. Cheers Phil
__________________
Phil Waterman `41 C60L Pattern 12 `42 C60S Radio Pattern 13 `45 HUP http://canadianmilitarypattern.com/ New e-mail Philip@canadianmilitarypattern.com
|
|
#3
21-06-14, 02:51
|
|||
|
|||
|
Hi All
This post is in response to a question asked by Alex van de Wetering who happened to send me a message asking about part numbers or a way of telling Pattern 11 from Pattern 12 Cab Frame. His message came in the day I was swapping out cab frames. I have not found any part number stamped on the cab frames. But it occurred to me that one of the major differences was Pat 12 have a hinged hood so the holes for the hinge and there location should be a give away. So the photos below are looking down on the top rail of the cab frame, with a tape measure stretched from one end to the other. The center of the top frame is at inch 26 the driver side hinge outside mounding bolt hole is 16 inches in from the end and the other 18 inches Alex I hope this is of help, because otherwise these are probably the dullest photos I have ever posted, not photo contest stuff. Cheers Phil
__________________
Phil Waterman `41 C60L Pattern 12 `42 C60S Radio Pattern 13 `45 HUP http://canadianmilitarypattern.com/ New e-mail Philip@canadianmilitarypattern.com
|
|
#4
21-06-14, 03:16
|
||||
|
||||
|
Quote:
__________________
One of the original Australian CMP hunters.
|
|
#5
21-06-14, 06:55
|
|||
|
|||
|
Hi Tony
I've look at the radiator with an IR gun to see the change in temp across the radiator, left to right and up and down on both sides of the radiator (You can only do this on the test stand without the fan mounted) fairly consistent readings left to right. and a good 20F-40F degree delta from top to bottom, moderate airflow from a fan. Reason I thing it is trash and crap in the water jacket, is when I removed the water pump and look in there was an acorn. Then when I started pushing a tube probe into the block and head with vacuum attached kept getting sandy or rusty grit out of the block. I've got the radiator mounted on the test stand with the 235 engine so tomorrow I'll start doing some run tests with airflow and see if I keep getting a good delta temperature drop across the radiator. Will say one thing about 235 it has hydraulic lifters and boy is that a quiet engine without a fan mounted. The loudest think is the mechanical fuel pump which I've bye past for an electric one. One thing I am going to check is the thickness of the radiator as compared to the Pattern 13. With the 235 or the 216 I have noticed one thing you need to have a bypass from the thermostat housing down to the pump housing because modern thermostats don't have enough bypass to allow the hot water to actually get to the thermostat to get it to open. Also these engines I think originally had 140F thermostats which are no longer available the lowest being 160F. On the test stand I have one temperature gauge reading the normal position at the rear of the block and another in the pump housing reading the return temperature. Then I use the IR gun to read the temp at the top of the radiator and the bottom. If this radiator doesn't work I'll order a aluminum hotrod radiator. More to follow. Cheers Phil
__________________
Phil Waterman `41 C60L Pattern 12 `42 C60S Radio Pattern 13 `45 HUP http://canadianmilitarypattern.com/ New e-mail Philip@canadianmilitarypattern.com
|
|
#6
21-06-14, 19:54
|
||||
|
||||
|
Very interesting post Phil. I had similar issues with my F15A when I first put it on the road. It was mid summer and the radiator kept boiling. I tried four different radiators before I found one that worked satisfactorily. Some of them worked on the flat but they boiled uphill. There's a long hill near my place where I could test them, using a digital thermometer probe in the top tank. The one that worked best has been recored at some stage, with the usual thin core seen on recored Ford CMP radiators. The others had the original "tropical" core, which is much thicker, having an extra row of tubes across the front.
Naturally I examined each radiator before fitting them. The tubes appeared to be clear, insofar as I could see them through the filler cap hole. I tested them for leaks by plugging the bottom outlets (using small lemons off my tree) and filling with water, and when I removed the plugs the water gushed out under gravity, which would seem to indicate no major blockage. In the course of this radiator swapping I decided to test the flow through the system, by running the motor with the top hoses disconnected and the radiator level maintained via a 3/4" garden hose from the tap (there are no thermostats in this motor). I don't know how much it's supposed to flow but it sure pumped out a lot of water at around 2000 rpm. It gushed out in front of the truck through both hoses and the garden tap was flat out keeping up. The water pumps are brand new and have the improved impeller design, ie. helical vanes instead of the original straight vanes. Based on these tests I'm satisfied that the radiators are all clogged to varying degrees, despite appearing to drain quite rapidly under gravity. Your IR gun may pick this up, although if the tubes are randomly blocked I suspect it may not, as there are multiple rows of tubes which may average things out from side to side. Also if they're all partially obstructed, or most of them, the effect would be the same. I guess that could result from small particles of rust lodged in the tubes, or perhaps a coating of residue internally, although chemical flushing should remove that if done properly. One thing I've noticed is that the recored radiator has much larger tubes than the original ones, which are flat and thin. Obviously these would be far more prone to blockage/obstruction, and would also flow much slower. On the other hand they allow more airflow, which is also a factor in cooling efficiency. However if you look at modern radiators you'll see they have large diameter tubes, so I imagine these are an improvement. That said, we know these CMP cooling systems worked in hot climates during the war, often in heavily loaded trucks grinding up long hills at full throttle. I'm told Fords had a reputation for boiling sometimes and Chevs were preferred in this respect, so you shouldn't haven't any boiling problems in New Hampshire with the stock Chev radiator, even on peak summer days. Which brings us back to your present problem! Let's consider the physics. Boiling is caused by one thing and one thing only - insufficient heat loss through the radiator. Heat input is determined solely by the rate at which fuel is being burned. It can't be increased by blocked water jackets, because they're not generating heat energy. Only combustion gases can introduce additional heat energy to the coolant, via a leaky head gasket or cracked head. Blocked water jackets may cause overheating of the surrounding metal, but they can't add heat energy to the system. All very obvious of course but worth covering nonetheless, as it helps us to focus on the real problem, namely heat loss rather than heat gain. Heat loss occurs through the radiator and is a function of coolant temp and flow rate, cooling air temp and flow rate, and heat exchange surface area. We're not concerned with cooling air temp and flow rate, and we've fixed the coolant temp at say 170F, which leaves only coolant flow rate and heat exchange surface area. If all the radiator tubes are clear, then the heat exchange surface area is maximum, so the problem has to be insufficient coolant flow rate. Obviously if the radiator tubes are clear it has to be in the block! It seems unlikely that all the water jackets could be so badly blocked as to restrict coolant flow rate sufficiently to boil, but if the acorn was restricting the flow out of the water pump it could conceivably be the problem on its own. At that point in the system the effect on flow rate could be similar to a partially closed thermostat. Not having seen its position I'm unable to judge. Alternatively, if some of the radiator tubes are blocked, then obviously the heat exchange area is reduced proportionately, and also the flow rate. That's the usual cause of overheating, however there's usually no acorn in the block to consider! Of course, it could also be a combination of these factors - acorn, partially blocked radiator, and badly blocked water jackets. If that's the case, then the radiator may be adequate with the new motor after flushing, and it won't be subject to subsequent blockage from crap in the block. Whatever the case I'd persist with the Chev radiator myself, even if it needs recoring. I look forward to future instalments. My blitz mate down the road is putting a 235 in his C15A project so I'll post some pics when he gets to that stage. Cheers, Tony
__________________
One of the original Australian CMP hunters.
|
|
#7
22-06-14, 01:27
|
|||
|
|||
|
Hi Tony
Interesting thoughts on cooling issues, takes a bit of careful thinking to nail down the causes and issues. Agreed with what you are saying but still trying to figure out what is going on with my Pat 12. Concerning flow testing, when I did the water pump conversion on the 261 engine before putting it my C60S actually did flow testing both with the stock 261 water pump and with adapter plate and the 216 water pump. Set up the engine test stand with a large tank at level of the standard radiator so the water came out the top outlet and dumped into the tank with 22 inches of standing water in the tank same as the radiator. Of course with the thermostat installed the flow rate is control by temp and RPM. Results with the two water pumps came out almost identically so it probably the thermostat throat that controls the flow rate. The at 500RPM flow is 2-10 gallons per minute at 1000RPM flow rate is 8-20 gallons per minutes. After two hour long test cycles to day with the 235 I'm getting strange results. I have two water temperature sensors one in the normal location at the rear left of the block and the other into the water pump housing. At 500RPM the engine seems to stablize with the rear reading 170F and the return reading 150F good 20 degree delta for the radiator. But when you bring the engine up to 1500RPM rear is reading 170 and the return is reading 170. To further confuse things though at 1500PRM the water going into the at 200-210F (read with IR gun) and returning at the bottom of the radiator 198-175 The other thing that was going on during these test was the air temperature in the shop went from 74-80F. I knew there was a reason normally do engine testing and break in running in the winter heats the shop up nicely. Will have to figure out how to display the data so you can take a look. Cheers Phil
__________________
Phil Waterman `41 C60L Pattern 12 `42 C60S Radio Pattern 13 `45 HUP http://canadianmilitarypattern.com/ New e-mail Philip@canadianmilitarypattern.com
|
|
#8
22-06-14, 05:52
|
|||
|
|||
|
When you're hot you are hot.
How can you tell if it is the engine that is being overheated by a plugged passageway or the radiator that is not flowing in all tubes. I would try to test the radiator with a known temperature water going in and measure the delta.... actual drop in water temp..... and by this I mean off the engine completely...... but may be cheaper to run it to the rad shop to have it boiled out and the tubes rodded which means taking(unsoldering) the top and bottom tank off. On the engine...... without taking the engine apart.... would it be possible to remove the water pump, all frost plugs, temp sensor and drain petcock and flush and fish in there with a coat hanger and/or pressure washer until all that flows out is clear...? How worn out are the impeller blades on your water pump..... I have seen even rebuilt pumps with very eroded impeller blades. Can the engine be run with no rad but with a garden hose with controlled flow X amount of water volume and measure water temp going in and going out at various RPM...... hard to simulate load on the engine without some braking device on the output shaft...... On the other issue raised by Alex...... in the Chev parts manual dated Jan 1941 they list the cowl as a separate part from the ARCH BARS...... and the cowl is common to all sizes of cab11/12...... on the other hand they also list the ARCH BARS right and left ( confusing because to us restorer they are all the same once welded to the cowl angle iron) and shows that the arch bars are all the same part number for RH and LH for all C15, 15a,30, etc. size trucks....BUT the C8 has a separate part number which would reflect it own peculiar BAR shape due to the different frame, steering configuration, etc. I have two sets of C15a spare arches at the barn ....... I could not find any numbering on them at all.... mind you all are rusty. Phil .....US radiator makes an aluminium rad that is a copy of the cab 12 and includes the off set 90 degree filler tube.... only issue with the AL rad is you will need special coolant compatible with AL...... U tube has a few clips on their manufacturing process and they sell regularly on EBay. Good luck. Bob C
__________________
Bob Carriere....B.T.B C15a Cab 11 Hammond, Ontario Canada
|
|
#9
22-06-14, 14:15
|
|||
|
|||
|
Quote:
|
|
#10
24-06-14, 22:07
|
||||
|
||||
|
Quote:
Phil, you won't detect any delta once the motor speeds up with the thermostat open, because the water passes through the radiator far too quickly to cool down measurably. At normal flow rate it's only in the radiator tubes for an instant, you'd need quite sensitive equipment to measure the temperature drop from top to bottom. The cooling system relies on the huge volume circulating every minute, so it only needs to cool down a few degrees through the radiator. We can do a rough calculation based on your 8-20 gallons per minute result at 1000 rpm, choosing say 16 gallons per minute, which is 16 x 3.8 = 60 litres per minute = 1 litre per second. I don't know what the total volume of all those skinny tubes would be, but if we estimate it to be 1 litre, then the water passes through in 1 second. It just won't cool down much in that time, esp. stationary with modest fan rpm. Different story at idle when the thermostat is closed and you're only getting 2 gallons per minute flow. That's 8 times slower, which means the water spends 8 times longer in the radiator, ie. 8 seconds by this calculation. That would account for your 20F delta at idle. Of course, the delta will also be greater at speed when you're getting maximum airflow. We can do a rough calculation based on a CMP at cruising speed, let's say 50 HP engine output. Petrol engine efficiency is about 25%, which means there's another 150 HP being lost in heat. About half goes out the exhaust and half into the cooling system, which means the radiator is operating at 75 HP (x 0.746) = 56 kW. That would heat your workshop nicely Phil, and it also explains why the engine cover gets so bloody hot! 56 kilowatts = 56 kilojoules per second, and since the specific heat of water is 4.2 kilojoules/kilogram/degree Celsius, and a litre of water = 1 kilogram, the delta will be 56/4.2 = 13 degrees Celsius. However...that's based on our 1 litre per second figure, ie. 16 gallons per minute, which applies to 1000 rpm. If the flow rate is 3 times higher at 3000 rpm, the delta will be one third, ie. 13/3 = 4 degrees Celsius. Also, if the volume of all those skinny tubes turns out to be 1/2 litre, the delta will be halved, ie. 2 degrees Celsius. It's a fascinating experiment you're running Phil, I don't think I've ever seen it done before, and it gives a lot of insight into how cooling systems work, esp. the thermostat. We tend to think they're only for cold start up, but in fact they're constantly varying the flow rate. It would be interesting to set one up in a perspex tube instead of the housing, so it could be seen operating. It would also be interesting to have a delta gauge on the dashboard, I'm not sure what earthly use it would be but the same could be said of vacuum gauges!
__________________
One of the original Australian CMP hunters.
|
|
#11
25-06-14, 00:44
|
|||
|
|||
|
Hi Tony
Your giving me some interesting things to think about with this which is making it into both an interesting test but a quest for more information. I'm rethinking my testing logic and data collection methods. One thing for sure next test will set the Go-Pro Camera to capture the engine instrument panel through the whole test. Need to move it closer to the instrument panel this next time, so the gauges are easy to read. At the end of your post you said " It would be interesting to set one up in a perspex tube instead of the housing, so it could be seen operating. It would also be interesting to have a delta gauge on the dashboard, I'm not sure what earthly use it would be but the same could be said of vacuum gauges" Your comment about being able to see the thermostat in a prespex tube how about thisl Clear View.bmp Here is their web site https://coolviewthermostat.com/ not sure I want to spend that much for a single test but it would provide an interesting diagnostic tool. I just check and they have one that fits 216 https://coolviewthermostat.com/products/chevy-products/ and they have ones that fit the Ford Flat Head. Here is the first round of data collection for this test I'm going to do one more engine flush on the radiator tomorrow then do another round of testing. Bob, your thoughts on cleaning are running along with mine. I did back flush the radiator with it upside down but surely did not reach the flow rates my flow test (on the 261 at 1000RPM) showed of 20GPM. Had thought about mounting the radiator upside down running the engine but with no way of catching any trash that might come out decided that might be counter productive. One of the things that running the engine from cold to full hot showed was the value of the coolant recovery tank over a Half Gallon of water goes out into the tank and is drawn back in as the engine cools. Cheers Phil PS In the 1990s worked on a couple of large Co-Gen setups for hospitals we were using 545 Cat engines which put out a lot of heat at full power, the system was recovering the heat from both exhaust and from the cooling systems and using the heat to heat the hospitals. As owners rep on the project part of my role was to make the various engineers and suppliers explain how the system and components worked. If they could not explain it they generally did really understand it themselves.
__________________
Phil Waterman `41 C60L Pattern 12 `42 C60S Radio Pattern 13 `45 HUP http://canadianmilitarypattern.com/ New e-mail Philip@canadianmilitarypattern.com Last edited by Phil Waterman; 25-06-14 at 01:14. Reason: Add Information
|
|
#12
25-06-14, 00:54
|
|||
|
|||
|
Quote:
My main question was how to tell a C8 arch bar assembly (trying to find a suitable name here for the weld assembly of the three parts....) apart from a C15A one....or a Ford one for that matter. As usual such a question results in an interesting query.....with new questions arising along the way....what's the difference between Ford and Chev?. Is there a difference between cab 11 and 12......what's the difference between the C8 and other Chevs? My intention was to find out if the arch bar assembly in the yard at LWD parts was from a C8.... and possibly a suitable replacement for mine...which is pretty rusted. Dirk and Stefan were very helpful as always and it was enjoyable to talk about the hobby. Sadly for me the assembly they had available proved to be from a Ford, so I have decided to try and repair my rusted example. Maybe this info is useful for others, otherwise it might be the dullest info ever posted  - Ford vs Chev Arch bars....the Chev RH arch bar has an extra bend/bulge, to give some extra space for the pedals. I guess Ford's don't need the extra clearance (?), as they lack the extra bend. - The cowl as mentioned by Bob is listed in the Chev parts list with a Chev part number, as well as a Ford number, so I presume the cowl is the same for all(?). I don't have a Ford parts list here, so I can't check if all Fords used the same....nor can I check if the F8 used different arch bars (compared with F15 F30 etc.) as seems the case with Chev. - I have to check Phils pictures closely, but the parts list seems to suggest the cowl is the same for the cab11 and 12. Usually there is a mention of "before serial...." if there is a part difference between Cab 11 and 12....or a mention on using up old stock, before using the new part(number), but that doesn't seem to be the case here. - Also interesting.....in the Chev parts list you will notice that it takes 2 bolts and nuts less to assembly the fenders on a C8, compared with it's bigger brothers......so, could that be a way to tell a C8 arch bar assy from the others? - The fender itself are definitely different in width between a C8 and the sisters....we compared my C8 fender to a fender of the F60H....wow....a considerable difference! Phil, please keep the pics of your work coming....never dull....always useful! good luck with the engine. Alex
__________________
Chevrolet C8 cab 11 FFW BSA Folding Bicycle Last edited by Alex van de Wetering; 25-06-14 at 01:00.
|
|
#13
25-06-14, 03:39
|
|||
|
|||
|
Hi Alex
I have mixed and matched parts from both cab 11 and cab 12.... they all interchange. Except for some minor adjustments between the cab 11 engine cover lid and the cab 12. For example I have transplanted a cab 12 brace to my cab 11 to make the nose stronger...less saggy !!!. Took some sheet metal from the inside alligator cab 12 nose piece to replace sheet metal torched by the previous owner.... and arches are absolutely the same. The C8 has the cab sitting lower on a civvy frame therefore the bends would have to be different to join the regular sheet metal to the civvy C8 frame. It's amazing what you can fix with patience, a MIG welder and a back up copper plate. Phil After looking at your data chart...... would an oil cooler for the engine be part of your solution..? they now have an oil spin-on filter with a thermostat that will cool the engine ONLY when required..... and you can use a double PH 8 spin on for approx. 2 more liter of oil. Have you considered installing side panels on your engine stand to simulate the engine compartment air flow and large fan in front of the engine......... Interesting read.
__________________
Bob Carriere....B.T.B C15a Cab 11 Hammond, Ontario Canada Last edited by Bob Carriere; 25-06-14 at 03:45.
|
|
#14
25-06-14, 19:15
|
|||
|
|||
|
Quote:
Strange you should mention Oil Temps as part of the equation. When I was testing the 261 engine prior to putting it in I ran some long test on the engine stand hour plus one of the things being checked was the inlet and outlet temp of the oil filter that was mounted in the airstream from the fan. What I was testing for was oil pressure drop as the oil and engine temp went up. You will notice that there is a significant delta temp across the filter from the cooling area of the big spin on filter. Once the engine was installed with the longer lines to and returning from the filter and the filter mounted lower more down in the airstream under the truck the delta got even larger. The cooling effect on the oil means that you have to drive the truck pretty hard for at least an hour to get the oil temp and the engine temp to equalized. If the outside air is much below 70F it never does, which means the valves can only really be adjusted in hot weather. As to adding an oil cooler/ oil warmer wonder which would be better an air flow cooler or one that runs through the bottom tank of the radiator? But will over cooling the oil just add to the problem of vapor condensation in the oil not getting boiled out? Or is the internal air temperature through which all the oil must travel at some point get high enough to boil of the water vapor. But maybe that is why they have the thermostatically control oil cooler? Now as to adding side panels to the test stand, that will raise a whole another set of study questions. I do know that if you run the Pat 13s with out the front side shield it makes the cab a lot hotter. Managed to over heat the driver (me) on the recent long convoy I think because didn't have the drivers side shield installed. The guy riding with me used the IR gun to read the foot well temps and the drivers side (no shield) was 20F higher than the passengers side (with shield) now how much of this was also the air spaces around the pedals I don't know. Since have fabricated a two piece drivers side heat shield which is easy to instal and remove for service and I put rubber flaps around the clutch pedal which is inboard of the shield. Now to Tony's comment on delta on the radiator at full throttle, believe he is absolutely correct if the radiator is at all undersized. If the radiator is big enough there will be a delta change and should be a delta. There is also the obviously, as Tony points out, a speed through the radiator at which fluid is moving to fast for heat exchange to take place. This gets into the problem of no thermostat no flow restriction may make an over heating problem worse. With the CMPs though I don't think we are at that point because the top hose is so small. This afternoons work will be to use a radiator flush and do another long engine run to see if the temperatures change.
__________________
Phil Waterman `41 C60L Pattern 12 `42 C60S Radio Pattern 13 `45 HUP http://canadianmilitarypattern.com/ New e-mail Philip@canadianmilitarypattern.com
|
|
#15
25-06-14, 20:34
|
||||
|
||||
|
Quote:
There's only one improvement I can think of for this test regime, and that would be a coolant flow meter. It would be very useful to know what the flow rate is doing in response to RPM increase, because it would tell us if the radiator is partially blocked. The temp graph doesn't tell us much there, because although it shows a huge drop in delta when the revs increase, which indicates greatly increased flow rate, it doesn't mean a great deal if the baseline flow at idle is being restricted by the thermostat. We need to know absolute flow, not relative flow, and only a flow meter can tell us that. They're dirt cheap nowadays, eg $57 US for 1.5" diameter: http://www.aliexpress.com/item/Free-...572166866.html On the subject of flushing radiators, I recall using a kit back in the '70s which had a tyre valve on the hose fitting, the idea being to introduce a burst of air into the backflush flow to help dislodge particles. I don't know if it's still done that way but it makes sense to me. However I only used it in a servo for routine servicing, so I don't how effective it would be on a problem radiator. I haven't had much luck clearing blocked radiators over the years, despite using some very savage chemicals at times. Last year I put a whole bottle of phosphoric acid in a blitz radiator and left it for a month! It was bright green when I emptied it out but when I stuck it back in the truck it made no difference. You'd think by now there'd be a chemical on the market specifically designed to dissolve that brown stuff that clogs radiator tubes. Unfortunately it seems mankind has yet to come up with a way to unblock long skinny tubes except by poking things into them. In that respect we don't seem to have progressed beyond the monkey poking sticks into ant holes. I was amused by the Coolview thermostat, I thought only someone like me would think of something so weird! I love it as a dress up item and it would be very instructive to see a thermostat working, however apart from that I don't really see the value. My query would be replacement thermostats, ie. do they sell the thermostat separately or do you have to buy a complete new unit. Look forward to your next data set Phil.
__________________
One of the original Australian CMP hunters.
|
|
#16
26-06-14, 02:04
|
|||
|
|||
|
Hi Tony
Your graph came out giving more information than mine because of the way you ordered the data to be graphed. Did you have to type all this data back in because or did you capture from the picture? (Will add a photo of location of measurements) Well this afternoon, did flush the radiator with radiator cleaner, because of the right angle filler neck you can not see in to see if it really cleaned. But what came out was nearly clear. The engine had been hot tanked when it was rebuilt so it was clean inside. As to air burping radiator while flushing, yes I did this when back flushing the radiator upside down. Shop vac to what would be the in pipe water to the out pipe and a flex tube fed in through the drain cock hole with the engine upside down ran the water at full tap flow in and kept moving the flex tube in and out of the tank so that it would move the stream of bubbles around no crap came out. Ran the engine for nearly an hour today. Air temp in the shop when I start was 80F/26C (hot day here) very quickly the shop air temp jumped to 90F/33C. Ran the engine for 30 minutes with the cleaner in then 30 minutes with drain out and cold tap water going into the top tank to make up what was coming out to clear the flushing agent out. Running the engine at 2000RPM it climbed to about 190F and on the water jacket sensors and about 205 on the top tank with IR gun, but no higher. Interesting to watch the temp gauges with the engine not running but the blower fan still on the engine continues to circulate, thermosyphoning causing good circulation. (to insure some flow with the thermostat fully closed I have added an 1/8" hole to thermostat body.) Was going to do more testing but by then I was pretty well cooked standing around in the hot air blast coming through the radiator. Think the next step will be to finish the conversion of water pump from the low mount position to the high mount to match the original fan location. 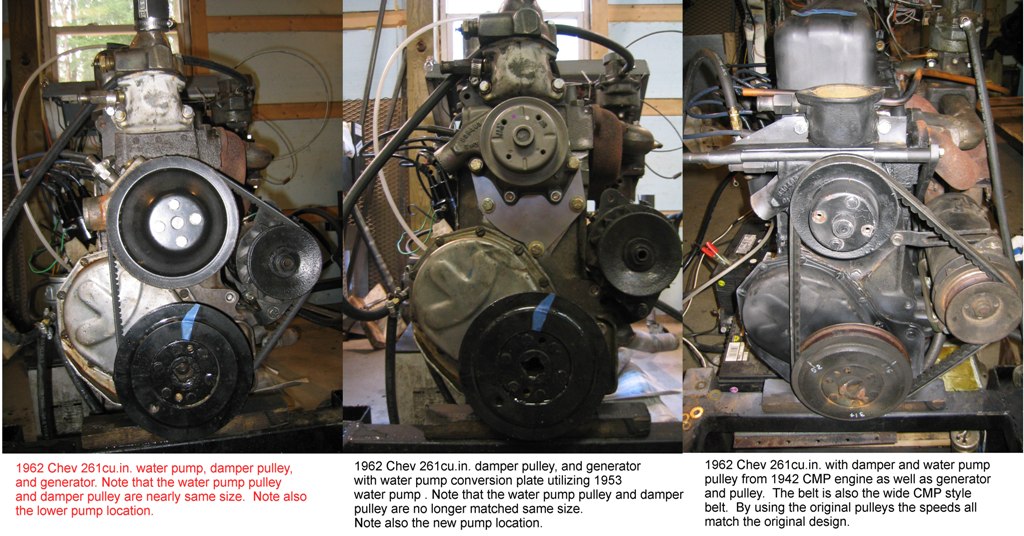 More details on pump swap from doing it on the 261 http://www.canadianmilitarypattern.c...ifications.htm Looking at these photos, it reminds me that I need to check the pulley sizes back to the original engine on the Pat 12 engine just to be sure that in the process of swapping out the original unusable 216 engine for the one that is in it now that I didn't in inadvertently mess up both the water pump and fan speed. Ah the mysteries of CMPs. Thanks everyone for taking time to read this thread and add thoughts and suggestions. Cheers Phil
__________________
Phil Waterman `41 C60L Pattern 12 `42 C60S Radio Pattern 13 `45 HUP http://canadianmilitarypattern.com/ New e-mail Philip@canadianmilitarypattern.com
|
|
#17
27-06-14, 01:09
|
||||
|
||||
|
Hi Phil
I haven't learned how to split posts on MLU so I'll have to do it manually: re: Your graph came out giving more information than mine because of the way you ordered the data to be graphed. Did you have to type all this data back in because or did you capture from the picture? Something else I haven't learned is how to use chart functions on MS Excel. I'm still using the old school method - graph paper! Other times I just use plain paper and construct my own axes, which means using a ruler to mark scales and plot data, but for presentation I do it on MS Paint, using the cursor pixel position instead of a ruler. It means using a calculator to convert figures to pixel position, but I'm pretty handy with a calculator so it's a very quick method, esp. with my scientific calculator which stores data. I've had it for 20 years and I'm always using it for something or other, in fact I rarely leave home without it! It's a bit tragic, but I'm one of those people with numbers rattling around inside my head all the time! I daresay you can relate to that Phil. Unfortunately though I don't have the patience or aptitude to learn computer programs, and unless I use them regularly I soon forget. re: Running the engine at 2000RPM it climbed to about 190F and on the water jacket sensors and about 205 on the top tank with IR gun, but no higher. That's very encouraging Phil, hopefully it will do the job on the road. re: Interesting to watch the temp gauges with the engine not running but the blower fan still on the engine continues to circulate, thermosyphoning causing good circulation. I hadn't realized you were running a constant speed blower fan, I had assumed the engine fan was fitted. That's why I was disturbed by the temperature spike at 1500 rpm. It's a good idea though as it allows you to load up the cooling system. If the fan was fitted it would just maintain a steady 170F, which doesn't tell you much. re: I need to check the pulley sizes back to the original engine on the Pat 12 engine just to be sure that in the process of swapping out the original unusable 216 engine for the one that is in it now that I didn't in inadvertently mess up both the water pump and fan speed. If the radiator is in good condition you may find you can get away with the larger pulley, which would be highly desirable in terms of fan noise. However I suspect it may overheat in summer, because it's reducing not one but two variables, ie. fan speed and water pump speed as you say. It would be an interesting experiment though. re: If the radiator is big enough there will be a delta change and should be a delta. There is also the obviously, as Tony points out, a speed through the radiator at which fluid is moving to fast for heat exchange to take place. As you say Phil there HAS to be a delta, and there always WILL be a delta. However, my reference to high coolant speed through the radiator core was not to suggest it's a bad thing, but merely to indicate the difficulty in measuring delta when the value is small. That's actually a GOOD thing. Believe it or not, the aim with radiators is to MINIMIZE the delta, which is done by MAXIMIZING the flow rate, so the coolant spends the LEAST possible time in the core. This is why our brain hurts when we try to get our head around cooling systems. It's entirely counter intuitive, because we've learned from everyday experience it takes time for hot water to cool down! However, it's the RATE of cooling we need to consider, because it needs to keep up with the RATE of heating in the motor. We need to forget about TEMPERATURE LOSS, and think about HEAT LOSS, which is a different thing altogether. I'll try to elaborate in a separate post, or maybe even start a separate thread, as it's highly relevant to flatheads. Cheers, Tony
__________________
One of the original Australian CMP hunters.
|
|
#18
27-06-14, 15:26
|
|||
|
|||
|
Hi Tony
Going old school on graphing the data makes it even more interesting. Agree on splitting the thread to put the cooling system discussion in one thread and the rest of the nose job in another makes senses, will see if I can figure out how to do it. Worked yesterday and hope to finish today the water pump conversion. The directions with the conversion plate spend a lot of time on the fan/water pump speed. When I did this conversion on the 261 I did run the engine on the test stand with big pulley on the crank and a small one water pump. That combination seriously over speeded the fan. Particularly with the 6 blade CMP fan, which when you cracked the throttle sounded like a plane, with a really strong prop wash. Air flow was so strong that it was sucking oil out of the oil breather. Was really concerned about the fan failing from being overspeeded so swapped the pulleys around from engine to engine to get the speed down. Now out to work on the truck. Cheers Phil
__________________
Phil Waterman `41 C60L Pattern 12 `42 C60S Radio Pattern 13 `45 HUP http://canadianmilitarypattern.com/ New e-mail Philip@canadianmilitarypattern.com
|
|
#19
27-06-14, 20:20
|
|||
|
|||
|
I have a recorred 3 rows of tubes with the six blade fan..... no sheet metal yet except for the front fenders.
Not sure if I have the 216 I have the large 261 crank pulley front pulley but the engine maintains a steady 161.005 degrees F with the 160 thermostat. Double PH-8 spin on oil filters. This Spring when we first took it out of storage is ran at about 900 rpm for nearly an hour to cook off any condensation then the oil was changed. I drive it in the back field exclusively in low range ( t-case was changed to a 2 speed). Low range allows me to cycle/crash in all 4 gears when travelling on the paved road from the house driveway entrance to the back field lane. On wide open throttle the heat damper on the exhaust manifold vibrates the little coil spring like crazy...need one of the antirattle spring..... the Carter YF carb sounds like a vacuum cleaner trying to suck tennis balls. Filling the bowl of the air filter with oil has toned down the sucking sound somewhat. Never gets up above 161 F. Cheers
__________________
Bob Carriere....B.T.B C15a Cab 11 Hammond, Ontario Canada Last edited by Bob Carriere; 27-06-14 at 20:28.
|
|
#20
23-08-14, 00:10
|
|||
|
|||
|
Hi All
Have you ever taken a Chinese Puzzle apart an had problems putting it back together, well I'm convinced the Patter 12s are more challenging. With all mechanical work done I'm finally finishing reinstalling all the body panels on the cab and was just about done when I discovered that the last two panels could not be installed because other parts are in the way. So here is a tip I learned then forgot then learned again the hard way. For those of you who are working on Pattern 11 and 12 Cab CMPs remember the order in which the various body and panels are removed. Many of the panels and parts can only be assembled in one sequence. If you don't follow the same sequence that they were removed you suddenly discover that the last panel or part will not fit with out removing other parts. In particular the inner fender wells and the engine side covers are problematic. Once you have worked on worked on Pattern 11 & 12 you realize how much of an improvement the Pattern 13s were. Next time I disassemble the cab on my Pattern 12 I plan to have a paint pencil in my pocket and plan to number each part as it comes off. Cheers Phil
__________________
Phil Waterman `41 C60L Pattern 12 `42 C60S Radio Pattern 13 `45 HUP http://canadianmilitarypattern.com/ New e-mail Philip@canadianmilitarypattern.com
|
|
#21
23-08-14, 01:09
|
|||
|
|||
|
HI Phil
I am currently going through the smae frustration. Grants keeps laughing at me for putting on 2 pieces remove one installing two more and then thebolt hole do not line up. Fortunately I have other less molested cab 12 to refer to. Yes ...... their is a specific order to installing the sheet metal andnow I think I know. First of all the 3/16 floor panels that have been in place for years have to be loosened up ....only to realize that the nice hole I cut into the floor plates for the 2 speed T case was too tight and gave me no flexibility at all...... so I removed about 5/16 of an inch on two sides and that made a whole difference. Having removed all the sheet metal panels previously installed Grant and I started to pull, pry with alignment bars and tapered punches and in some cases with 4 inch long bolts to pull everything together...... now all of this work is ONLY for a trial fit..... it all has to come off for the official 5/16 domed slotted fine thread screws...... and also to fit the antisqueak/rattle tape on all metal to metal surfaces. I don't know how you do it all alone particualrly some fo the frame/floor bolts as I was glad to have Grant work the top side while I crawled underneath to hold the other end of the bolt/nut. Your name did come up many time deuring the difficult fitting. So it is round bulding inner fender, front inner panel, then remove half the inner fender bolts and do the top inner foot well,....oops forgot to insert the front fenders at this point......yeck !!! then the nose vent panel without forgetting to install the funnel and short peice of duct macterial then over the radiator cross piece then the outter nose panel..... and that is only for one size. Now I do have a few bolt holes I cannot instal a bolt as the fender support bracket is now in the way.... not sure I can take ther backet off now... and all of this is for one side only..... and the engine cover has to be remembered... I am sure I will have to remove some panels to get this job done. Wish you where closer Phil. Cheers
__________________
Bob Carriere....B.T.B C15a Cab 11 Hammond, Ontario Canada
|
|
#22
23-08-14, 01:14
|
|||
|
|||
|
Chinese puzzle....
Holly manure...... now I can't post pictures as the system says I need "security tokens" and I think Bill Alexander bought them all last time he had to post pictures. Any one has a nickle for me to buy a security token??? UN - Cheers
__________________
Bob Carriere....B.T.B C15a Cab 11 Hammond, Ontario Canada
|
|
#23
23-08-14, 04:47
|
|||
|
|||
|
I guess I have lots to look forward to with a cab 11 and 12 to do.
__________________
40 Chev Cab 11 41 Ford Cab 12 FAT 42 Chev 1 1/2 ton G506 1943 Chev M6 Bomb Truck 1942 Slat Grill MB 1952 M38 x2 1955 GMC M215 1955 M38A1x2
|
|
#24
23-08-14, 16:48
|
|||
|
|||
|
Lots of pictures Ian...... and then some more.....before...during and after.....
None of the shop manual gives you those details. Cheers
__________________
Bob Carriere....B.T.B C15a Cab 11 Hammond, Ontario Canada
|
|
#25
23-08-14, 16:57
|
|||
|
|||
|
...apparently security token is code for your picture is too lrage and needs resizing...
__________________
Bob Carriere....B.T.B C15a Cab 11 Hammond, Ontario Canada
|
|
#26
23-08-14, 22:52
|
|||
|
|||
|
Hi Bob
Got a kick out of your two steps forward one back, on a good day it is three steps forward and only one back. Well this morning - Another Lesson Remembered- when things don't seem to fit call it a day go have a cool one and start over again in the morning. Which fortunately is what I did yesterday when the inner fender panels didn't want to fit. When I started fresh this morning they fitted with only having to remove one part. Which was much better than what I thought would have to be done yesterday. As to how do I manage to assemble these trucks working alone, you know how the Pat 11&12 are some times referred to as Monkey Faced. Like every one I assumed this reference was to the appearance, wrong it is a reference to who assembled the trucks I am now convinced that they were assembled by monkeys with extremely long arms who could also hold wrenches with their feet. Though I've not taken my shoes off to hold a wrench but come close. Actually a really fast impact wrench will often let you push a bolt through a hole then instal the washer lock washer and nut, if you put the impact socket on the nut you can spin the nut tight before the bolt has a chance to turn allowing one sided tightening. Well the truck is nearly all reassembled which is good because we have some real hot weather forecast for next week 30C or 86F which will give me a chance to see if after all this work I've actually cured the over heating problem. Ian yes you are in for a lot of fun and just as Bob says lots and lots of pictures. Don't know how many times I've gone back to the pictures I or other people have taken of their trucks to get a part positioned correctly. One other thing Ian if you whether or not you plan to reuse the bolts have lots of small containers which you can label right front fender etc and throw all the bolts into the correct bucket. Will help in figuring out what bolts and what size and length to get as well. I buy all grade 8 bolts in 50-100 count bulk from an industrial supplier much cheaper than the hardware store or auto-parts store. Cheers Phil Cheers Phil
__________________
Phil Waterman `41 C60L Pattern 12 `42 C60S Radio Pattern 13 `45 HUP http://canadianmilitarypattern.com/ New e-mail Philip@canadianmilitarypattern.com
|
|
#28
26-08-14, 00:26
|
|||
|
|||
|
Hi All
Well the nose job and engine swap worked, the truck can now breath and it doesn't seem to overheat. Took the truck for an extended drive today ambient air temp 29C or 84F and the truck never got much over 190F which is a far cry from boiling into the recovery tank which it did before. Also now that the clutch completely disengages the truck shifts like a dream. The clutch problem was caused by a clutch disk that actually was sticky to the touch. Cheers Phil
__________________
Phil Waterman `41 C60L Pattern 12 `42 C60S Radio Pattern 13 `45 HUP http://canadianmilitarypattern.com/ New e-mail Philip@canadianmilitarypattern.com
|
|
#29
26-08-14, 02:19
|
|||
|
|||
|
Hi Phil
Any idea how the sticky stuff came from?? Leak somewhere.....? What temp setting are you using for the thermostat...... we are using the GM 1959 manual recommended 160 on ours and fear it may be too cold. We are about ready to fire up Grant's rebuilt 261 in the next few days. Bob C
__________________
Bob Carriere....B.T.B C15a Cab 11 Hammond, Ontario Canada
|
|
#30
26-08-14, 23:03
|
|||
|
|||
|
Hi Bob
Not sure of the source of the sticky stuff, this is the second time that I have run in to it. Both times it has developed on clutches that had worked fine but were out of the truck for some reason then when reassembled the clutches did release correctly and sometimes I would have to start the engine with the truck in gear, brake on and clutch peddle pushed all the way in. Only cure seemed to be to pull the clutch out again and replace or really clean it. Only thing I can suspect is that I had degreased or cleaned the clutch plate while it was out but not gotten it really clean. Then the first time the plate was warmed up the oil or grease came to the surface. But what confuses me is that when I overhauled the HUP I had this problem when I reassembled. Had to pulled the clutch again, really cleaned it, flywheel and pressure plate. Second time cleaned it I know I used brake cleaner and then a water based degrease and rinsed the whole thing with very hot water 160F and it worked fine since then. Now as to the thermostat what I wanted was a 140F but they are no longer available so went with a 160F drilled a 1/8th hole in the thermostat to be sure that there would be flow to get the hot water up into the thermostat housing. Without a heater connected to the thermostat housing and the water pump as on all current cars there can be a real lag in getting the thermostat to open. On my 261 I actually put a small bypass tube to be sure of flow. As to worrying about not getting the engine warm enough don't think it will be a problem. The dog house is tight enough that my 261 with no manifold heat riser starts and runs fine even below "0"F do put the radiator muff on to drive in real cold weather but that is more for the driver. My IR gun readings of the oil pan tell me that drives of hour even in cold weather the oil is getting up to 180F. The remote oil filters on 261 do not get that warm though. Suppose in arctic conditions there might be a problem with water collecting and freezing in the oil filters. Cheers Phil
__________________
Phil Waterman `41 C60L Pattern 12 `42 C60S Radio Pattern 13 `45 HUP http://canadianmilitarypattern.com/ New e-mail Philip@canadianmilitarypattern.com
|
 |
|
|
 Similar Threads
|
||||
| Thread | Thread Starter | Forum | Replies | Last Post |
| Knock me down with a feather, M43 under my nose | Robin Craig | Post-war Military Vehicles | 15 | 10-02-14 02:51 |
| Planes and Nose Art pics | Vets Dottir 2nd | WW2 Military History & Equipment | 20 | 25-02-08 19:03 |


 Linear Mode

