MLU FORUM  

Go Back   MLU FORUM > GENERAL WW2 TOPICS > The Wireless Forum

Notices

Reply
 
Thread Tools Display Modes
  #1  
Old 01-12-13, 15:06
Johnny Canuck Johnny Canuck is offline
Geoff Truscott
 
Join Date: Aug 2011
Location: Ottawa, Ontario, Canada
Posts: 163
Default

It would appear that a special mounting bracket is required for a Universal Carrier installation.
The Packing Piece No.1 (wood, rubber, bakelite) and a Seating Plate Metal are required. These are fastened to the Variometer with 3 screws ( the 3 holes are visible on the underside of the Variometer case)
The problem is how to fasten this assembly to the vehicle as you can not reach the mounting screws once the Variometer is attached to the plate assembly.
A Brackets, Metal, Mounting, Variometer No.C1 (ZA/Can 1376) is required to mount it to the Vehicle.
This bracket is just visible as the hashed line behind the Variometer in the picture you posted.

Geoff

You need items 2, 27 and 28


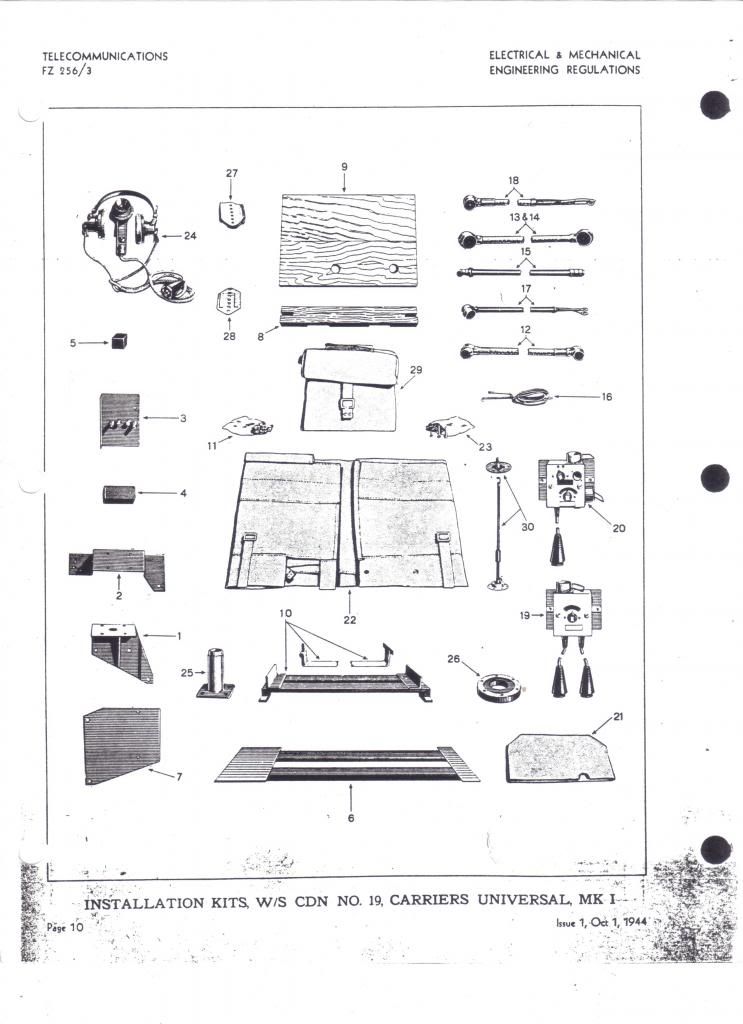
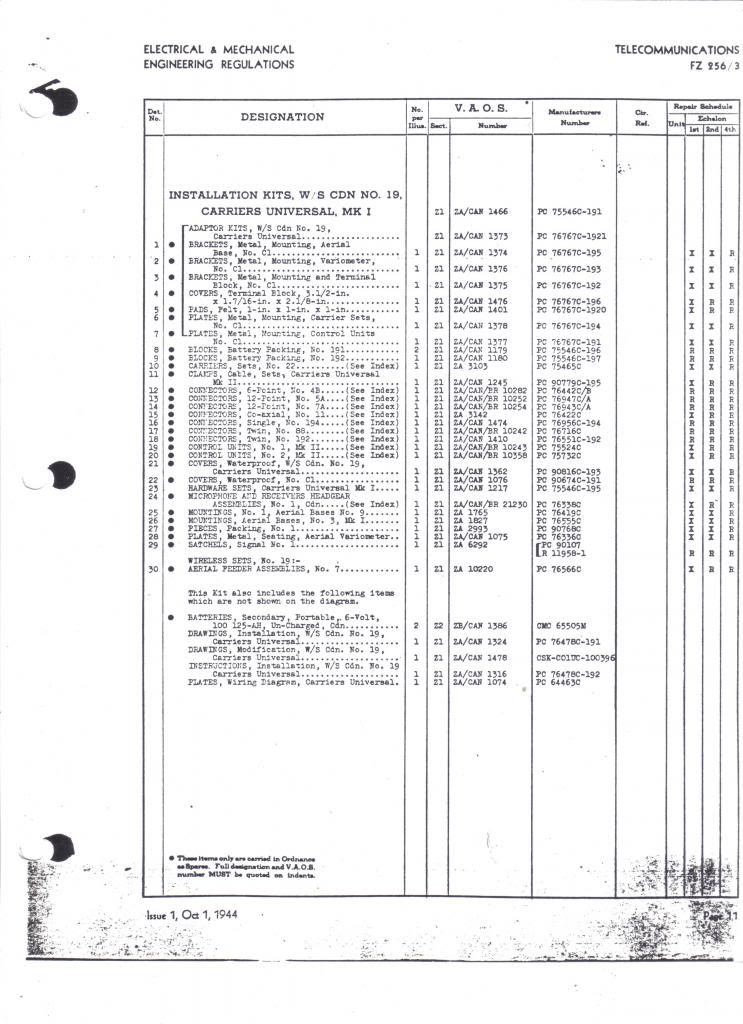
Last edited by Johnny Canuck; 01-12-13 at 15:23.
Reply With Quote
  #2  
Old 01-12-13, 17:03
kevin powles's Avatar
kevin powles kevin powles is offline
Registered User
 
Join Date: May 2006
Location: united kingdom
Posts: 1,984
Default

Hi johnny, that info is great!, I have seen the spacer available but I guess the metal bracket would be difficult to get, has anyone got a drawing of it, looks easy to make.

Regards Kevin.
__________________
2pdr Tank Hunter Universal Carrier 1942 registered 11/11/2008.
3" Mortar Universal Carrier 1943 registered 06/06/2009.
1941 Standard Mk1 stowage Carrier, Caunter camo.
1941 Standard Mk1 stowage Carrier, light stone.
10 cwt wartime mortar trailer.
1943 Mk2 Daimler Dingo.
1943 Willys MB.
1936 Vickers MG carrier No1 Mk1 CMM 985.
Reply With Quote
  #3  
Old 01-12-13, 22:00
Jordan Baker's Avatar
Jordan Baker Jordan Baker is offline
Moderator
 
Join Date: Feb 2003
Location: Hamilton, Ontario, Canada
Posts: 4,156
Default

Kevin, my carrier has that mounting for the variometer. However I am a few thousand miles away from home for a while. Check my carrot thread and there might be some pictures of it.
__________________
Jordan Baker
RHLI Museum,
Otter LRC
C15A-Wire3, 1944
Willys MB, 1942
10cwt Canadian trailer
Reply With Quote
  #4  
Old 14-12-13, 00:17
Chris Suslowicz Chris Suslowicz is online now
Junior Password Gnome
 
Join Date: May 2007
Location: England
Posts: 854
Default

Quote:
Originally Posted by kevin powles View Post
Hi johnny, that info is great!, I have seen the spacer available but I guess the metal bracket would be difficult to get, has anyone got a drawing of it, looks easy to make.

Regards Kevin.
As Johnny (Geoff?) said, you need items 2, 27 and 28 (plus Aerial Feeder No.7).

Item 2 is the bracket that bolts to the carrier hull and supports everything.
Item 27 is the "Piece, Packing" and is just a spacer between the curve of the variometer and the flat mounting surface of the bracket.
Item 28 is the critical part: "Plate, Seating" - it's a stretched hexagon matching the outline of item 27 and has a row of pressed-in countersunk holes for the three variometer fixing screws, plus two spot-welded metal strips (it's too thin, otherwise) with a pair of tapped holes in each to fit it to the bracket (Item 2).

I suspect the assembly sequence is:

First, fit the aerial feeder cable to the plate and fit that to the variometer.
Next, assemble items 27 and 28 and fix them to the "barrel" of the variometer with 3 screws provided.
Then fix the whole assembly to item 2 with the four screws provided.
Finally, fit item 2 to the vehicle hull.

(Trying to do it any other way, e.g: fitting the hull bracket first, will be very difficult because you won't get a screwdriver under the bracket even if you have eyes in your fingertips.)

Once that's all done you can feed the aerial cable through the aerial mounting (don't forget the rubber sleeve), attach the connector plate to the cable and position it on the top of the mounting (rubber gaskets as desired), then screw the pigtail lead into the underside of the aerial base, connect the pigtail to the connector plate (centre contact - ring terminal and very fiddly screw), then fix the whole lot to the aerial mounting plate with the six bolts.

After all that, a cup of tea (or something stronger) is definitely recommended.

Chris.
Reply With Quote
  #5  
Old 14-12-13, 10:16
kevin powles's Avatar
kevin powles kevin powles is offline
Registered User
 
Join Date: May 2006
Location: united kingdom
Posts: 1,984
Default

Thanks Guys, A kind gentlemen on this forum has already done me a very nice drawing of item 2, the fixing bracket. Many thanks for the other info.

Does anyone have item 28 the steel bracket they could loan me to copy?, I understand item 27 the wood packing piece is quite common so should be available to purchase at some point in time.

regards kevin.
__________________
2pdr Tank Hunter Universal Carrier 1942 registered 11/11/2008.
3" Mortar Universal Carrier 1943 registered 06/06/2009.
1941 Standard Mk1 stowage Carrier, Caunter camo.
1941 Standard Mk1 stowage Carrier, light stone.
10 cwt wartime mortar trailer.
1943 Mk2 Daimler Dingo.
1943 Willys MB.
1936 Vickers MG carrier No1 Mk1 CMM 985.
Reply With Quote
  #6  
Old 23-12-13, 12:39
kevin powles's Avatar
kevin powles kevin powles is offline
Registered User
 
Join Date: May 2006
Location: united kingdom
Posts: 1,984
Default Shared information.

Hi, A kind gentleman has supplied this information to me, will start making in the new year.


Many thanks Kevin.
Attached Images
File Type: jpg image.jpg (80.9 KB, 36 views)
__________________
2pdr Tank Hunter Universal Carrier 1942 registered 11/11/2008.
3" Mortar Universal Carrier 1943 registered 06/06/2009.
1941 Standard Mk1 stowage Carrier, Caunter camo.
1941 Standard Mk1 stowage Carrier, light stone.
10 cwt wartime mortar trailer.
1943 Mk2 Daimler Dingo.
1943 Willys MB.
1936 Vickers MG carrier No1 Mk1 CMM 985.
Reply With Quote
  #7  
Old 04-01-14, 01:24
kevin powles's Avatar
kevin powles kevin powles is offline
Registered User
 
Join Date: May 2006
Location: united kingdom
Posts: 1,984
Default

Quote:
Originally Posted by Johnny Canuck View Post
It would appear that a special mounting bracket is required for a Universal Carrier installation.
The Packing Piece No.1 (wood, rubber, bakelite) and a Seating Plate Metal are required. These are fastened to the Variometer with 3 screws ( the 3 holes are visible on the underside of the Variometer case)
The problem is how to fasten this assembly to the vehicle as you can not reach the mounting screws once the Variometer is attached to the plate assembly.
A Brackets, Metal, Mounting, Variometer No.C1 (ZA/Can 1376) is required to mount it to the Vehicle.
This bracket is just visible as the hashed line behind the Variometer in the picture you posted.

Geoff

You need items 2, 27 and 28


Hi, Does anyone know where I can get the top two straps (item 10) of the featured drawing, also the 6 pin dog bone.

thanks kevin.
__________________
2pdr Tank Hunter Universal Carrier 1942 registered 11/11/2008.
3" Mortar Universal Carrier 1943 registered 06/06/2009.
1941 Standard Mk1 stowage Carrier, Caunter camo.
1941 Standard Mk1 stowage Carrier, light stone.
10 cwt wartime mortar trailer.
1943 Mk2 Daimler Dingo.
1943 Willys MB.
1936 Vickers MG carrier No1 Mk1 CMM 985.
Reply With Quote
  #8  
Old 04-01-14, 02:04
Jordan Baker's Avatar
Jordan Baker Jordan Baker is offline
Moderator
 
Join Date: Feb 2003
Location: Hamilton, Ontario, Canada
Posts: 4,156
Default

I had to buy an extra one of the linfer straps and cut it down. Was simple to pop off the rivets and shorten it.
__________________
Jordan Baker
RHLI Museum,
Otter LRC
C15A-Wire3, 1944
Willys MB, 1942
10cwt Canadian trailer
Reply With Quote
  #9  
Old 05-01-14, 02:26
Chris Suslowicz Chris Suslowicz is online now
Junior Password Gnome
 
Join Date: May 2007
Location: England
Posts: 854
Default

Quote:
Originally Posted by kevin powles View Post
Hi, Does anyone know where I can get the top two straps (item 10) of the featured drawing, also the 6 pin dog bone.

thanks kevin.
Item 10 is declared as "Carriers, Set, No.22", which may just be the metal frame. The set retaining strap is the same length as the longer strap in the No.21 or No.23 carriers, but the one for the supply unit is somewhat longer than the supply unit mounting strap for those carriers (as the supply unit fits on top of the set - using the same steel angle strips as used on Carrier 21 or 23 (screwed into the flat plates on the set top)). You may need to cut a longer strap down to make the supply unit mounting strap.

The strap lengths are listed in the Parts Identification section of the EMER, but I'm not sure what the length actually represents! (Just the canvas bit, from the studs to the strap-end of the thread, or the overall length of the whole thing.)

Chris.
(Carriers 1, 2 & 3 were renumbered 21,22 & 23 at some point, 24 is for the WS22 (I think) and 25 is an all-steel carrier for a demountable WS19 used in vehicles (similar to the No.3/23 wooden board type but shorter and with a single very long strap that goes around set and supply unit, plus a plate on top of the set to carry the variometer, an aerial base and a control unit. I'm still looking for the supply unit adapter plate for this carrier.)
Reply With Quote
  #10  
Old 05-01-14, 11:50
kevin powles's Avatar
kevin powles kevin powles is offline
Registered User
 
Join Date: May 2006
Location: united kingdom
Posts: 1,984
Default

Hi , Many thanks for the info, it appears all very complicated and the line drawings shown are not that clear, what I really need is a few pictures of what a correct bren gun carrier radio mount, strap and brackets assembly looks like in situ, I will post a picture of the radio trays I have currently, they both came out of carriers and look correct.

Regards Kevin.
__________________
2pdr Tank Hunter Universal Carrier 1942 registered 11/11/2008.
3" Mortar Universal Carrier 1943 registered 06/06/2009.
1941 Standard Mk1 stowage Carrier, Caunter camo.
1941 Standard Mk1 stowage Carrier, light stone.
10 cwt wartime mortar trailer.
1943 Mk2 Daimler Dingo.
1943 Willys MB.
1936 Vickers MG carrier No1 Mk1 CMM 985.
Reply With Quote
Reply


Posting Rules
You may not post new threads
You may not post replies
You may not post attachments
You may not edit your posts

BB code is On
Smilies are On
[IMG] code is On
HTML code is Off

Forum Jump

Similar Threads
Thread Thread Starter Forum Replies Last Post
Sten Gun mounting kevin powles The Carrier Forum 10 04-07-10 22:13
Location of Variometer on a late Ram Kangaroo? kevinT The Armour Forum 6 21-11-07 06:28
Radiator mounting rampant rivet The Restoration Forum 8 18-05-07 17:27
Variometer Installation for T-16 horsa The Carrier Forum 0 08-04-07 21:34
Mounting new tyres sapper740 The Restoration Forum 18 26-11-05 00:07


All times are GMT +2. The time now is 13:02.


Powered by vBulletin® Version 3.8.4
Copyright ©2000 - 2025, Jelsoft Enterprises Ltd.
Copyright © Maple Leaf Up, 2003-2016