|
#121
 24-05-09, 06:47
|
||||
|
||||
|
Will do Jim...
If anymore Un-Cut MUTTs pop up, please let me know. As much as I love this one, it still bugs me that it is rewelded. Scotty 
|
|
#122
24-05-09, 06:57
|
|||
|
|||
|
hi scotty.i read an earlier post.i didnt realize eric had already got the info on the mutt i had sold him.just need mine if you can.thank you.regards jim
|
|
#123
24-05-09, 07:07
|
|||
|
|||
|
scotty i will keep that in mind for you.i think ive had a least 4 or 5 uncut versions.there was a least 6 bodies down my way that sold about 2 years ago uncut in a surplus yard.ive never found out where they went.the guy took them apart but never cut them.he passed on they had an auction sale.i figured they would pop up but none have of yet.if i see something i will let you know.i can check with the guy i sold one to see if he is interested in selling.i know eric is going to start work on his soon.regards jim.ps your mutt looks great.
|
|
#124
24-05-09, 07:32
|
|||
|
|||
|
Quote:
|
|
#125
24-05-09, 16:45
|
||||
|
||||
|
Quote:
It killed me to know that those were sitting there while I tooled away reconnecting this one. At the end of the day, I just couldn't live with myself to dispense what he was asking for the relatively clean body. Scotty
|
|
#126
25-05-09, 21:29
|
|||
|
|||
|
In response to Jim Fraser's request for info on M151A2 I checked a few minutes ago on what info I could find.
1974 M-151A2 Ser. No. 43942 CFR#09417 01 Jan 1974 to 03 Dec 1982 Canadian Airborne Regiment 03 Dec 1982 to 16 May 1985 CFB Petawawa 16 May 1985 to 12 June 1985 CFB Suffield 12 June 1985 to 06 Sept 1985 CFB Edmonton Detachment at CFB Wainwright 10 Sept 1985 until 28 June 1987 VMO No. DP358355 07 Jan 1987 Disposed of 18 Feb 1988 for $325.00 The only record of any Work Order's I could find were between 14 March 1977 and 04 June 1980. All work done by 3 RCR Maint Pl., except for 21 Feb 1978 for a 2 hour Vehicle Tech Repair done by 2 Svc Bn. Cheers.
|
|
#127
26-05-09, 05:02
|
|||
|
|||
|
Quote:
__________________
Terry Warner - 74-????? M151A2 - 70-08876 M38A1 - 53-71233 M100CDN trailer Beware! The Green Disease walks among us!
|
|
#128
26-05-09, 06:37
|
|||
|
|||
|
hi craig.Thankyou,thankyou,thankyou......I appreciate the info very much.it was awesome to read your post.its just great to have that info.thank you again.regards jim fraser 613 623 6156.
|
|
#129
31-05-09, 03:04
|
||||
|
||||
|
Went to the OMVA show in Oshawa today. It was a good shakeout run for me. Gave me a chance to put some miles on it and see if there were any kinks. Also got to see some other MUTTs in the flesh, as well as get a Club Membership:
 I was having some Fuel problems which was causing some sputters every so often. I decided to pull the Carb while I was at the show to see if some junk got in the Idle Passage. It seemed to provide some entertainment to those who popped over. You have to love the simplicity of these things. Anyway, everything appeared nice and clean, so i'm suspecting the Fuel Pump is on its way out. I've noticed that the Fuel Filter (Clear Housing) doesn't seem to completely fill up while its running like it used to, so I may be starving the engine from time to time. Now for the biggy. If you take the time to do a good job installing and maintaining your mechanicals, spring the $$$ to get the High Tensile Cotter Pins like the Tech Manual call for. Even though I went to great pains to make sure the Wheel Bearings were packed and pre-loaded properly, it was the cheapo Cotter Pins that left me in this position:   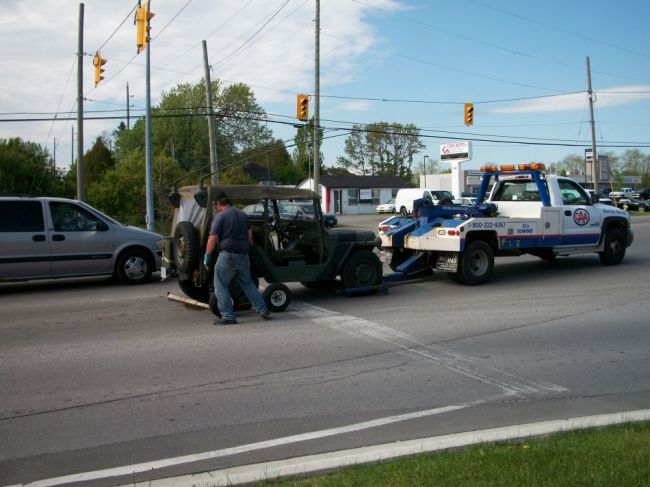 I'm not ashamed to admit when i've pulled a boner. Fortunately this happened while we were in town rolling at about 10km/h. Needless to say, i'm not sure when i'll convince my wife to come for a ride again. Scotty
|
|
#130
01-06-09, 21:35
|
||||
|
||||
|
Closer inspection revealed that the Cotter Pin sheared and the Nut let go. Looks like the Nut loosened off a bit, then took the threads off, and well, you can see the result.
Needless to say, i've ordered the correct rated/grade Cotter Pins as specified in the TM. Time to put her up on stands again for a bit. Oh, as for the sputtering... It was the plugged up Sock Filter in the Tank 
Last edited by Scott Bentley; 01-06-09 at 21:42.
|
|
#131
01-06-09, 22:08
|
|||
|
|||
|
Hi Scott
Thanks for sharing, your not the first person to have this happen to or the last, so the lesson is a good one for the rest of us. Think about those keepers, wheel cotter pins etc. I've been using stainless steel cotter pins but now you make me wonder and make me think about all the critical torque locations that I've used them. Speaking of keepers has anybody found a source for off the shelf nut keepers for CMPs. I'm getting tired of cutting out keepers out of sheet steel, little easier now with a plasma cutter but still takes time. Cheers Phil
__________________
Phil Waterman `41 C60L Pattern 12 `42 C60S Radio Pattern 13 `45 HUP http://canadianmilitarypattern.com/ New e-mail Philip@canadianmilitarypattern.com Last edited by Phil Waterman; 01-06-09 at 22:10. Reason: correction and adding info
|
|
#132
01-06-09, 22:28
|
|||
|
|||
|
Quote:
|
|
#133
01-06-09, 23:43
|
|||
|
|||
|
Quote:
Hi Grant Yes those are the critters, I've never found ones that had the hole diameter and tab size and are big enough to fold up and down on the nuts. Cheers Phil
__________________
Phil Waterman `41 C60L Pattern 12 `42 C60S Radio Pattern 13 `45 HUP http://canadianmilitarypattern.com/ New e-mail Philip@canadianmilitarypattern.com
|
|
#134
08-06-09, 00:53
|
|||
|
|||
|
Hello Scottie
I know i have a photo of my 42 GPW being towed as well. A brand new oil line blew. I just obtained a demilled Vinson KY-57 encryption box. On this site somewhere is a side photo of a M151A2 with with mounted on top of the 524 radio set in a doghouse. Does anybody have the installation instructions for the Vinson? I have the regular radio instructions for mounting on the regular tray. Thanks Eric
__________________
Collecting data on the WW2 Canadian jeep and trailer. Serial, WD Numbers etc.
|
|
#135
22-09-09, 02:30
|
||||
|
||||
|
If you ever need a good workout, try removing ROPS Feet from the ROPS. What a colossal PITA!! I was lucky enough to have the complete ROPS and Feet out and easy to manage. I can't even imagine how hard this must have been with them still mounted in the vehicle.
They are finally off for the installation of the straighter "Un-Cut" ROPS. Needless to say, I will be slathering the Feet sockets with Anti-Sieze when I reassemble. Scotty
|
|
#136
22-09-09, 16:32
|
||||
|
||||
|
So, a bit of background since this thread is spanning nearly 6 pages.
I built one good M151A2 from 2 x Demilled Units. Essentially, I used the Power Pack and components from one out of Gagetown, and the Body Tub from another from Calgary. Mike McKinley was gracious enough to provide me with the Data Plate for the Gagetown unit (CFR 09782 from 403 OTS). The other had no CFR or Serial Number provided. It did however have the original Odometer and TAC Markings which indicated it was C/S 9A from 1 Service Battalion. Scouring the paint did not reveal any other covered over markings. For all intents and purposes, it was a one VMO, one C/S Vehicle. I spent a few hours on EDR Viewer, and was able to narrow down to a single M151A2 from 1 Service Battalion which had last maintenance entry mileage within a few hundred miles of where it is now. There was little evidence that it had been driven at all, since it was scrapped from the CF. Previous owner never had it running, and none of the others from 1 Service Battalion came within 5000 miles. So, I think I may have found the origin of the Body Tub: CFR 74-09195, Serial Number 43813 One last thing I was thinking of doing was comparing the Mod History of this CFR to the list of M151A2 CFTO Mods. I can visually verify if the Mods were done. Heres the hold up, I have the list of completed mods from EDR, but I don't actually know what the Mod Numbers mean. Here is list of completed mods: 30010000CF003, 30105000CF001, 30105000CF003, 30105000CF004, 30105000CF005, 30105000CF006, 30105000CF007, 30105000CF008, 30105000CF012, 30105000CF013, 30105000CF016, and 30105000CF017. Thanks Scotty
|
|
#137
22-09-09, 17:13
|
|||
|
|||
|
30010000CF003: This was a common mod to the SMPs. It was either seatbelt installation, or else modification to the distributor cap for the autosense diagnostic computer. I am leaning towards the distributer cap mod. The autosense was the "state of the art" automotive diagnostic system we used back in the 80s. About the size of a chest freezer, it was rarely to never used on the SMPs as first line army units weren't entitled to one.
30105000CF001: Installation of the radio power cable 30105000CF003: Modification to door rods (cotter pin) to prevent loss while driving 30105000CF004: Battery box cover insulation (rubber sheet glued into battery box cover to prevent shorting) 30105000CF005:Installation of hasp to tool box cover...allows mechanics access to batteries without access to tool box 30105000CF006:Installation of new footman loops to back corner of body...holds tarp over body instead of at body. 30105000CF007: Drilling hole in top of radiator baffle to allow proper reading of radiator level 30105000CF008, Installation of fuse protection for turn signals 30105000CF012: Installation of grill type radiator guard 30105000CF013: Installation of lap belts 30105000CF016, relocation of rear view mirrors onto fenders 30105000CF017: Installation of roll bar and safety (seat) belts These were all very common mods to the mutts, and some could easily be removed through normal maintenance and operators changing things like doors between each other. Too bad service Battalion doesn't have an archive of photos from back then. You could possibly find a photo of this jeep on a parade.
|
|
#138
22-09-09, 19:59
|
||||
|
||||
|
Quote:
It definitely has those mods done to it that you listed. But as you said, they were common. The more I look at this, the more inclined I am to go with the 1 Service Battalion provenance with this M151A2. Reason being, the body of the 403 OTS MUTT shows no signs of ever having any Comms installations (holes are drilled but plugged) or any other little "field mods" like you find on a front line vehicle. Actually, aside from the massive corrosion, the body was as straight as an arrow, not full of the usual dents and dings you see on front line vehicles that suffured hard field time. The 1 Service Battalion MUTT has had Dual 524s, C2299 Box, and a Radio Speaker on Dash, In-Line Coolant Heater (although not approved or official, this had to be installed during its service, previous owner did not add it, and its from the era), and one of the more interesting things, the Base for a small vehicle Flag Staff welded onto the Passenger Fender just behind the Signal Lamp housing. There could be other "field mods", as I seem to notice little things when I stare at. Hmm....
|
|
#139
22-09-09, 20:07
|
|||
|
|||
|
Here is a link to a book on 1SB during the period your Mutt was in service. You never know.....
http://www.antiqbook.com/boox/mikejo/28141.shtml Quote:
|
|
#140
22-10-09, 02:46
|
||||
|
||||
|
This image is posted on the Cornwallis Museum website at: http://www.cornwallismuseum.ca/Basic...Photos.html#90
j
|
|
#141
10-12-09, 00:20
|
||||
|
||||
 Does anyone know where I can find one of these or have one kicking around? That is the pesky item that has left two holes in my Dash. Would like to get my hands on one. Scotty
|
|
#142
10-12-09, 00:26
|
||||
|
||||
|
Hell, anyone with the skills of the Hammond Crew could make you one in half an hour! I used to do stuff like that in the old days when I had access to machine tools, but they're way better than I ever was... why don't you talk nice to them and see where that leaves you?
 Quote:
__________________
SUNRAY SENDS AND ENDS :remember :support
|
|
#143
05-01-10, 05:18
|
||||
|
||||
|
With the move to NB came some heated garage space and more spare time. So after getting settled in the fun begins......
The full restoration teardown has started. Its actually a bit more bare as of this afternoon. Only the front and rear suspension remain now to be pulled tomorrow. It is a real testament to the quality of metals used back in the day. Not only is there very little rust, but all of the bolts came out cleanly with nothing more than a simple wrench and ratchet set. No need to break out the Pipe and Cheater Bar. Gotta love it when the previous owner used the garage as a home gym and put nice paint and blinds in  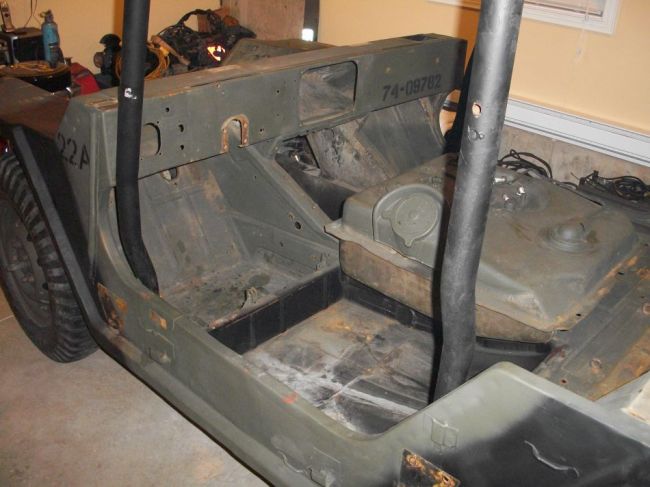    After alot of thought on sandblasting versus wirebrushing (on the grinder), i'm starting to lean towards wirebrushing. I tried the Heatgun and Scraper, but found it to be too time consuming. Rob Love, you were right, it does have 3 Color Cam under my Canadian Tire Cam. Wire brushing exposed some nice very clearly IRR OD next to IRR Flat Green..... So, back on topic, I'm assuming that if it is sandblasted, even though its stored in a heated garage (with the wifes dripping wet car), i'd imagine its going to need to be primed right away to avoid flash rusting. Since I can't actually do all of the body repairs right after the sandblasting, i'd end up having to re-expose a bunch of trouble spots. I'm liking the approach of just doing one panel at a time; strip, repair, light coat of rattlecan primer, then move on. Then when its completely finished, taking it in for a base coat. Is Rattle Can primer going to be sufficient? Any suggestions on preferred brands? Another thing i've been tossing around was building a Body Tub Rotissery. I can't find a way to build one without diverting a bunch of funds away from the project for metal and will most likely not require it after the restoration. Is there any harm in just setting the bare body on its side and properly brace it, turning it as required? Thanks Scotty Last edited by Scott Bentley; 05-01-10 at 05:25.
|
|
#144
05-01-10, 06:15
|
|||
|
|||
|
hi scotty.i dont have a rotisserey either.i have 2 gpws on their ends right now.when i get my jeeps blasted i get them to shoot a coat of primer right away.regards jim.
__________________
,3-m38,1-m38a1,1-,2-mb,2-cj2a.mbt,m100.
|
|
#145
05-01-10, 18:55
|
||||
|
||||
|
Hey Scotty:
How are things? I see you've settled back in NB.....that Mutt we dragged away from your place in Trenton last year is now mercifully gone from my yard....especially merciful after seeing the look on my wife's face last winter when we pulled in with it! If you're not going to blast, and are going to wire-wheel section by section, then you should consider using the DuPont rattle can epoxy primer--get it at NAPA, about 16 bucks a can but very good primer. However, I just recently did a jeep from the frame up for a friend and blasted the frame and body all at once and did the whole epoxy primer thing through my spray gun---the yellow DuPont is best, but expensive. Bout a 100 smackers a half gallon, and then should be sanded, but bullet proof. HTH Scotty. Don
__________________
Don Dingwall 'Strange women lying in ponds distributing swords is no basis for a system of government.'
|
|
#146
05-01-10, 23:06
|
||||
|
||||
|
Here it sits now... Completely stripped minus the rear Differential and rear portion of the Wiring Harness. Only one broken bolt on the whole thing, the mirror pivot bolt of all things. Between my Engine Crane and a few strapping buddies, I think it will be easy to just turn the carcass as required to get at the bottom. Your right Jim, a rotiserrie would be overkill. As it is now, I can lift up the front end myself.
  I'm going to go at it section by section. Because i'm doing this all in my attached garage, i'm thinking about building a 2"x4" wood frame around it and close it in with Poly. Should keep the nasty dust contained. I suppose if the Ziebart in the nooks and crannys underneath proves a bitch to remove, I can use a small Pressure Pot Blaster. Thanks for the tip on the Primer Don. I'll check it out at the local Napa. Sounds like it would be perfect for this. We hauled that MUTT down to the Swords last spring. I ended up yanking a few more parts from it, but the tub and suspension is still there. Scotty
|
|
#147
06-01-10, 05:42
|
||||
|
||||
|
HMVF - Historic Military Vehicles Forum
http://www.hmvf.co.uk/forumvb/showthread.php?t=16221
|
|
#148
06-01-10, 15:56
|
||||
|
||||
|
Quote:
I'll keep my eyes on that post. Scotty
|
|
#149
06-01-10, 20:19
|
||||
|
||||
|
Well, its officially a frame off restoration now.. or whatever the hell you call a stripped unibody restoration.
I'm not the kind of guy to sit around and stare at it... So with an Engine Crane, some Shackles, Cargo Straps and some Sapper intuition, I managed to get it stood up on its side this morning over a cup of coffee. 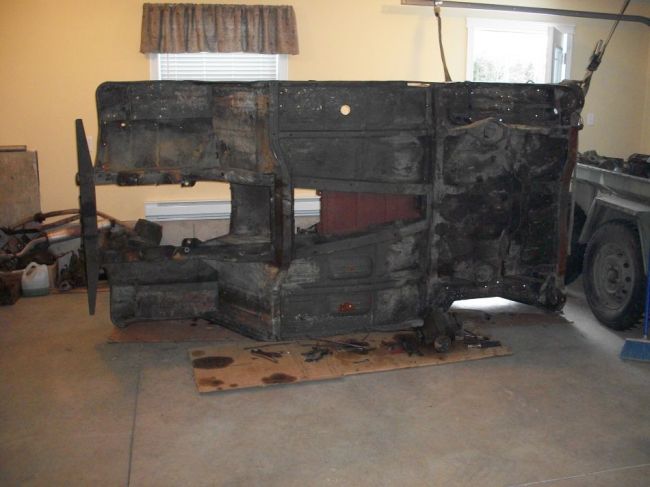 This gave me a really good chance to really look over the bottom in a manner much more thorough than laying on a creeper with a flashlight.   Working my way up and down the uniframe with a body pick hammer it turns out (thank god) that the only rust through spot is right under the drivers side floorpan in a cross member. Not enough to even require a repair kit. I should be able to just cut the bad spot out and patch it with new metal.  The only other rust is just on the surface of the inside of the wheelwells from the usual road blasting. Now the fun begins......
|
|
#150
06-01-10, 20:59
|
||||
|
||||
|
Scotty,
Instead of adding to the "pictures wanted.." thread how about you start your own resto thread. That way it will be easier to follow your progress without having unrelated posts stuck in between? Clive
__________________
Those who live by the sword will be shot by those of us who have progressed. - M38A1, 67-07800, ex LETE
|
 |
|
|


 Linear Mode

