|
#1
 25-07-07, 17:12
|
||||
|
||||
|
My basket case in Swiss configuration:
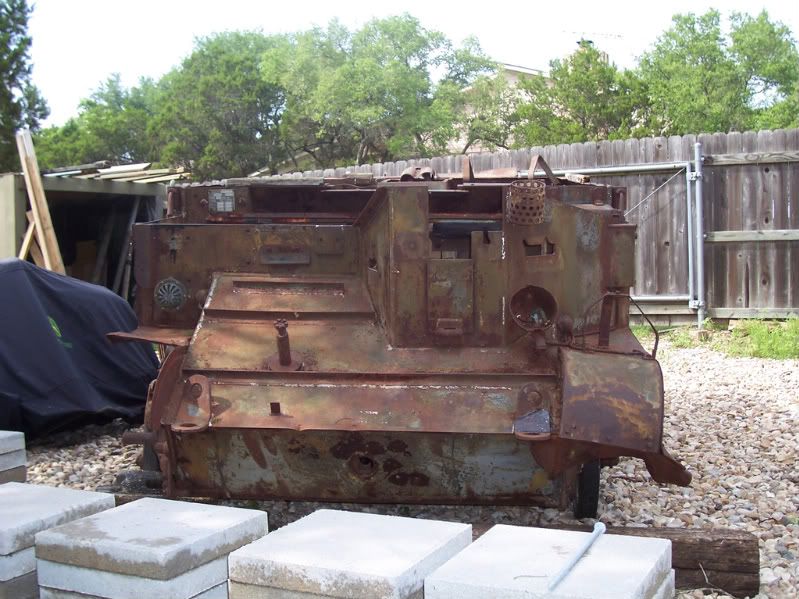 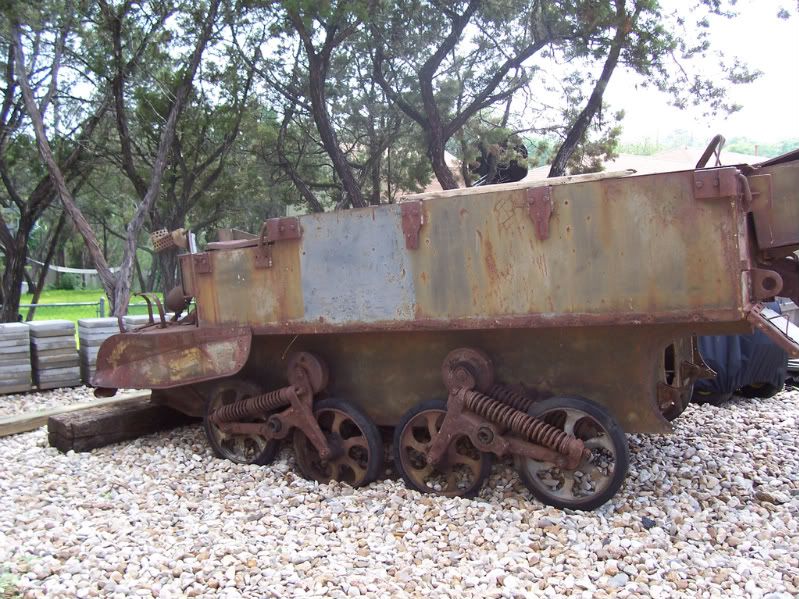 Complete with bullet holes from someone having target practice.... 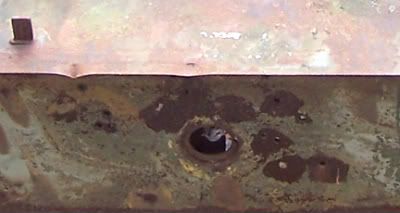 And the holes welded up.... 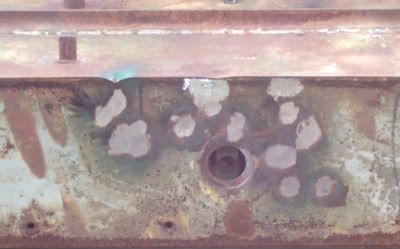 The floor area over the tracks and differential were pretty much rusted through so I cut out and replaced the metal to save future headaches and remorse had I left it in. 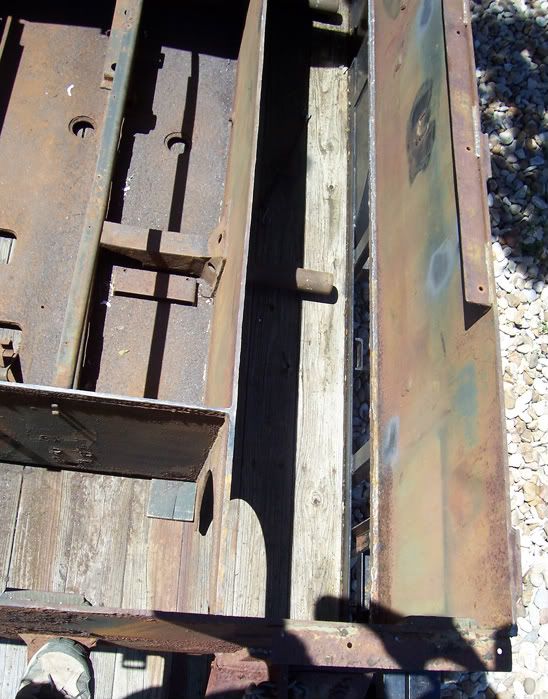 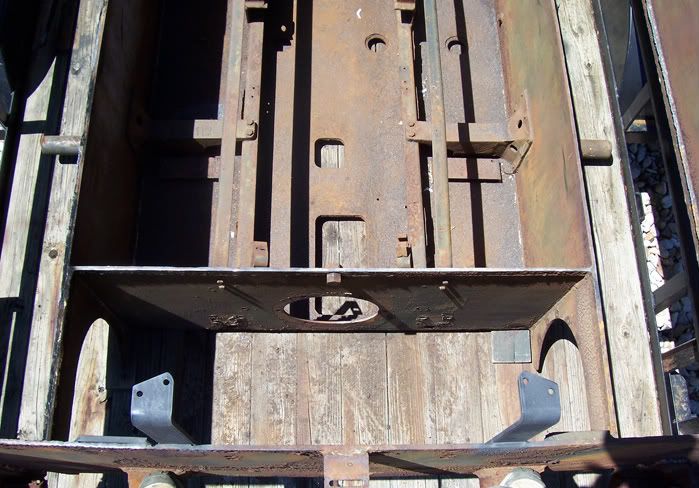 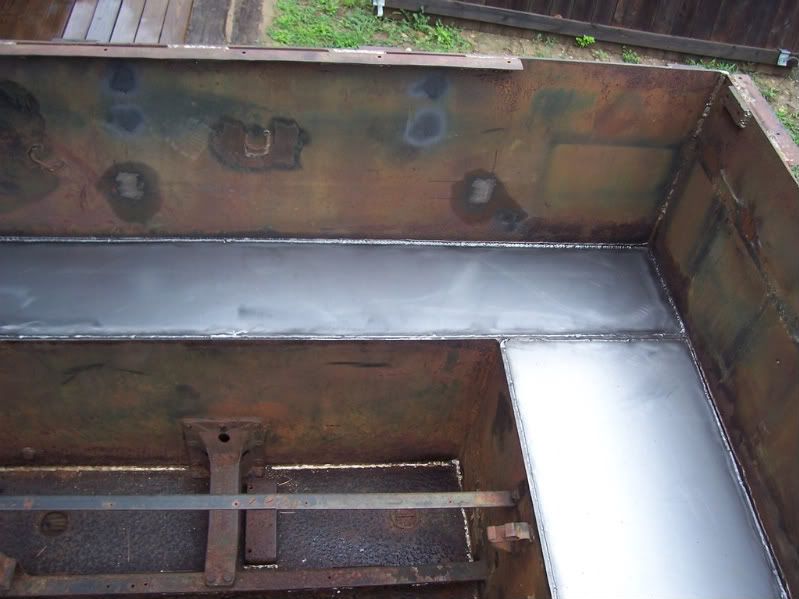 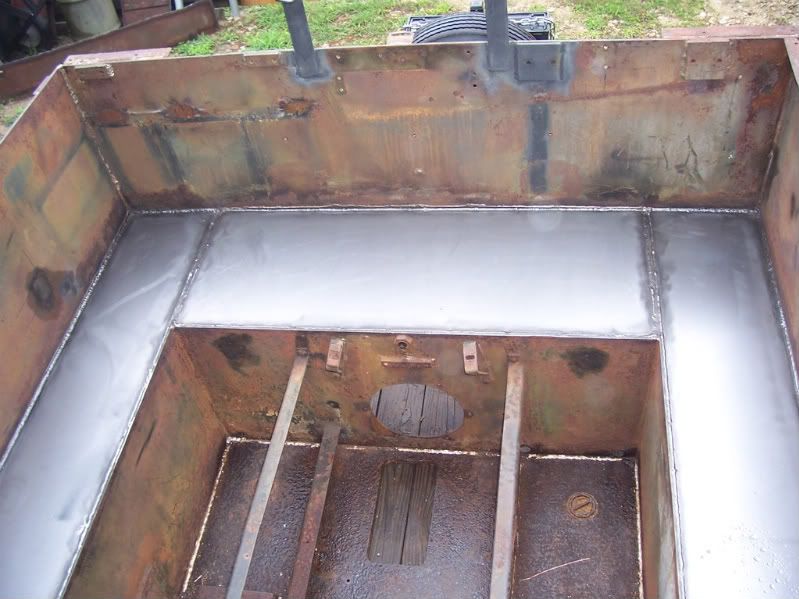 Shot below is with the hull on the trailer prior to striping after finally getting the last of the Swiss modifications removed, unneeded holes welded up and British modifications added back on. 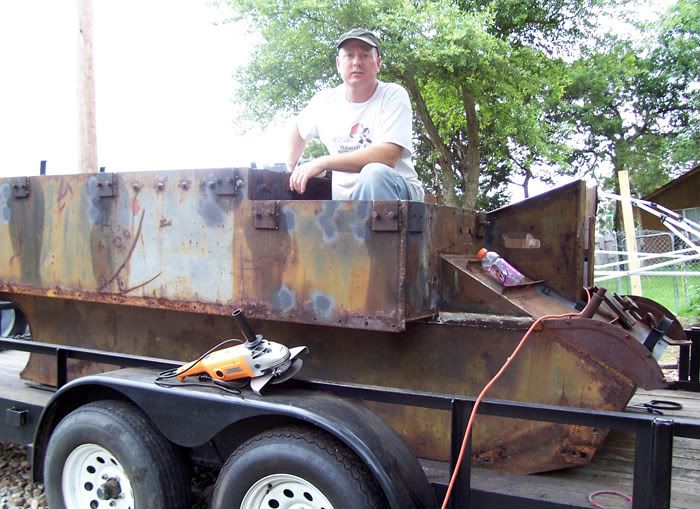 This shot shows the hull just after getting it back from being striped and primed. I'll be doing the OD paint over time as I get some little things on each panel taken care of over the next few weeks. [ 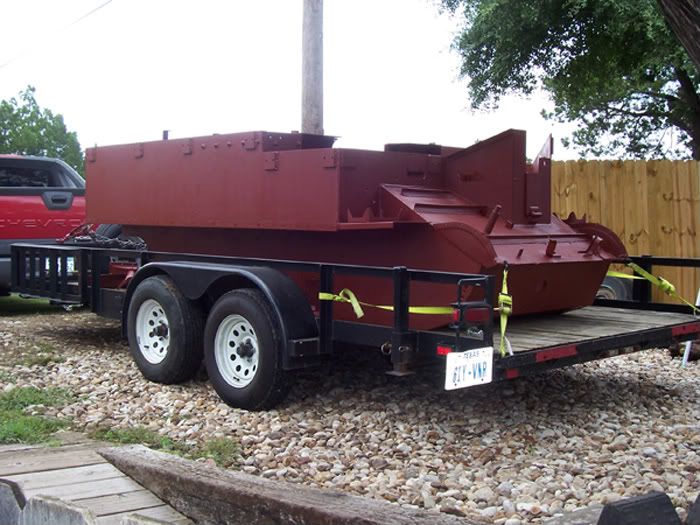 Below are two videos of me pushing and pulling the hull off my trailer where it will rest on blocks until I get everything bolted back on and can put the wheels on again. Really sucks having to do everything manually since everything on a carrier project is heavy. But its the only way we poor folks can do it for lack of proper equipment. Video of unloading the hull by hand (1) Unloading the hull by hand (2)
__________________
David Gordon - MVPA # 15292 '41 Willys MB British Airborne Jeep '42 Excelsior Welbike Mark I '43 BSA Folding Military Bicycle '44 Orme-Evans Airborne Trailer No. 1 Mk. II '44 Airborne 100-Gallon Water Bowser Trailer '44 Jowett Cars 4.2-Inch Towed Mortar '44 Daimler Scout Car Mark II '45 Studebaker M29C Weasel Last edited by horsa; 29-10-08 at 17:29. Reason: Changed photo and video host |
|
#2
25-07-07, 18:12
|
||||
|
||||
|
The Hull looks good in primer . What were the Swiss modifications ?
Be careful with your back moving the hull like that, it doesn`t take much to do some long term damage . Keep up the good work 
|
|
#3
25-07-07, 19:13
|
|||
|
|||
|
Amongst other things, many Swiss T16's had semaphore Indicators fitted in metal boxes on the front armour.
|
|
#4
25-07-07, 19:19
|
||||
|
||||
|
My back has been messed up for a long time already. Left leg has a steel rod in it as well which I've had upgraded to a thicker one after having busted the first one that was installed. Doing this type thing actually straights everything back out again since I wasn't outright lifting the hull. Plus it really was only 2600 pounds and not two tons like I told my four year old daughter who you can hear in the video
 Swiss mods and things they removed which were British are quite extensive. I'll try to list the main ones I can remember off the top of my head. Swiss Added: Welded on bracket for headlight External horn pair of welded on armor plate turn signals Welded on rear brake light bracket Welded on pair of hangers under dash for modified brake levers Brake levers modifed with top studs for above hanger modification Welded on front aerial bracket Welded on heavy frame on gunners side deck for radio Welded on heavy cover for same gunner side radio Welded on rear inside frame work for battery and spare gas cans Welded on straps for large gas tank on gunner rear side Swiss had troop seats with back rests so about 60 holes had to be welded up from all of their bolt down locations British/USA features removed: All bailout bag metal hangers that are supposed to be all over the vehicle Pair of front POW can holding brackets on fender flats Front and back PIAT brackets on engine deck cover fin Armor fin on the engine deck cover half cut off by they Swiss Pair of Bren gun holding bracket plates on each side of vehicle ground off by Swiss Pair of alternate radio mounting straps in rear cut off to allow Swiss gas tank Single normal raido mounting strap behind driver cut off sor Swiss troop seat Pair of welded angle brackets for radio and fifth passenger removed by Swiss for troop seat Seven tool bin/lockers were removed by Swiss and all of their mounting bracked welded to the floor were ground off Swiss removed all brackets and holders for rear armor pioneer tool placement Pair of front recovery cable horns removed Pair of brackets for storage of aerial sections removed Bracket for mounting radio control box removed from behind driver armor Five of the wading skirt plates were removed by the Swiss British/USA features that bolted on and the Swiss welded up the holes: Front siren removed and holes on driver side fender welded up Front Bren gun brackets for holding gun in standby position removed and holes welded up Holes for front smoke discharger/mortar mounting bracket welded up Front bracket for PIAT standby position removed and holes welded up Rear bracket for PIAT standby position removed and holes welded up Left and Right tail lamps removed and all eight holes in rear armor welded up Pairs of holes for bolting straps were welded up at front recovery cable location and two places for the aerials Think that covers the main things that had to be removed or replaced to get back to British WWII configuration. Now the fun part begins with bolting everything back on to make this a running carrier again since the hull is 100 percent empty right now. Shots below show some of the things I had to build and weld back onto the hull since virtually all British modifications had been removed from it. Bare metal parts don't stay rust free for very long when you work outside in a tent... 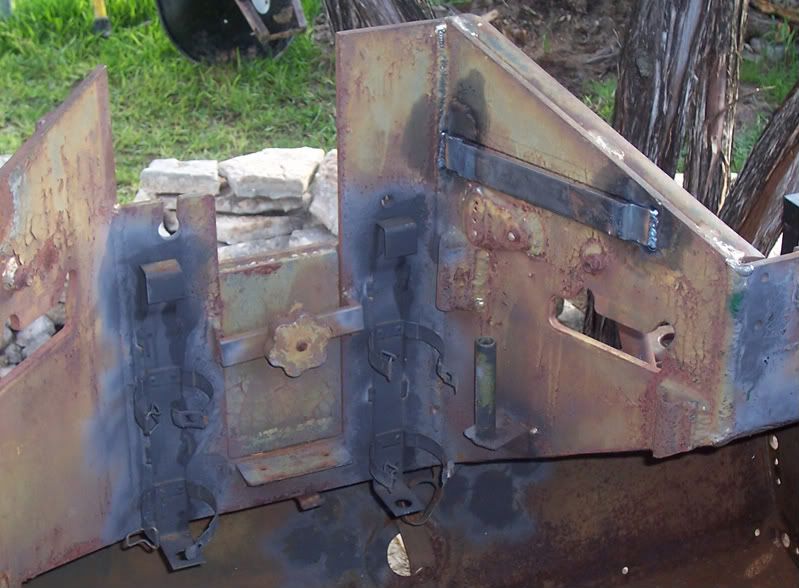 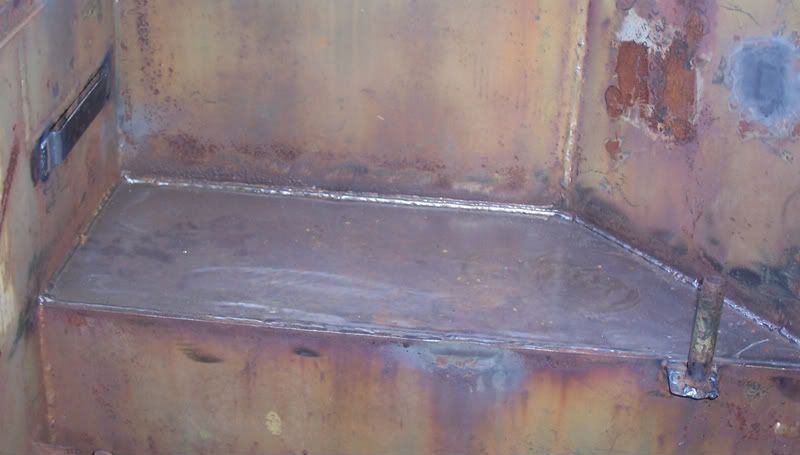 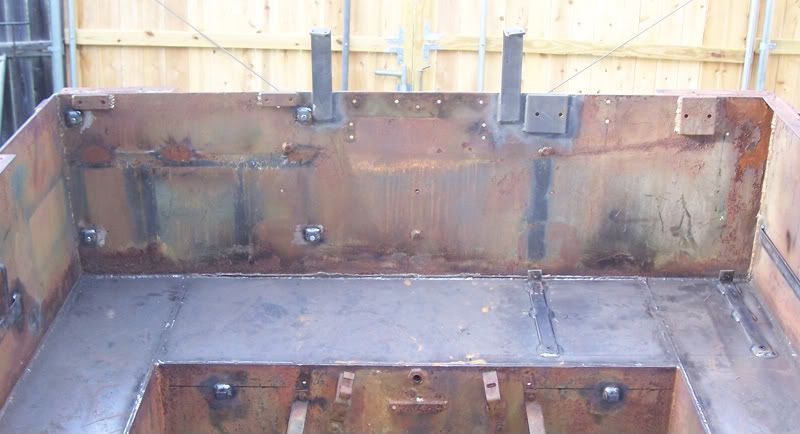 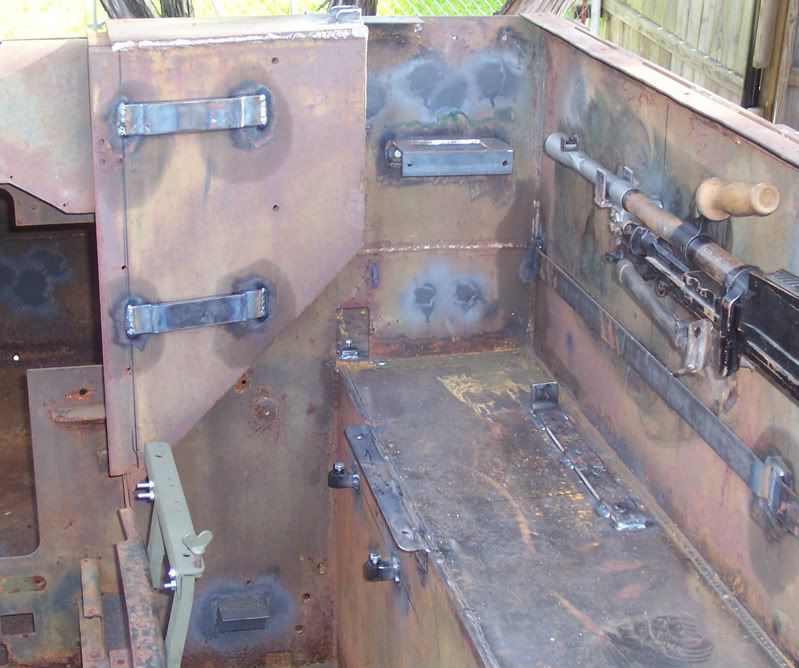 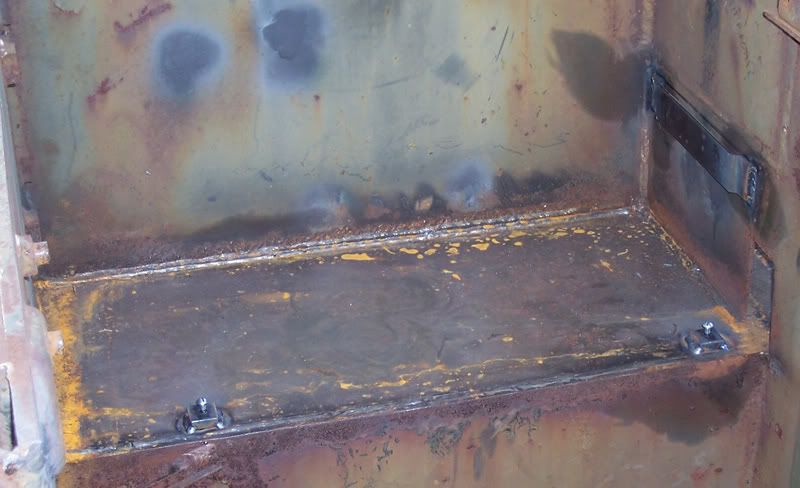 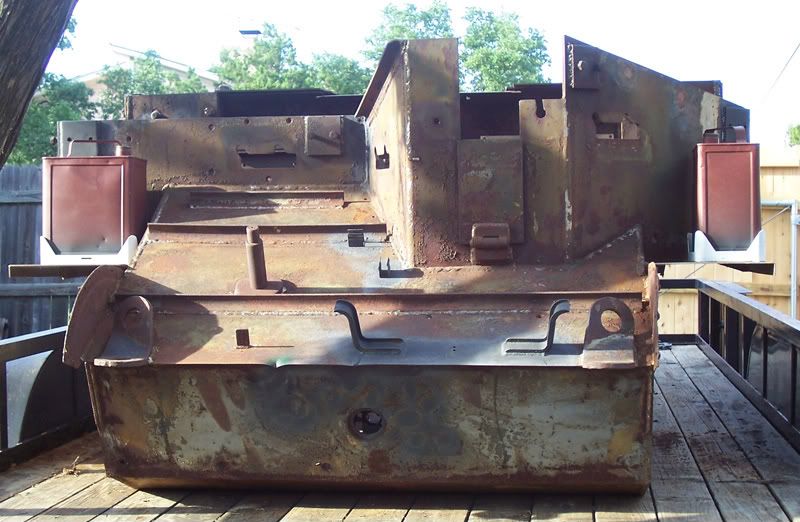 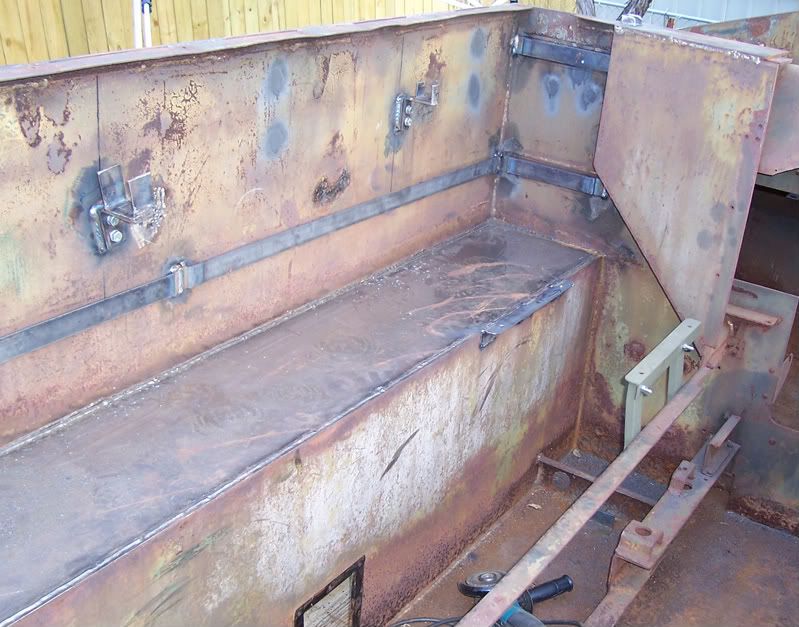
__________________
David Gordon - MVPA # 15292 '41 Willys MB British Airborne Jeep '42 Excelsior Welbike Mark I '43 BSA Folding Military Bicycle '44 Orme-Evans Airborne Trailer No. 1 Mk. II '44 Airborne 100-Gallon Water Bowser Trailer '44 Jowett Cars 4.2-Inch Towed Mortar '44 Daimler Scout Car Mark II '45 Studebaker M29C Weasel Last edited by horsa; 19-06-08 at 02:06. Reason: Added Photos |
|
#5
11-06-08, 19:06
|
||||
|
||||
|
Finally got around to bolting up the main accessories on the T-16 engine so I could do an initial test start. Had to build a little temporary loop for the oil cooler lines since the engine isn't in the vehicle and of course several other things are jerry rigged for now but it seems to want to run
 Shots below show the engine, transmission and differential prior to restoration. What a mess... 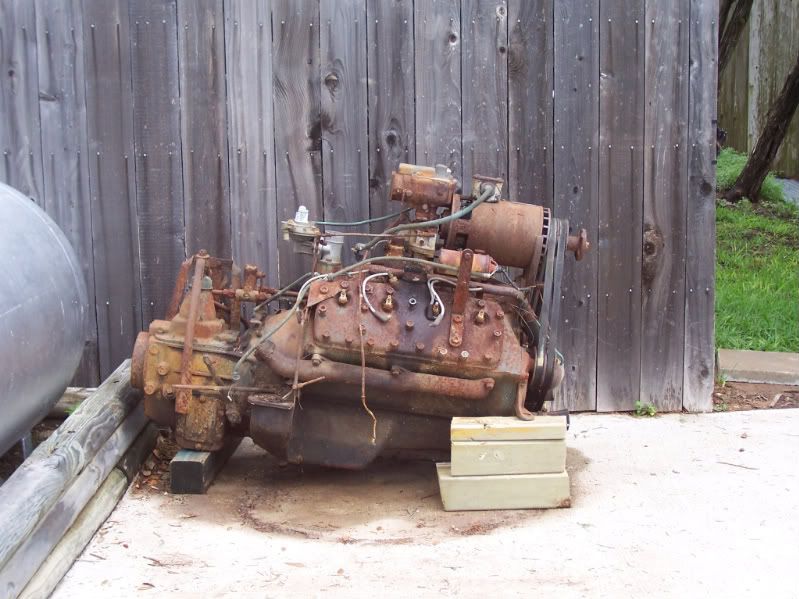 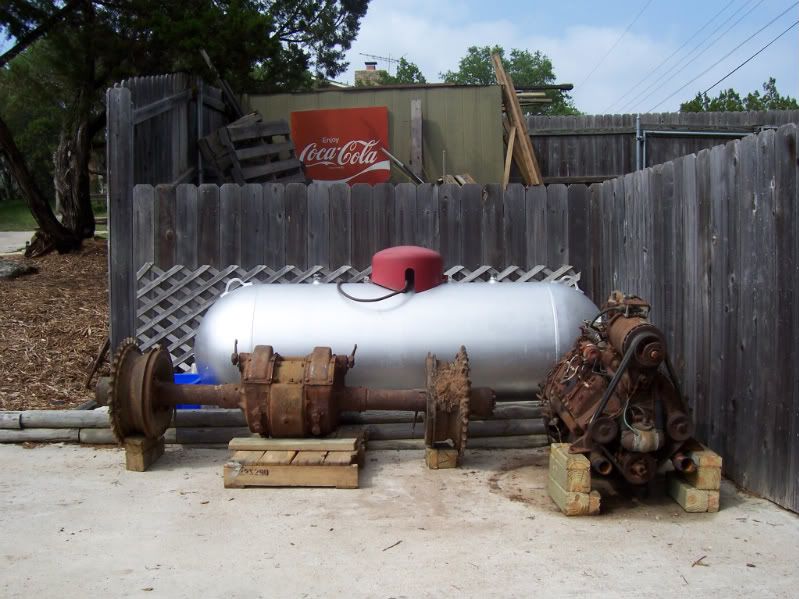 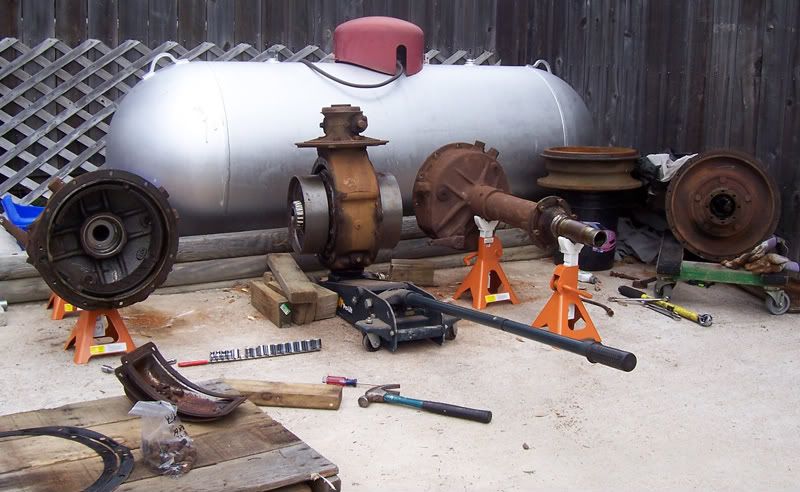 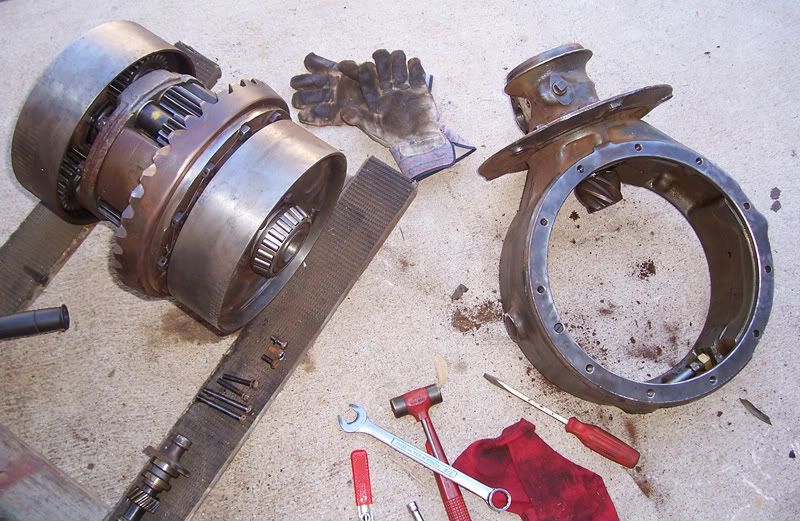 Shots below are of the engine prior to first start. The color matches what we found on the engine and transmission under the crud and rust. It also matches the original Ford tagged WWII NOS parts like the water pump pullys and crank case pully that I installed. For now, all of my lines are made from 1/2" copper as I have had problems with doing decent flares on steel tube. You'll also notice the coil is held in place with rubber bands right now 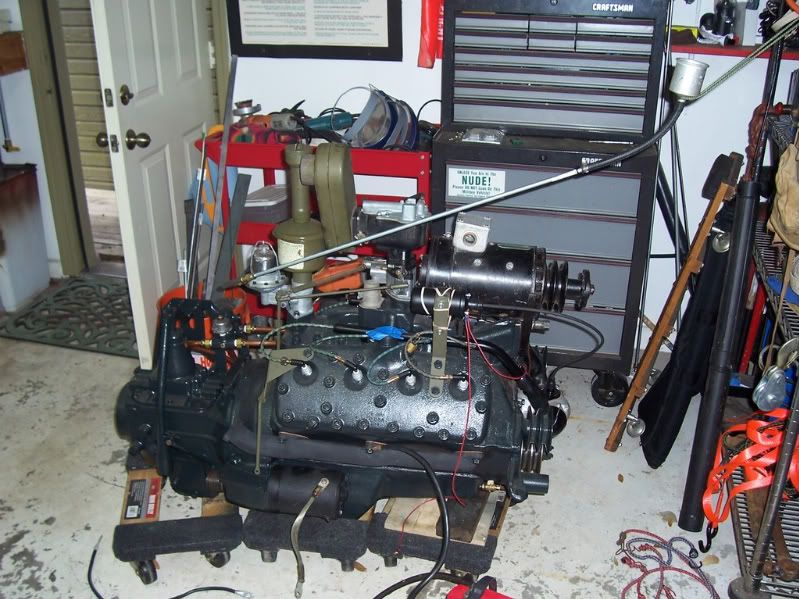 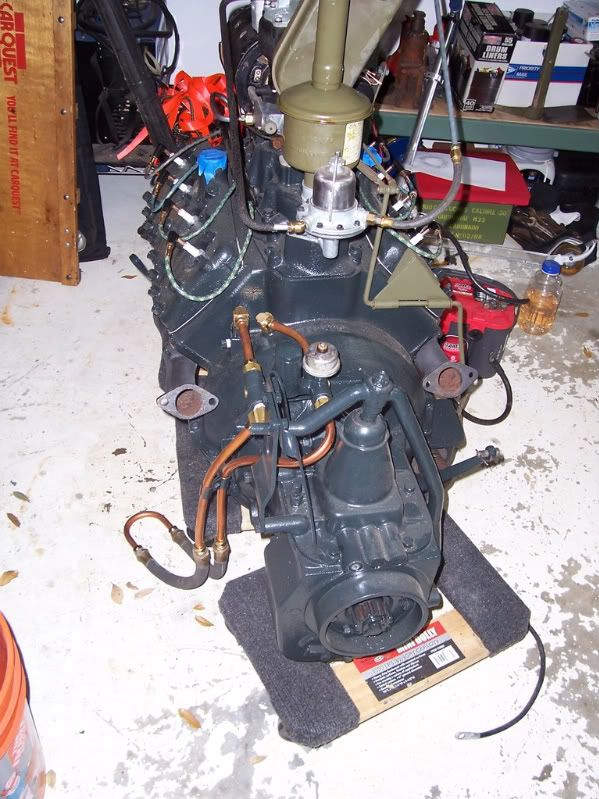 Two video links attached if you have a high speed connecton. The automatic choke isn't hooked up and you can see it bouncing up and down on the intake manifold since it isn't bolted down yet. Engine Running 1 Engine Running 2 I'll try and post some updated photos of the hull later today.
__________________
David Gordon - MVPA # 15292 '41 Willys MB British Airborne Jeep '42 Excelsior Welbike Mark I '43 BSA Folding Military Bicycle '44 Orme-Evans Airborne Trailer No. 1 Mk. II '44 Airborne 100-Gallon Water Bowser Trailer '44 Jowett Cars 4.2-Inch Towed Mortar '44 Daimler Scout Car Mark II '45 Studebaker M29C Weasel Last edited by horsa; 29-10-08 at 17:33. Reason: Changed photo and video host provider |
|
#6
12-06-08, 00:12
|
|||
|
|||
|
For a first short run it sounds good. Must have been firing most of the cylinders if not all 8 because the engine didn't seem to move around.
Going to be impressive when all hitched up and running at full power under full load.
__________________
Phil Waterman `41 C60L Pattern 12 `42 C60S Radio Pattern 13 `45 HUP http://canadianmilitarypattern.com/ New e-mail Philip@canadianmilitarypattern.com |
|
#7
19-06-08, 01:11
|
||||
|
||||
|
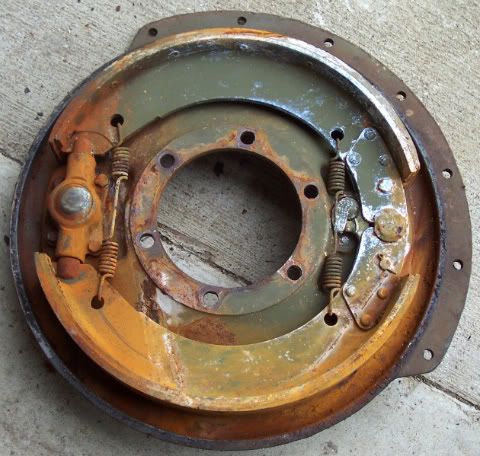
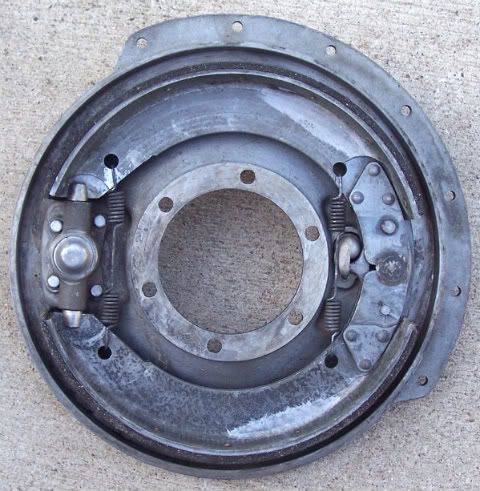
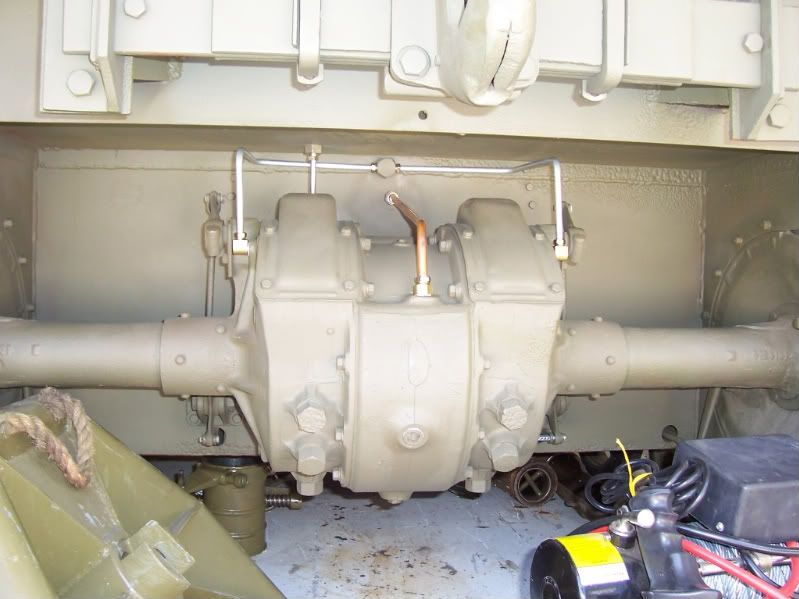
During the disassembly of the differential, I found the brakes were frozen even though the parts had no wear. Took everything apart and had it chemically dipped to clean them up prior to reassemby. Shots for reference if you've never seen how well the process can work for you.
  Also a shot showing my temporary paint booth / work area in a tent. Goes to show anyone can do a restoration on a budget. 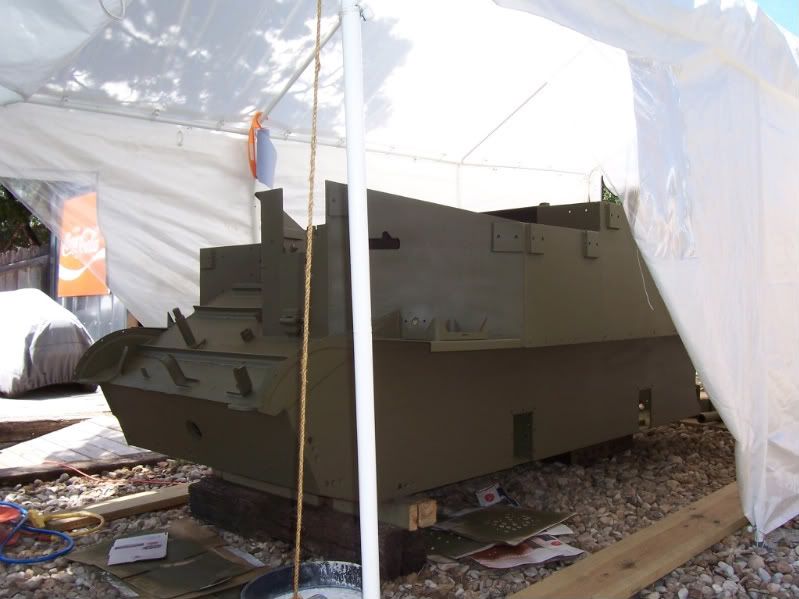 Shots below show the hull after I painted it and got the wheel assemblies completed and mounted. Next step is to scratch build all of the steering and braking linkage along with the engine and differential oil cooler lines. 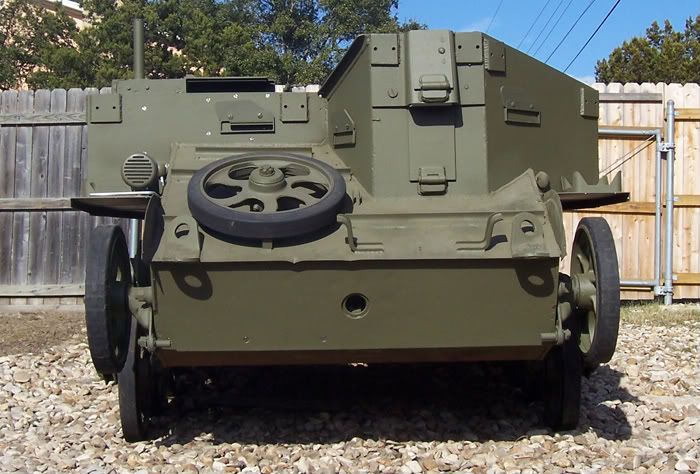 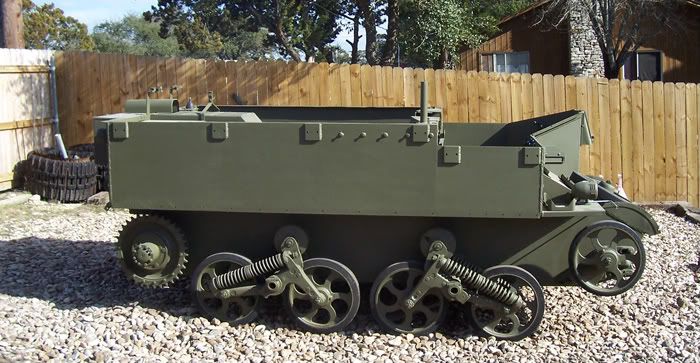 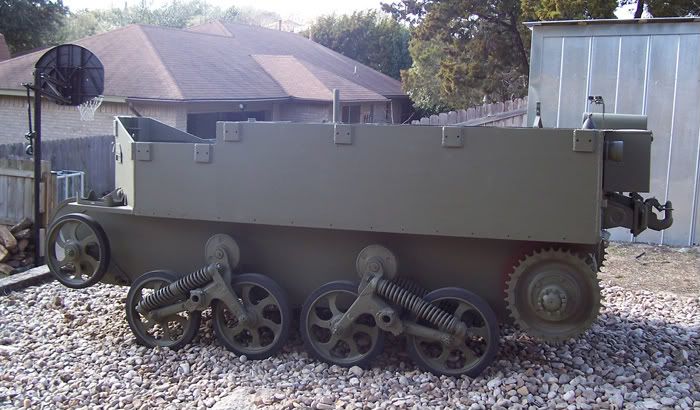 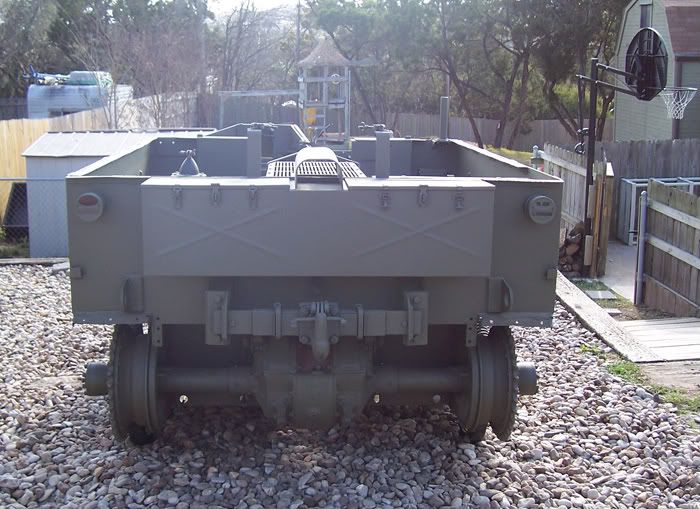 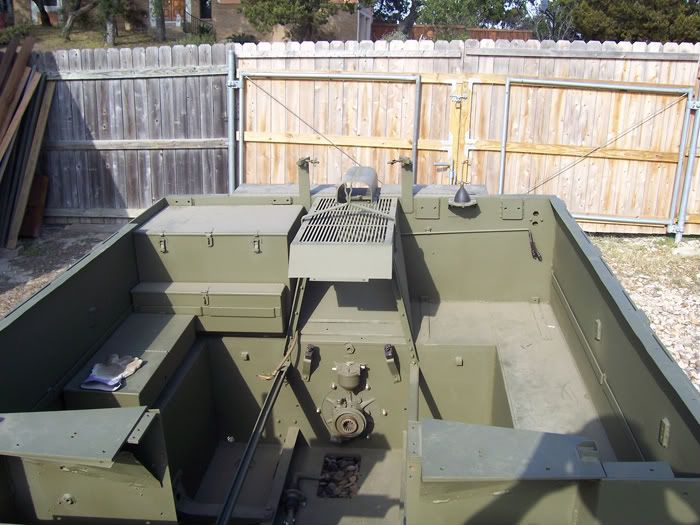 Also I moved the vehicle into the garage so I'm not working on a sloped gravel pad anymore which was a constant cause of aggrevation. The carrier is actually chained at the front but it isn't visible in the photos in case you're wondering about the durability of the little straps holding with the trailer parked on a hill. I also took the precaution of moving my jeep out of the other side of the garage, just in case. 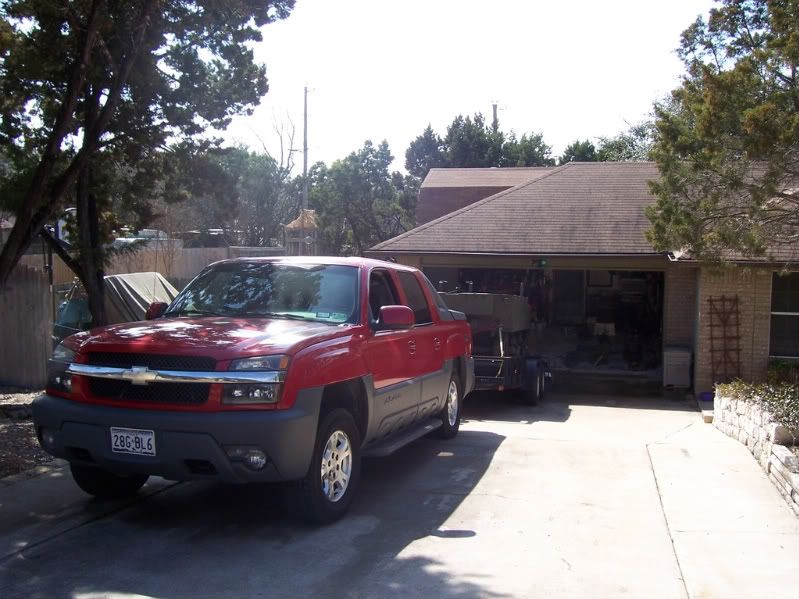 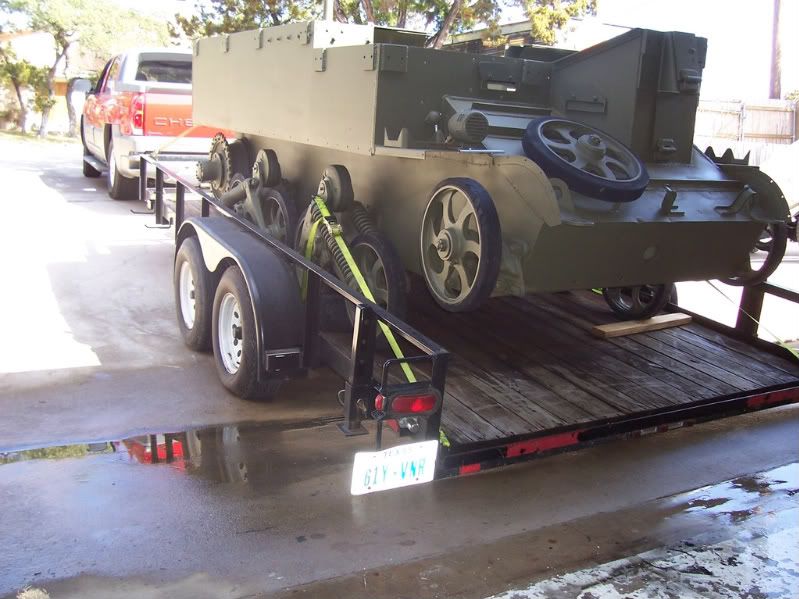
__________________
David Gordon - MVPA # 15292 '41 Willys MB British Airborne Jeep '42 Excelsior Welbike Mark I '43 BSA Folding Military Bicycle '44 Orme-Evans Airborne Trailer No. 1 Mk. II '44 Airborne 100-Gallon Water Bowser Trailer '44 Jowett Cars 4.2-Inch Towed Mortar '44 Daimler Scout Car Mark II '45 Studebaker M29C Weasel Last edited by horsa; 25-07-08 at 02:49. Reason: Added Photos |
|
#9
28-06-08, 11:44
|
||||
|
||||
|
Hi there,
do you need any parts for the T-16. I think I have a complete intrument/dashboard. Interested? greetings, Roland |
|
#10
16-07-08, 22:00
|
||||
|
||||
|
Hey Roland,
I have everything for a proper WWII USA pattern instrument panel with the exception of a Waltham speedometer and a speedometer cable. I'm currently following up on a few leads for the speedometer which will probably be the tougher of the two items to find as they were only used in the later pattern Ford jeeps and the T-16s. I know any jeep speedometer will work but would prefer the correct one if I can find one. As for parts I'm looking for in case you have other items there...I need several of the hull drain plugs. There are seven on the floor and one in the very front where the engine hand cranking rod goes when needed. The diameter of the threaded sections is 2 5/8" with the overall disk just slightly smaller than a 3" diameter. I'm also looking for one of the metal fittings which hold the head of a pick. Its the same size as the metal part that is on a pick handle but it is capped off and has a bolt welded onto it for another metal part to fit on which keeps the pick head from falling off the vehicle. The overall part bolts to the rear curved armor that protects the differential.
__________________
David Gordon - MVPA # 15292 '41 Willys MB British Airborne Jeep '42 Excelsior Welbike Mark I '43 BSA Folding Military Bicycle '44 Orme-Evans Airborne Trailer No. 1 Mk. II '44 Airborne 100-Gallon Water Bowser Trailer '44 Jowett Cars 4.2-Inch Towed Mortar '44 Daimler Scout Car Mark II '45 Studebaker M29C Weasel |
|
#11
25-07-08, 03:17
|
||||
|
||||
|
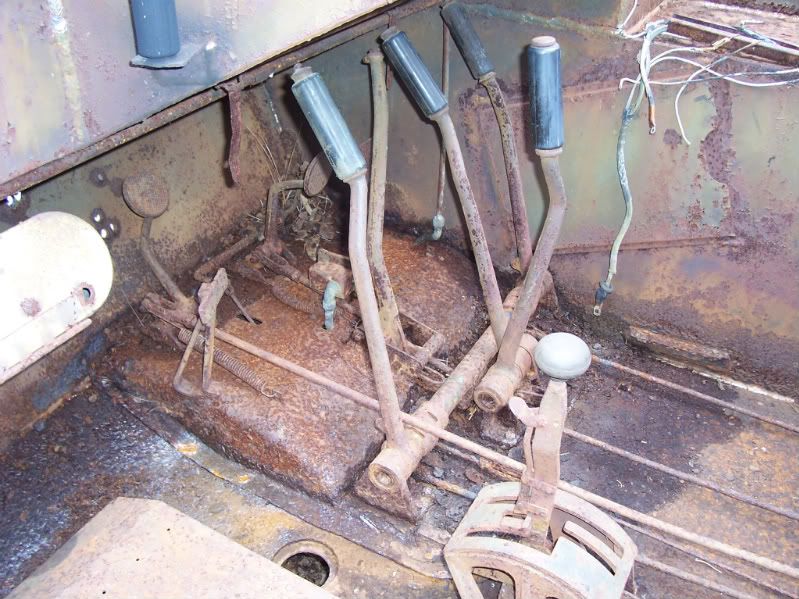
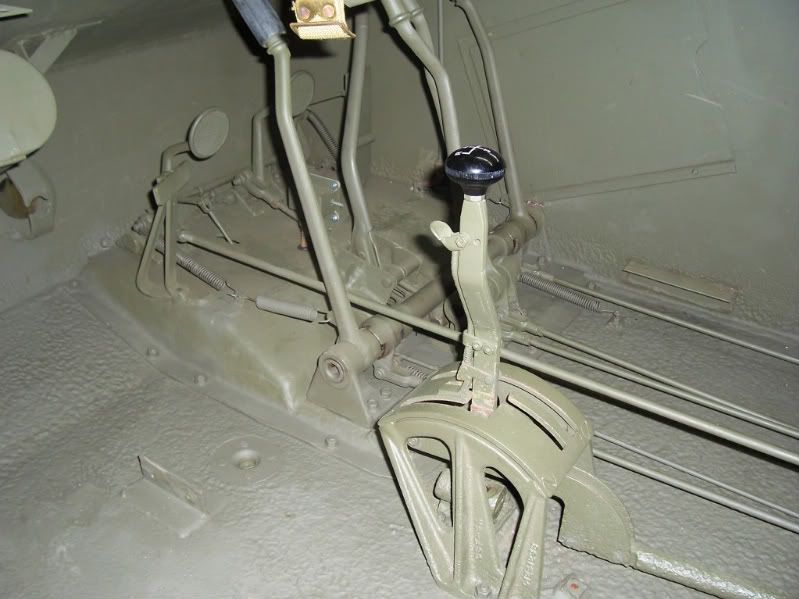
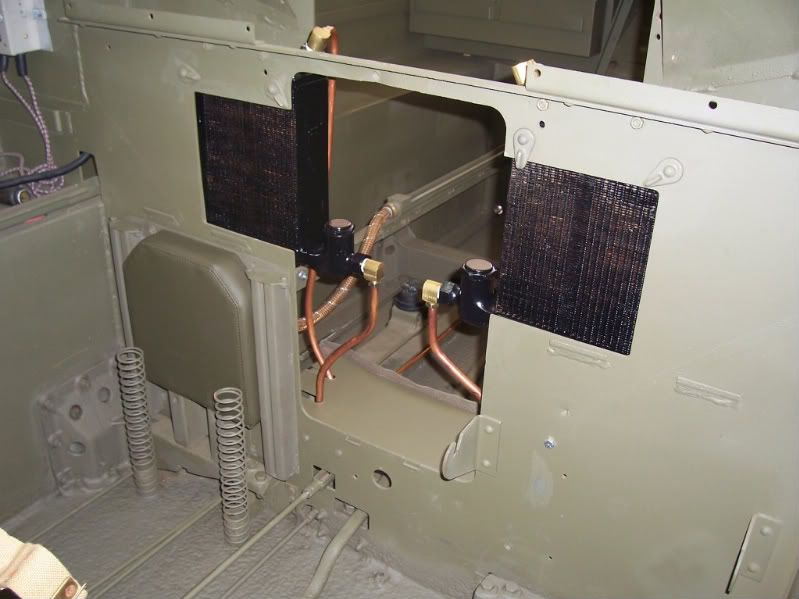
Made a little more progress and now have completed the fabrication of steering and braking controls along with bending oil lines in copper and bolting them up to the two oil coolers. Shots below are the before and after of the driver area which still isn't finished along with pictures of the lines and oil coolers.
   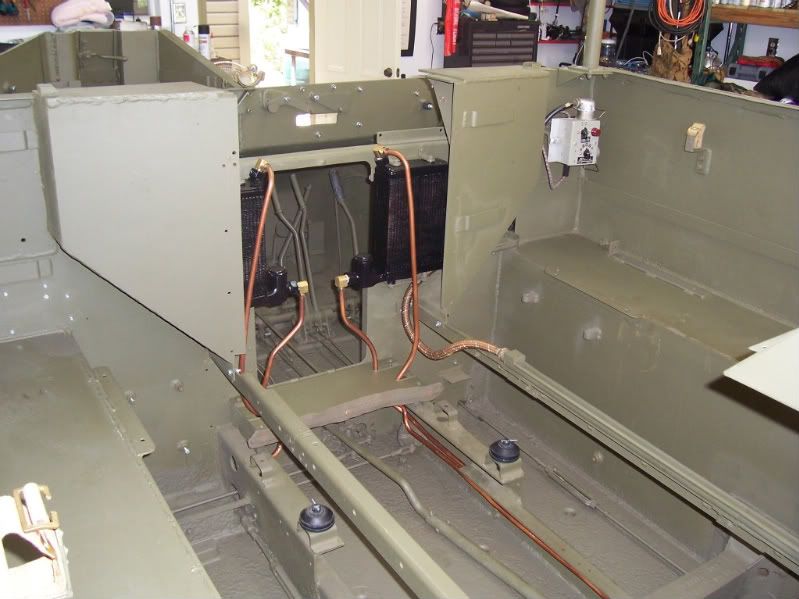 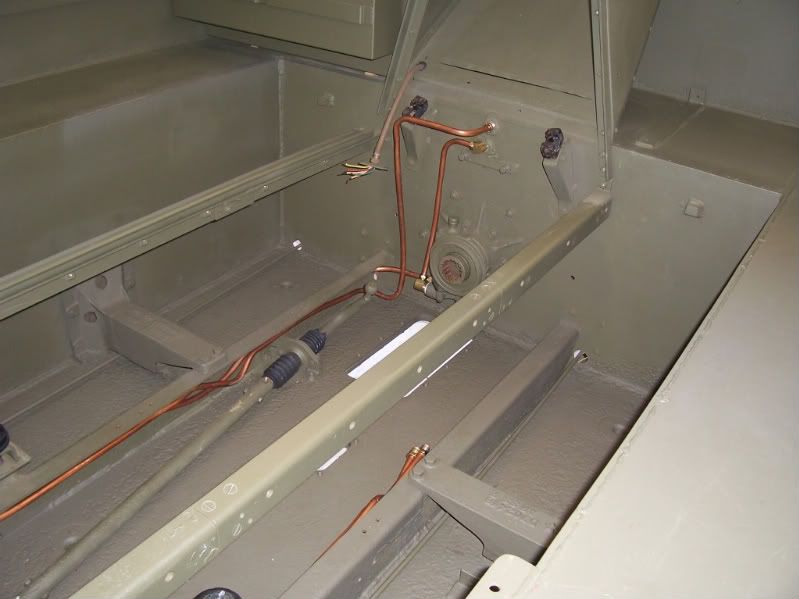  Also got the radiator and engine installed this past weekend. This allowed me to finally test my work from rebuilding the transmission, linkage and differential which so far all seem to be functioning properly. Although the real test will be after I put the tracks on and test everything under a load. 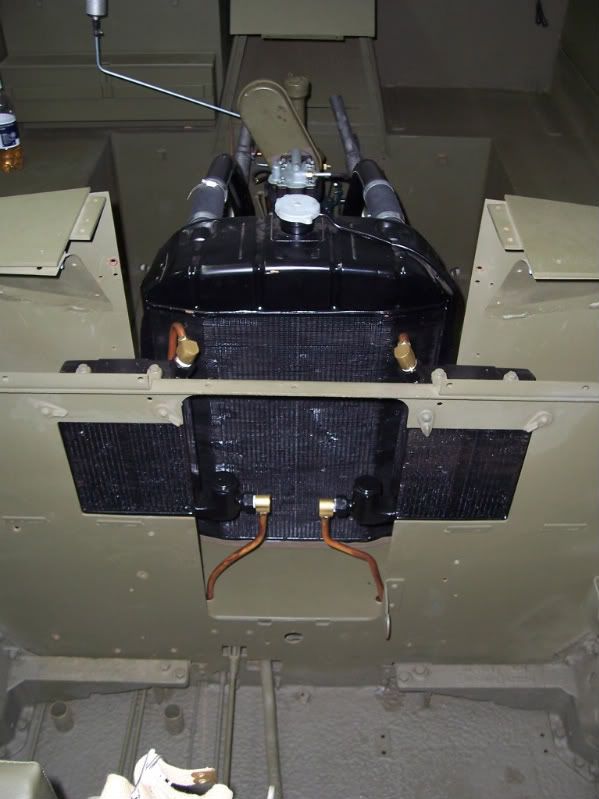 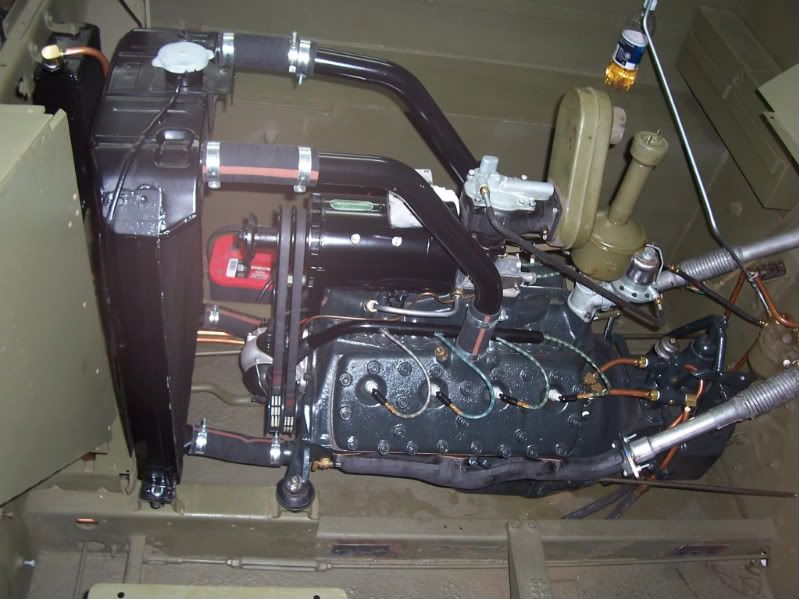
__________________
David Gordon - MVPA # 15292 '41 Willys MB British Airborne Jeep '42 Excelsior Welbike Mark I '43 BSA Folding Military Bicycle '44 Orme-Evans Airborne Trailer No. 1 Mk. II '44 Airborne 100-Gallon Water Bowser Trailer '44 Jowett Cars 4.2-Inch Towed Mortar '44 Daimler Scout Car Mark II '45 Studebaker M29C Weasel |
|
#12
25-07-08, 10:55
|
||||
|
||||
|
David,
Over time, I have been reading your restoriation thread with great interest. I think you are doing excellent and important work restoring your T16 to its wartime configuration. Hats off to you for a job well done, sir!  Regards, Hanno
__________________
Regards, Hanno -------------------------- |
|
#13
27-07-08, 03:46
|
||||
|
||||
|
Hey Hanno,
Researching the modifications for the T-16 in British service has sure been interesting. I've still had no real luck with identification of wartime records for the units that used the vehicle though. I do know that more saw use with the Canadian forces but since I had the original British wartime registration numbers, I opted to stayed with them and have adopted a British Regiment for now. Two shots below show the front and rear fender markings as I was messing with wiring this weekend and bolted up the front set to make sure the marker lights and headlamp lined up properly and that I had built the wires long enough to reach the instrument panel. 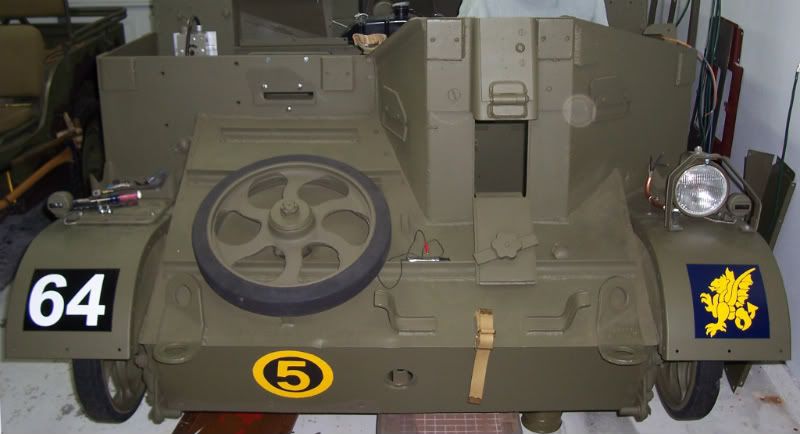 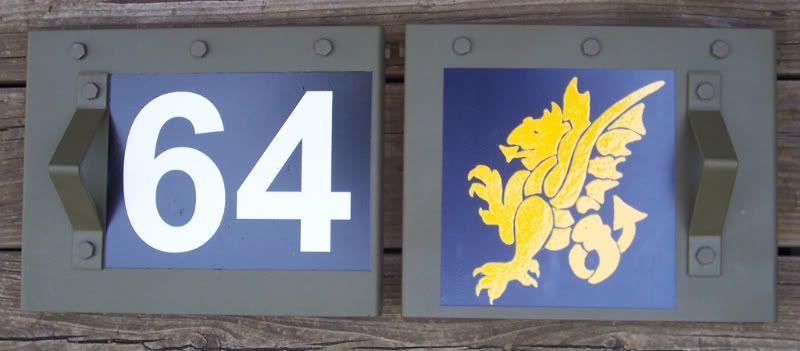 The markings represent 8th Battalion, The Middlesex Regiment which was detatched from the rest of their normal formation and assigned to the 43rd Wessex Division as part of the Independant Machine Gun Battalion. Company A, B, and C used carriers with machine guns and Company D used carriers with 4.2" Mortars. D-Coy is what I'll be configuring the vehicle for and it existed from February 28, 1944 until August 31, 1945. They landed at Ouistreham (Sword Beach, Normandy) on D+14 with a strength of four platoons and attached with the division to XXX Corps for the duration. Also have a few short movie clips below from the engine and transmission testing I did last week. It dosen't seem to get much traction without the tracks, even in 2nd gear. Go figure.... ") Installed Engine Running 1 Differential Spinning Rear Sproket Spins
__________________
David Gordon - MVPA # 15292 '41 Willys MB British Airborne Jeep '42 Excelsior Welbike Mark I '43 BSA Folding Military Bicycle '44 Orme-Evans Airborne Trailer No. 1 Mk. II '44 Airborne 100-Gallon Water Bowser Trailer '44 Jowett Cars 4.2-Inch Towed Mortar '44 Daimler Scout Car Mark II '45 Studebaker M29C Weasel Last edited by horsa; 29-10-08 at 17:39. Reason: Changed photo and video host provider |
|
#14
27-07-08, 04:53
|
||||
|
||||
|
What a great restoration job. I'm very impressed and looking forward to seeing it with tracks.
regards Colin. |
|
#15
27-07-08, 07:00
|
|||
|
|||
|
Hi David,
Once again very impressive job of restoration, you have done an excellent job, the colour looks great what did you use? also did you use stainless steel welding rods? nice to see them being restored instead of just being left to rot, well done, Regards, Ron
__________________
Ron Winfer |
|
#16
27-07-08, 11:09
|
||||
|
||||
|
Hi David, I'm curious to know how do you move the carrier around. It would'nt be easy to push on stones, or do you have a little crane tucked away somewhere.
Colin. |
|
#17
28-07-08, 05:16
|
||||
|
||||
|
Ron, All of the original welds on the armor were done in stainless and they held up very well over time. As I was tearing things down, I found the Swiss had not always used stainless for thier additions and for the places that they welded up British holes and features. So I opted to use normal steel as that was what I already had for the two welding rigs in sticks and wire reels. Sometimes hit reactive areas where the old metal wasn't pure or it could have been something to do with the hardend armor. That required extra grinding and then rewelding but none of the welds have cracked so far which is supposed to be one reason they used stainless during the war I'm told.
For paint, I use an enamel which is sold in gallon cans here in the USA for military vehicle restorations. Color is coded 33070 Olive Drab Flat and I reduce it with xylene so I can spray it through my paint gun with an air compressor. The primer is a red oxide made by the same people and I use xylene with it as well. The stars and registration number are semi-gloss white Rustoleum from a stray can. The squares for the unit markings on the fenders are smooth satin midnight blue Rustoleum for the Wessex Wyvern and Semi-gloss black for the vehicle code plate. The actual Wyvern is hand painted with Testors gloss gold model paint and the 64 was sprayed with the same semi-gloss white used for the census number. The bridge plate was also hand painted but with flat black and flat yellow Testors model paint. Colin, I don't have a crane and am too cheap to rent one when it would have helped me out. I figured a long time ago that I'd likely need a way to recover my own vehicle if it broke down in the field. So I welded a 12-volt winch to a plate which is welded to a normal removable tow vehicle receiver hitch fitting. The receiver hitch section normally mounted to a truck is welded to the front of my trailer behind the spare tire mount. That way the winch is only outside when I actually need it with the trailer and I can use it for other tasks while hooked to the truck if needed as well. It has enough power to allow me to drag the hull onto the trailer deck before I had wheels mounted when I took it in to have it stripped. After that I made it a priority to get the wheels done so it would roll around easier which sure makes it simple now to load and unload with the winch. Shots below of the wheels as I rebuilt them as well as a few showing the last time I loaded so you can see the winch in use. I'm on a hill which puts the rear of the trailer almost on the ground when backed all the way down in case you are wondering if I have a tilt trailer. Boards on my ramps cover up the angle iron steps which don't affect me loading my jeep but would likely cause added problems for the carrier wheels if not covered. 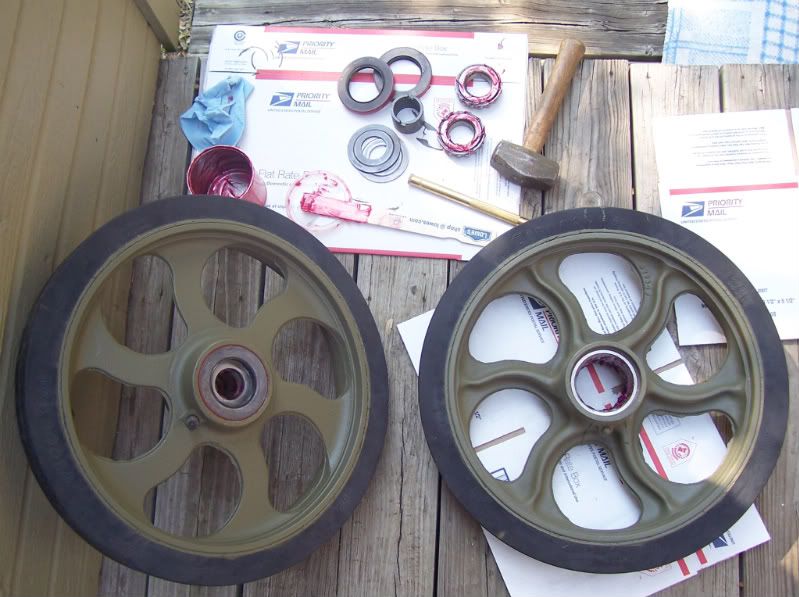 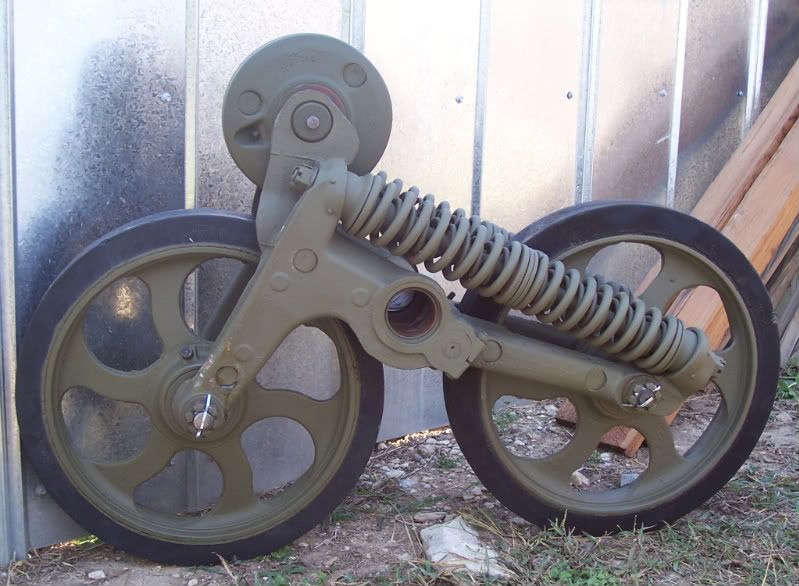 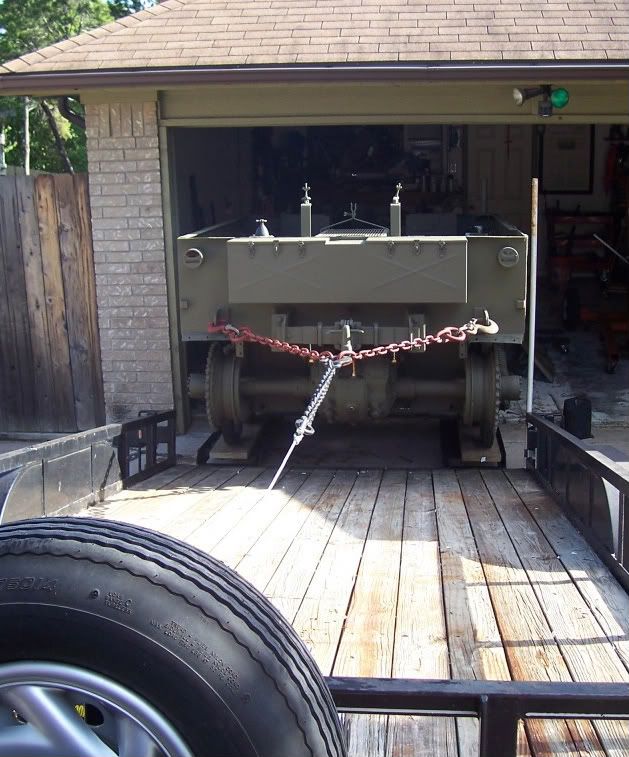 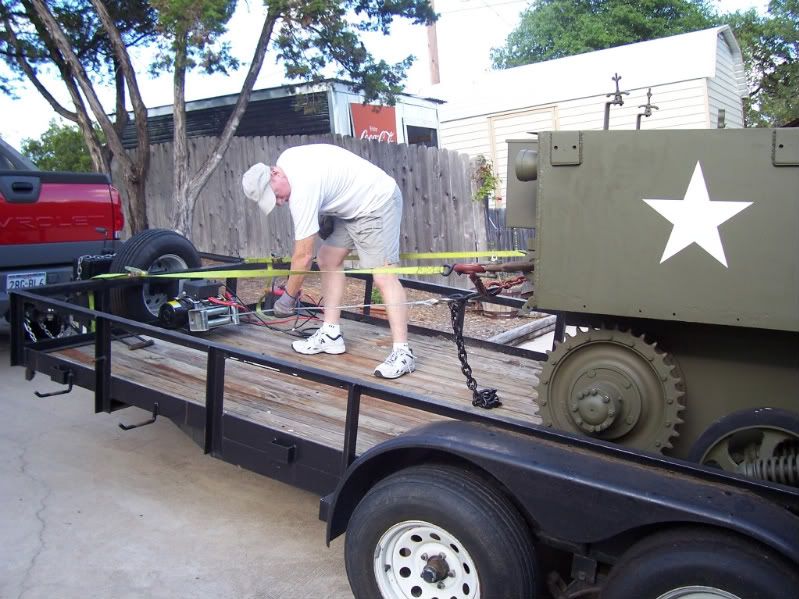 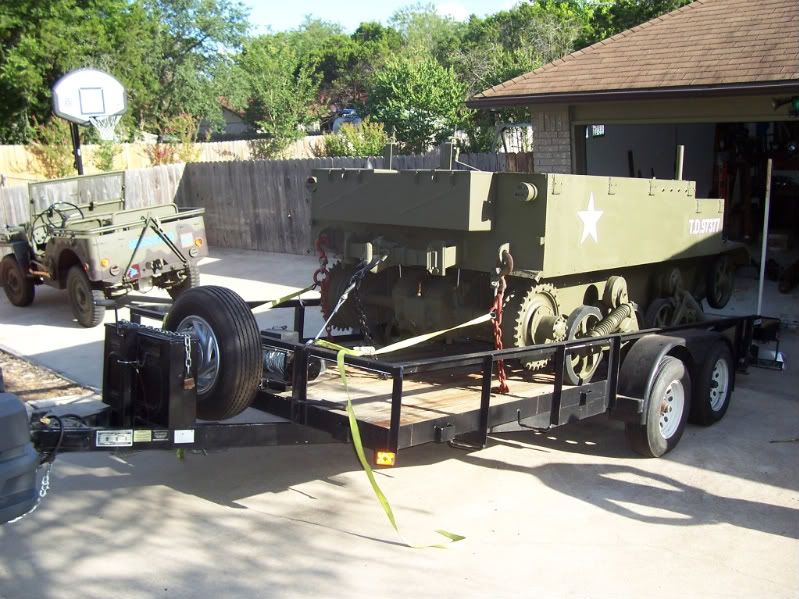 The straps you see in some of the shots are used as safety lines and I take them up as they get slack from the winch pulling the carrier onto the trailer. Cheap insurance in case the cable snapped as the wheeled carrier would roll through my garage and thru the brick wall in the back, taking out my work bench and welder along with it.
__________________
David Gordon - MVPA # 15292 '41 Willys MB British Airborne Jeep '42 Excelsior Welbike Mark I '43 BSA Folding Military Bicycle '44 Orme-Evans Airborne Trailer No. 1 Mk. II '44 Airborne 100-Gallon Water Bowser Trailer '44 Jowett Cars 4.2-Inch Towed Mortar '44 Daimler Scout Car Mark II '45 Studebaker M29C Weasel Last edited by horsa; 21-11-08 at 22:44. Reason: Relocated Photos |
|
#18
11-08-08, 03:47
|
|||
|
|||
|
what year is your carrier , i have a ford t16 march 1945 n 13588.
|
|
#19
11-08-08, 05:21
|
||||
|
||||
|
The hull armor was stamped as being made January 1944 and it is the earlier body style with seperated oil coolers and fuel strainer at the rear of the vehicle.
__________________
David Gordon - MVPA # 15292 '41 Willys MB British Airborne Jeep '42 Excelsior Welbike Mark I '43 BSA Folding Military Bicycle '44 Orme-Evans Airborne Trailer No. 1 Mk. II '44 Airborne 100-Gallon Water Bowser Trailer '44 Jowett Cars 4.2-Inch Towed Mortar '44 Daimler Scout Car Mark II '45 Studebaker M29C Weasel |
|
#20
11-08-08, 16:50
|
|||
|
|||
|
david dow you speak spanish?
you can see my carrier on youtube mi name is pablo50cal . i dont know how i can up the pictures of my carrier on maple leaf up. many thanks pablo. |
|
#21
12-08-08, 17:33
|
||||
|
||||
|
Hey Pablo,
I don't speak or read Spanish very well. Just enough I guess to figure out the basics of something when needing to communicate on occasion down in Mexico. Do you know Juan (JALFON ERNESTO) in Argentina as he also has a T-16 project down there.
__________________
David Gordon - MVPA # 15292 '41 Willys MB British Airborne Jeep '42 Excelsior Welbike Mark I '43 BSA Folding Military Bicycle '44 Orme-Evans Airborne Trailer No. 1 Mk. II '44 Airborne 100-Gallon Water Bowser Trailer '44 Jowett Cars 4.2-Inch Towed Mortar '44 Daimler Scout Car Mark II '45 Studebaker M29C Weasel |
|
#22
29-08-08, 02:44
|
||||
|
||||
|
Finally have had the time to sort out everything that was needed for doing the wiring more or less to match the wartime manuals. Its nice to be able to turn on the master switch and press the start button for the engine to roar to life. No more hot wiring it but I'm still using a temporary fuel system which keeps me busy adding gasoline every few minutes for now
Shots below show the instrument panel before and after, although I am still looking for a correct wartime Waltham Clock Company speedometer. 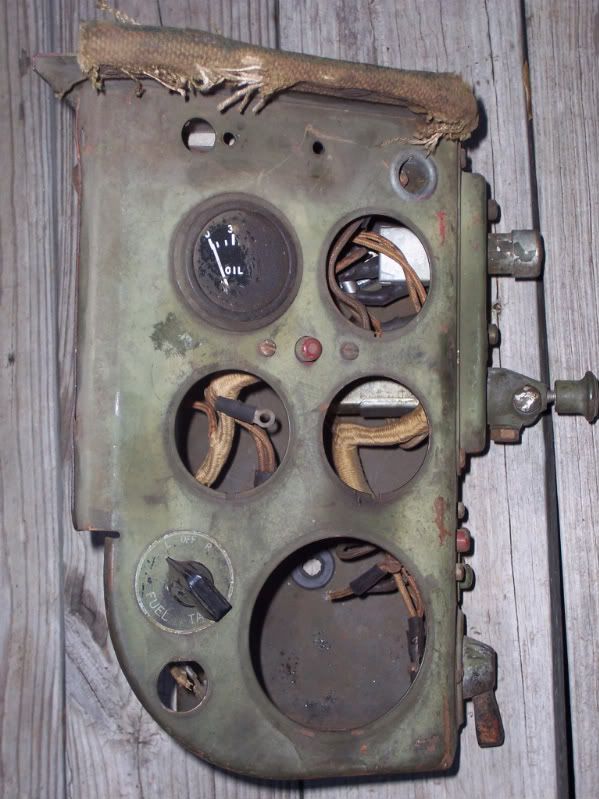 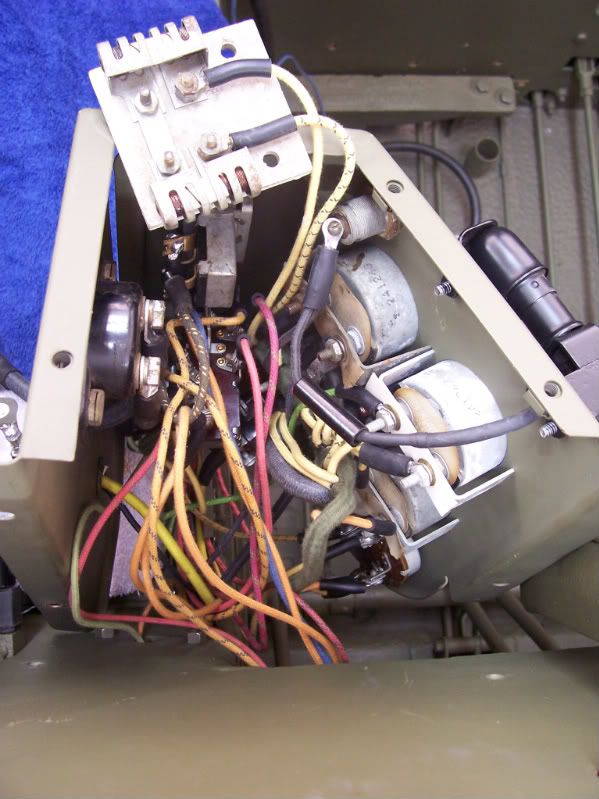 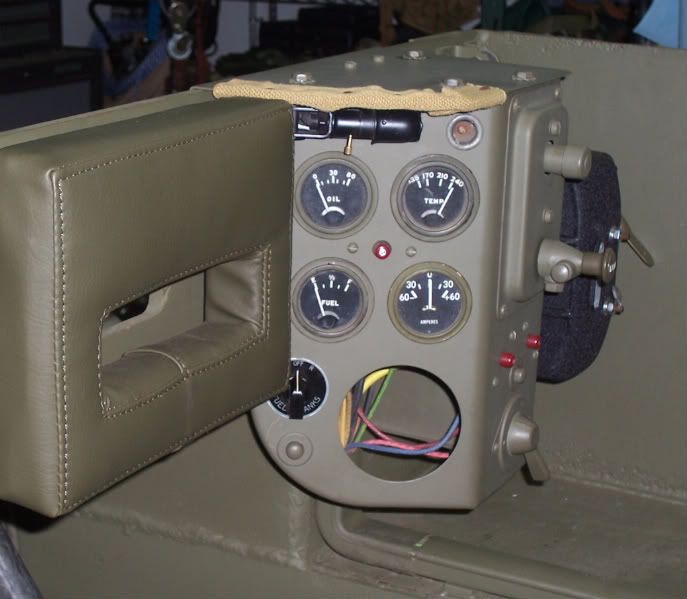 All of the wires on the T-16 go through conduit and then branch off through braided tubes to reach whatever they connect to. Lots of fun trying to thread all of the cloth loom wires in place on the vehicle. Everything is complete including front and rear lights and siren. Exception being the two wires for the left and right fuel tank sending units. They are ready to go but I don't have the fuel tanks yet. You can see them in the second shot showing the conduit as they are yellow and stick up and out without their braided tubes. 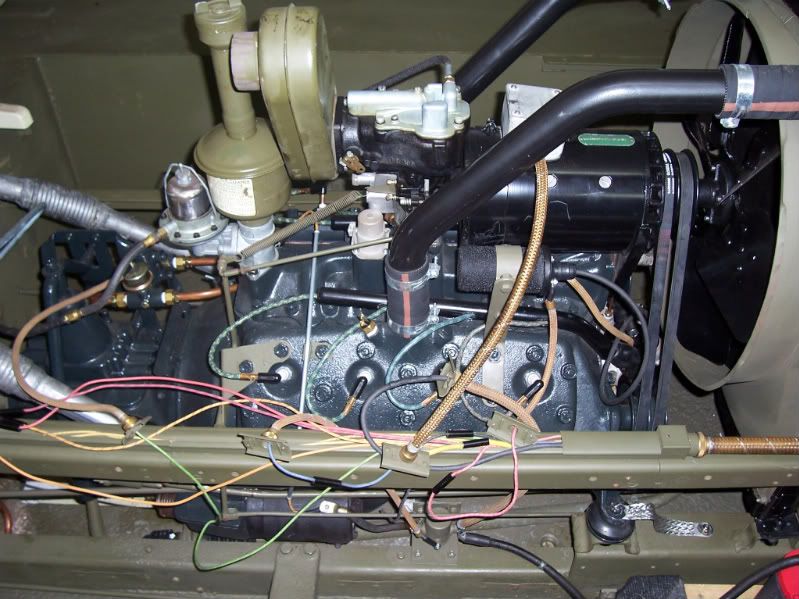 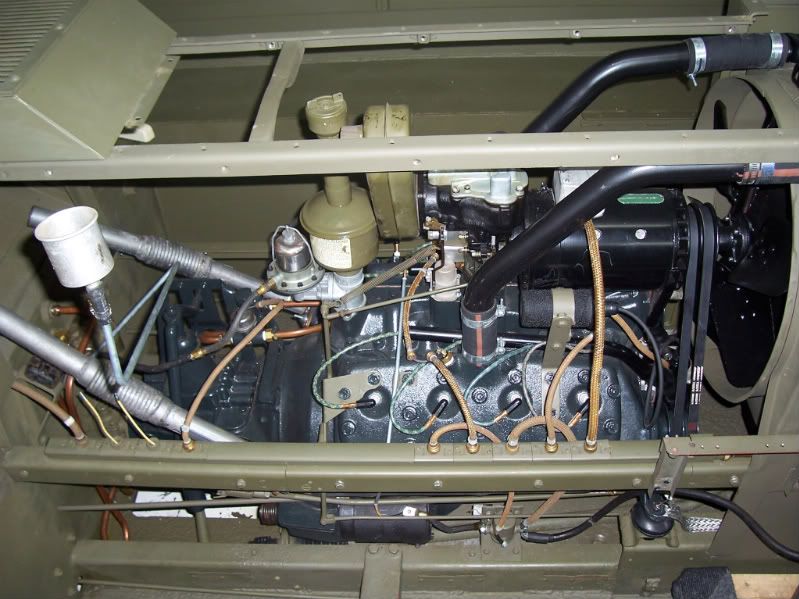
__________________
David Gordon - MVPA # 15292 '41 Willys MB British Airborne Jeep '42 Excelsior Welbike Mark I '43 BSA Folding Military Bicycle '44 Orme-Evans Airborne Trailer No. 1 Mk. II '44 Airborne 100-Gallon Water Bowser Trailer '44 Jowett Cars 4.2-Inch Towed Mortar '44 Daimler Scout Car Mark II '45 Studebaker M29C Weasel Last edited by horsa; 29-08-08 at 03:16. |
|
#23
29-08-08, 10:29
|
|||
|
|||
|
David
Regarding your markings, I am yet to see any photograhic evidence suggesting British Army use in NW Europe. Does anyone have any pictures? |
|
#24
02-09-08, 22:41
|
||||
|
||||
|
Hey Neil,
I'd also be interested in what others might have come across in terms of photos or Regimental diary entries that might reference British use of the T-16 Universal Carriers. The biggest problem with the written accounts I've seen is the use of generic terms for everything. All of the open top, tracked vehicles got lumped together as "carriers" most of the time with no specific identification nomenclature. From a photographic point of view, there is no doubt that the Canadian forces had and used the T-16s from within weeks of the Normandy landings throughout the end of the war. I've seen photographs of T-16s with the "T" and "TD" prefix but they have thus far all been referenced to Canadian units even though they should have been marked with "CT". Another mystery but the answers are out there somewhere I'm sure. For now, I'll just keep working the restoration and someday in the future I just might have to repaint the fenders to show a Maple Leaf. Shots below show a little more of my progress. Now that the wires are laid, I have been able to install the driver seat (shown in the high position) and a few of the little detail accessories. 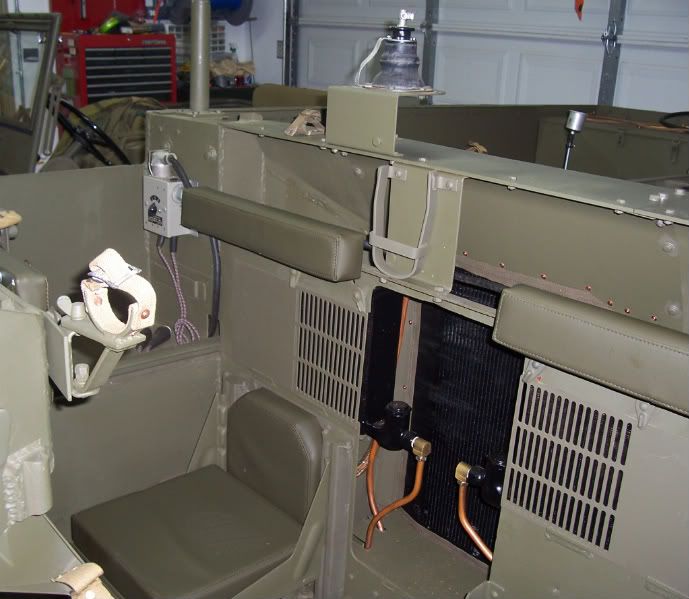 Also finally got around to finishing the work on the rear armor where the pioneer tools go. The Swiss ground off all of the attachment points and welded up the holes where the adjustable shovel fitting sits. 
__________________
David Gordon - MVPA # 15292 '41 Willys MB British Airborne Jeep '42 Excelsior Welbike Mark I '43 BSA Folding Military Bicycle '44 Orme-Evans Airborne Trailer No. 1 Mk. II '44 Airborne 100-Gallon Water Bowser Trailer '44 Jowett Cars 4.2-Inch Towed Mortar '44 Daimler Scout Car Mark II '45 Studebaker M29C Weasel |
|
#25
07-10-08, 22:33
|
||||
|
||||
|
Finally made some free time a few weeks ago so I could assemble the tracks and get them installed onto the carrier. Everything went pretty smoothly and the process was much easier and quicker than I thought it would be. The following shots are some I took that day but its taken me this long to get them uploaded for MLU...
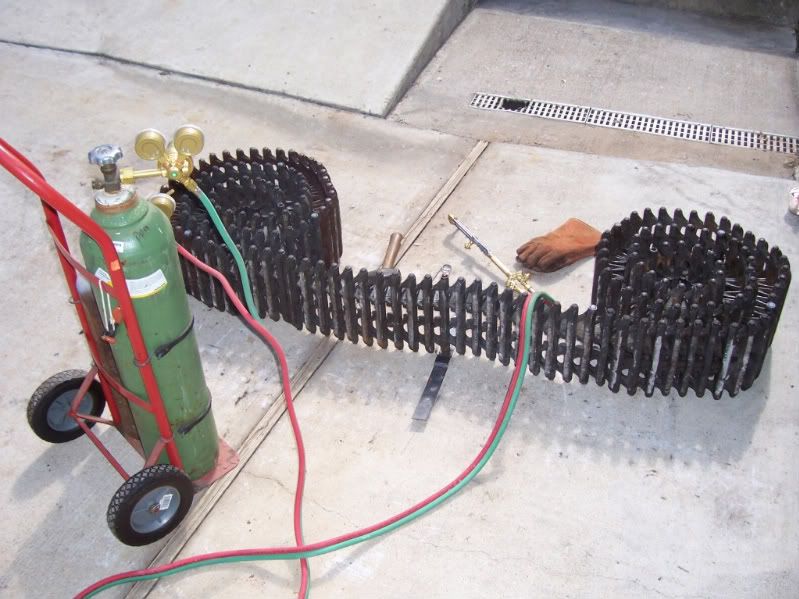 I had a handful of pins which were designed to be welded and knew they would be no good for emergency repairs in the field so used them to make up for my shortage of pins that can be removed which will stay in my recovery kit on the carrier. I opted to heat one end with my torch and then was able to make mushroom caps with a small hammer so they look similar to original factory pins. 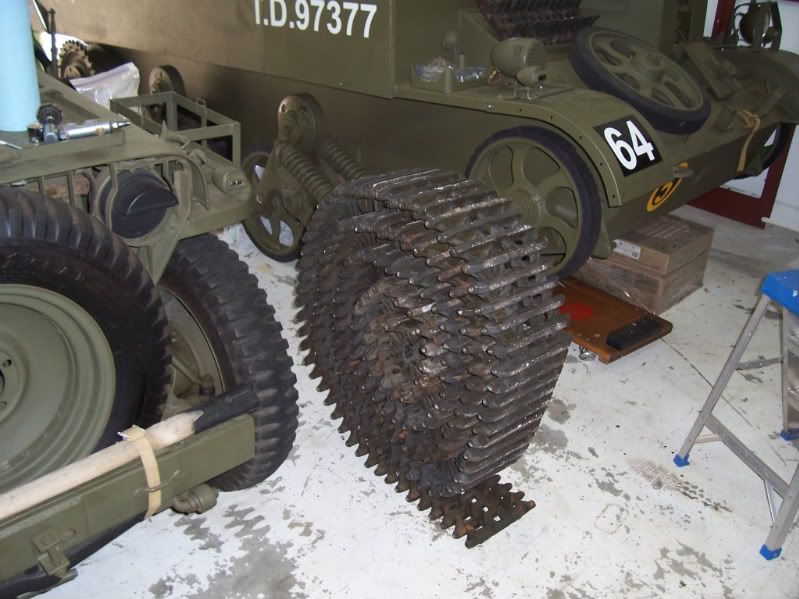 The next step was to carefully roll each of the complete tracks between my jeep and the carrier so they would be in front of the vehicle. Fortunately I had no problems but hindsight says I should have moved the jeep to avoid a potential accident. 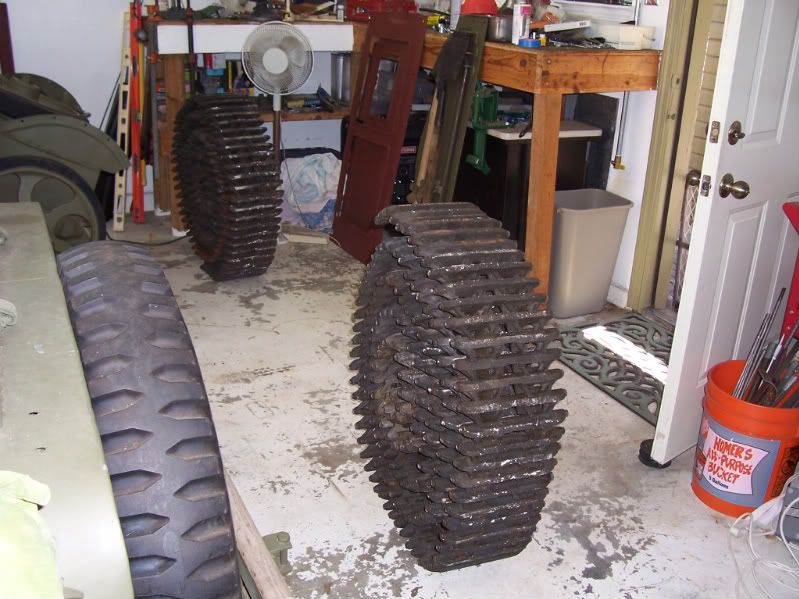 Both tracks now in place, only to realize I had rolled one backwards when compared to the other so I had to move it across the garage again after pulling the carrier out onto the driveway. Everyone needs to practice moving sets of tracks by themselves to get proficient at it. 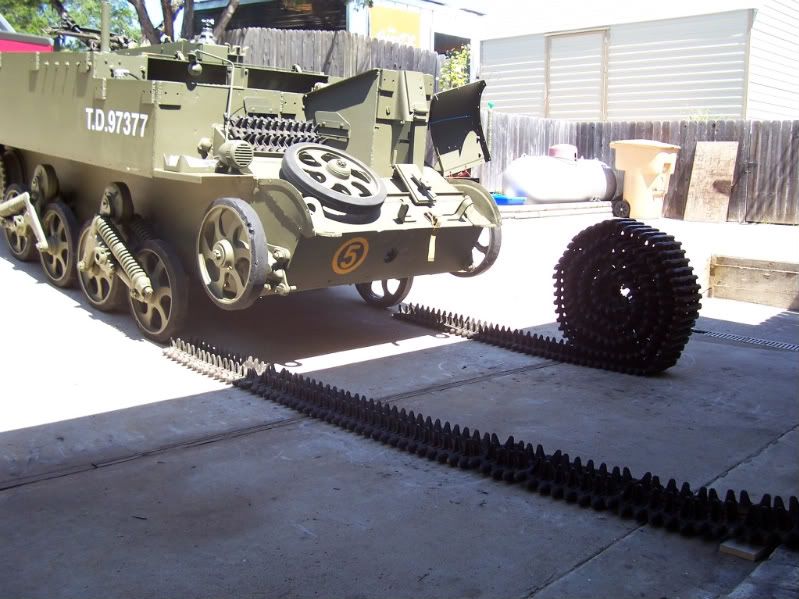 Tracks starting to get into position 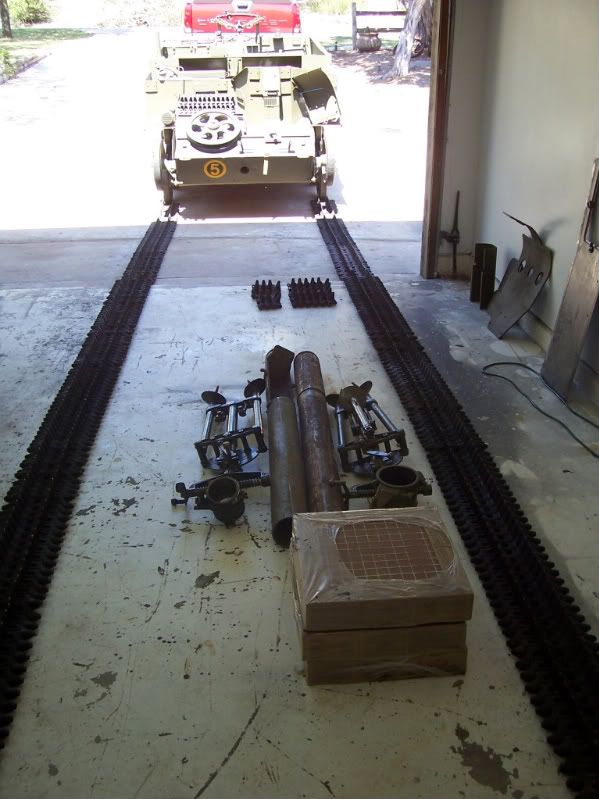 Tracks all laid out 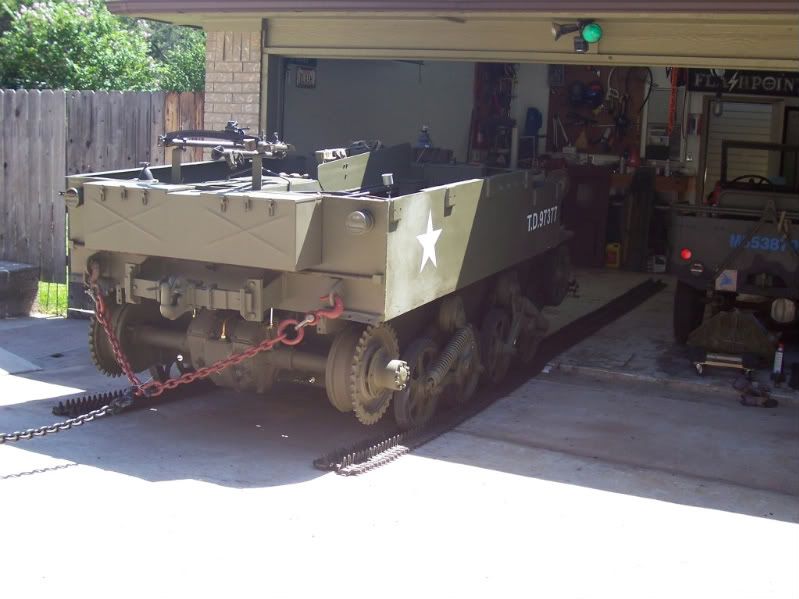 Having a driveway that goes up hill, I used my truck to pull the carrier out of the garage and then let it roll onto the tracks after I had laid them out. 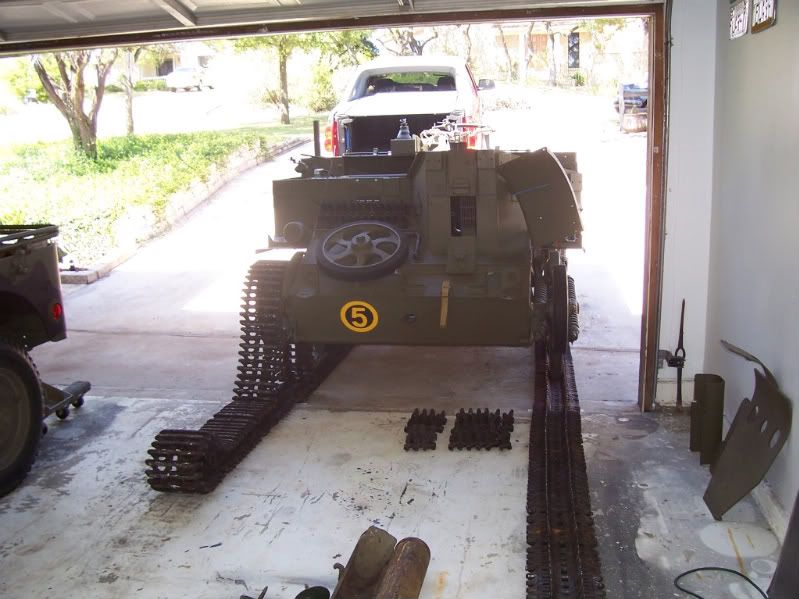 After having warmed up by moved the tracks around several times, dragging them onto the vehicle over the wheels was a piece of cake. 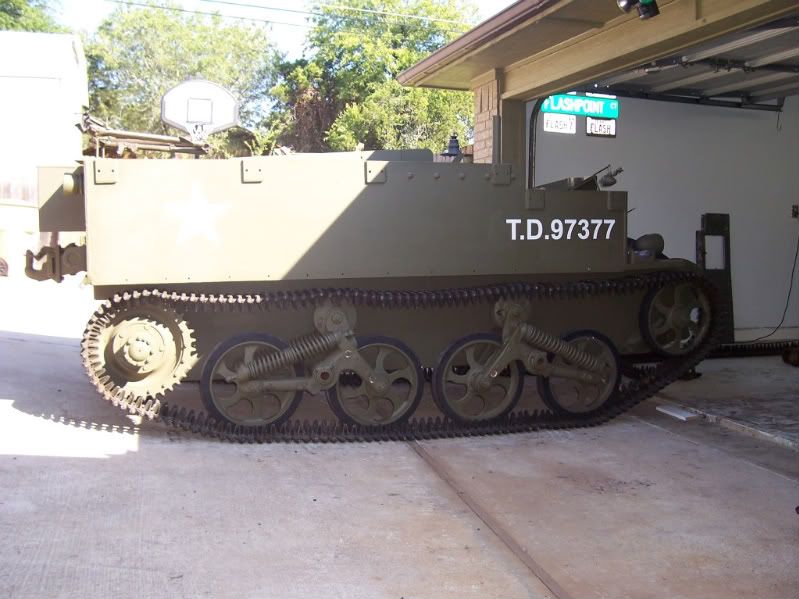 I used a modern turn-buckle type track jack to get everything tightened up for installation of the final pin on each side. Seemed pretty easy and overall both tracks took about an 2.5 hours to assemble, position and completely install to where I could drive back into the garage. Assembly with the torch probably took more than half of the total time since I didn't have everything in place to start working. 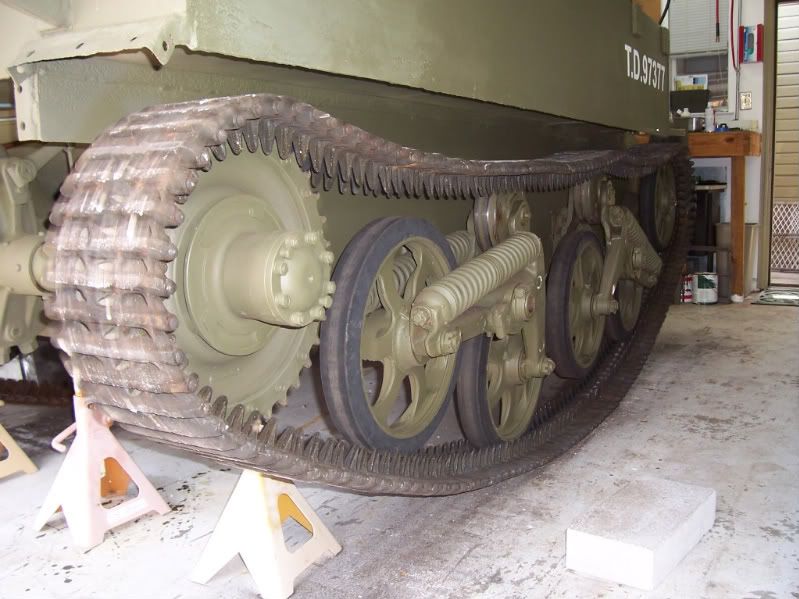 The final thing I did was to put the vehicle up on jack stands again so I could test run the tracks in the garage. I'd done this originally for testing the differential, engine and transmission together so thought it would help ensure I had no problems with the tracks when I actually took it down the road. After about an hour of running and shaking rust dust free, I broke each track and removed a single link. Being in the air, breaking the track, removing a link and reassembling the track only took six minutes per side. After another hour of running, I decided to go ahead and pull a second link from each side which made the track fairly tight but still within the specifications in the vehicle manuals. This way I still have the full range of idle wheel adjustment when I start driving and things continue to wear in.
__________________
David Gordon - MVPA # 15292 '41 Willys MB British Airborne Jeep '42 Excelsior Welbike Mark I '43 BSA Folding Military Bicycle '44 Orme-Evans Airborne Trailer No. 1 Mk. II '44 Airborne 100-Gallon Water Bowser Trailer '44 Jowett Cars 4.2-Inch Towed Mortar '44 Daimler Scout Car Mark II '45 Studebaker M29C Weasel |
|
#26
10-10-08, 04:00
|
|||
|
|||
|
david very nice job, show the video wen you drive the t16.
atte pablo |
|
#27
12-10-08, 00:56
|
||||
|
||||
|
Still a long way to go before I can run a race but here are two videos of the initial road test. Still no exhaust system and the fuel is coming from a small bottle right now. On the test run, I also only had the linkage adjusted for the outside tiller arms which control the brakes. The steering linkage was hooked up but not adjusted at the time so turns in the videos will probably look rough.
First one is backing up hill on my driveway past my truck which probably wasn't one of my smarter moves. Had no issues but probably should have moved the truck out of the way in case the vehicle spun on the concrete. Backing Out Second video is coming down the street in first and second gears. Accelerator linkage needed to be adjusted to get more power which I did after getting back into the garage. First Road Test 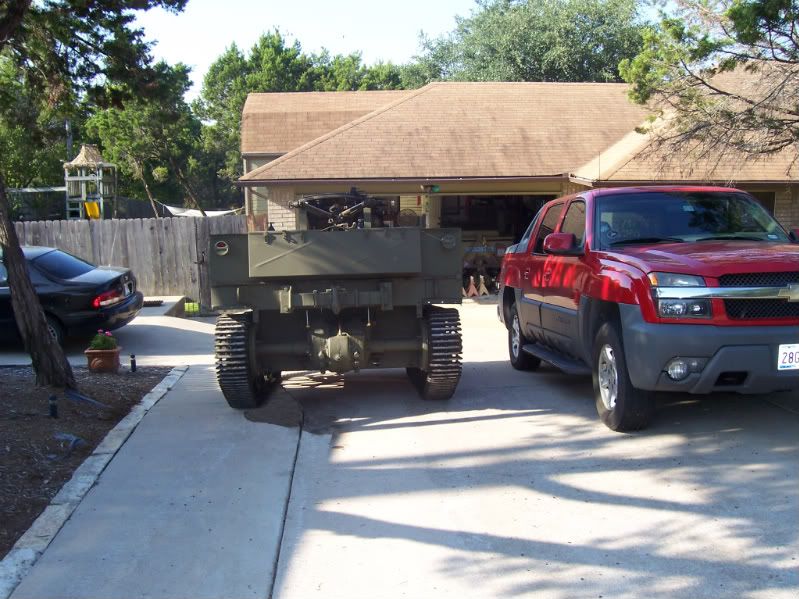 This is a shot of the driveway I have to back out of uphill... 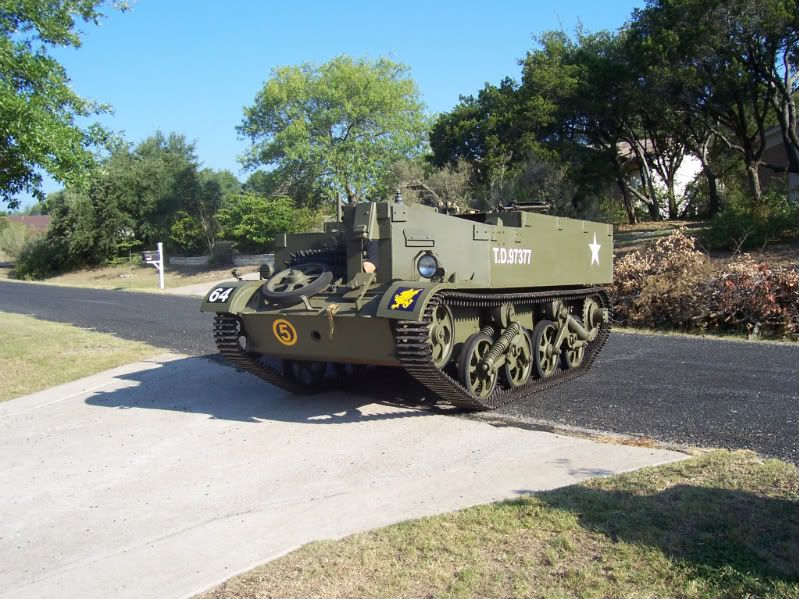 Made it to the top 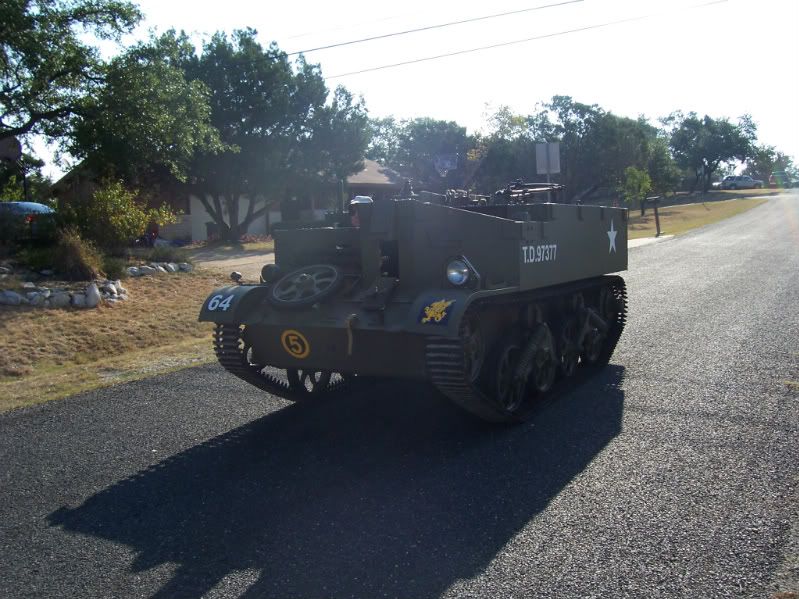 And one while driving on the street in case anyone can't access the videos.
__________________
David Gordon - MVPA # 15292 '41 Willys MB British Airborne Jeep '42 Excelsior Welbike Mark I '43 BSA Folding Military Bicycle '44 Orme-Evans Airborne Trailer No. 1 Mk. II '44 Airborne 100-Gallon Water Bowser Trailer '44 Jowett Cars 4.2-Inch Towed Mortar '44 Daimler Scout Car Mark II '45 Studebaker M29C Weasel Last edited by horsa; 29-10-08 at 17:49. Reason: Changed photo and video host provider |
|
#28
12-10-08, 18:15
|
||||
|
||||
|
Very nice and a job well done. It sure sounds like mine with no mufflers hooked up. And yes I would have moved the truck.
__________________
Jordan Baker RHLI Museum, Otter LRC C15A-Wire3, 1944 Willys MB, 1942 10cwt Canadian trailer |
|
#29
13-10-08, 20:05
|
|||
|
|||
|
david yours tracks are to tight isnt?
|
 |
|
|
 Similar Threads
|
||||
| Thread | Thread Starter | Forum | Replies | Last Post |
| my C15 restoration | rampant rivet | The Restoration Forum | 111 | 26-12-19 14:46 |
| M38 CDN Restoration | donjunior | Post-war Military Vehicles | 1 | 08-07-13 03:25 |
| 4.5 Restoration | James Shopland | The Gun Park | 7 | 18-03-13 17:38 |
| F8 for restoration | david moore | The Softskin Forum | 32 | 21-06-05 15:47 |
| Restoration tip........ | Bob Carriere | The Restoration Forum | 3 | 09-08-03 17:50 |


 Linear Mode

