|
A Commentary, by Paul Schoeman |
|
| Editor's Introduction | |
| Armour has always held a certain fascination for students of 20th century warfare. The iron behemoths which first emerged, chugging and belching, from the primeval cordite mists of the trench scarred battlefield in WW1, went on to play a pivotal role in Act II ('39-'45) of that prolonged engagement. There's no denying a sort of mystique surrounding those who lived, fought and died around these massive machines, although the survivors will be the first to deny it; to them, these were simply the tools by which they were expected to vanquish the enemy. This they did, although at times at questionable cost. Regardless, photographs and newsreels of period armour evoke a sense of unreality and invincibility which does much to lend an aura of mystery to remaining examples of these once mighty beasts. | |
| Collecting armour has its own unique lure, one which can trap the unwary and reduce even the most stalwart truck collector to helpless frustration. It takes a special sort of individual with strong motivation to tackle this kind of project, especially if the vehicle in question is tracked. 50+ year old armour has its own draw, and its own pratfalls. | |
| First, there's the whole question of finding it. | |
| Comparatively few examples remain, out of the tens of thousands left at the conclusion of the war. Once you've found that rusty billet of hardened steel you just can't live without, you have to pay for it. Generally, the price is inversely proportionate to availability. Fair enough. You have enough 'mad money' stashed away. Now, you have to get it home. | |
| Well, you certainly can't drive it! Even if you were prepared to sacrifice a week or two of holidays (with potentially dire consequences to and from your family), the local constabulary is sure to want to stop and exchange friendly greetings along your chosen route - and that can be such an annoying way to pass the time (steel bars hardly compare with steel plate). Even IF you don't throw a track at 25 mph, or otherwise leave bits and pieces of your baby's innards all over the highways (oil mixed with bits of piston and chunks of connecting rod are always good)... | |
| No, you have to arrange independent transport. Now the real fun begins. HOW much does that weigh? HOW far away did you want it delivered? HOW exactly did you think you would get it on the trailer? Hmmmm... we hope you're a good negotiator, because whichever company you deal with is there because they're in business to make a profit, and they don't have a lot of experience moving THAT kind of stuff. They WILL have questions. AND detailed flow-charts to explain to you precisely why it's going to cost twice as much as their previous estimate to get your piece where it belongs, WHEN you want it there. Feel free to consult with your friends, neighbours and local bartender, for every bit helps. You MAY get lucky.... and find someone with an otherwise empty float who's facing a long, fast, easy ride home without a load. Here's hoping... but HE'S not. | |
| Better to spend the money on someone reputable, who will more-or-less guarantee arrival during your lifetime. At the very least your beneficiaries will get it. Given that you've bitten off the bullet (without incurring lead poisoning), and given that your gem actually, magically, appears at your front door when they said it would (instead of being temporarily parked in a yard in Louisiana for three years), now, how do you offload it, and where do you put it? Ahhhhh, you didn't THINK of that... | |
| But, we digress... this is supposed to be a light look at what it's like to own your very own armour. Let's let Paul pick up the thread from here... | |
|
|
|
| by Paul Schoeman | |
| Finding a Carrier | |
| I don't know exactly when I decided I wanted a carrier, but I suspect it dates back to a boyhood filled with such delights as Britains and Dinky Toys. I recall pushing a diecast Bren Gun Carrier around the carpet and having a wonderful time, at least until it met with my diecast Tiger tank... |
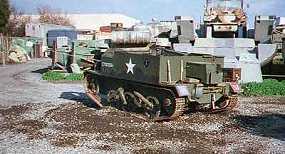
My Mk.I* as found... |
| Sooner or later we get big, and so do our toys. When I decided to find a real carrier, I started, logically, by first trying to find out as much as I could about them. I found little literature on them, and was forced to start asking for advice from anyone who knew MVs at all, including local MVCC members. I was told Canadian carriers were better than British ones (due to parts availability - they were right), and that I should spend somewhere between $1,000 and $20,000. That really narrowed it down for me. I was advised to stay away from T-16s, and that carriers worked best with automatic transmissions (some local member did this, and they all thought it was an improvement). Everyone knew of one for sale, but no one could tell me where or how much. This put me off the MVCC for a while, so I decided to look elsewhere. | |
| After a long time spent religiously scouring the classified ads in the MVPA magazine, but to no avail. Then the internet. One thing I found was that many people are looking for them. Whenever I would post on an MV page that I was looking for a carrier, I would always get emails back saying that if I found any I wasn't interested in, could I pass them their way. Most of the carriers I did find were in a bad way; some were running, but lacked armour and everything else. These were cheap. They all had the same problem of worn-out track and drive sprockets. Back to the drawing board. |
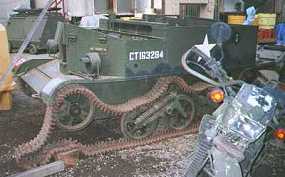
Um...er... tracks... |
| Success at last! The internet finally paid off. The best one I found was a Canadian Mk.I* in Virginia, which had been brought down from Canada. It was owned by a re-enactor who had purchased it from a Canadian in Ontario. The price seemed excessive, but I went ahead and phoned the Canadian who originally restored it. He was very helpful and told me a lot about the restoration as well as what he thought it should go for, which was somewhat less than the asking price. | |
| At that point I passed on this carrier as the price was just too steep. After a fruitless search elsewhere over time, I came back to it and was pleasantly surprised to see the price had dropped to approximately what the original Canadian owner had said they were worth. With some work I managed to contact the owner who had moved to another state, and we came to an agreement. |
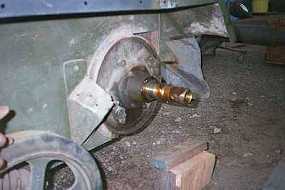
...and greasy brakes... |
| Wow, I now owned a carrier. Wow, it was in Virginia and I was in California. Hmmmm. | |
| Getting it Here | |
| I spent some time looking for trucking companies, and finally found one called PACER, which gave me a quote of $1500 for Virginia to California as a partial load. It took a little work to arrange for the now former carrier owner to coordinate a time with the trucker to load the carrier, but after some weeks all things finally came together and it was on the way. | |
| I am happy to say that a local tank museum in El Monte agreed to receive the carrier for me. They have all the heavy equipment to unload such vehicles as well as repair facilities. The carrier showed up about two weeks after it left Virginia; the trucker was very good, but he had to stop and chock the carrier with heavy wood shortly after starting the trip, as apparently it swayed badly even when chained down. The driver had worked for the museum once before, so at least he knew where to go. Unloading went off without a hitch. Phew. |
...and greasy brakes... |
| Learning to Love & Hate Tracked Armour | |
| I own a carrier! My first day out to play with it gave the feeling I had bitten off more than I could chew, but reinforced by cigarettes, beer and three friends with way too much energy, I was soon adjusting tracks and changing fluids. The man who owns and runs the museum, Craig, was very helpful with advice gleaned from 20 years of restoring tanks and other armoured vehicles. | |
| Getting into the carrier for the first time was interesting. I always remember hearing that they were designed for tiny people, but sitting behind the wheel, I counted my blessings that I weigh in at a hefty 129lbs. Ok, what now? I know, let's drive it! | |
| The carrier was in good overall shape, and really only needed minor maintenance, or so I thought. The first impression once we started moving was that there was a slight problem turning left. It wouldn't. |
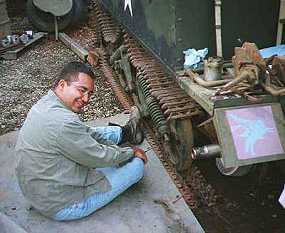
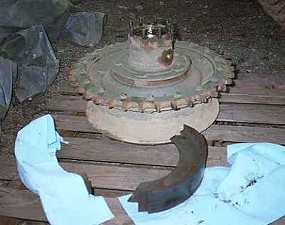
A press-ganged accomplice of the owner. The seal has been replaced, the spindle is clean, and everything is ready for reassembly. This is how to get really dirty. |
| At least barely, anyway. But first things first... the Great Track Adjustment Adventure. | |
| I looked at the manual and decided the track was in need of being adjusted. This is checked by measuring the space between the track and the hull where the track slackens in front of the drive sprocket. After counting the links, I was relieved to find out that only three per side had been removed so far (the maximum is ten before replacement). On this carrier, the left side track was comprised of large spans of twenty or thirty links, with some small sections of one or two links. The right side was comprised only of large sections, with only one single link as a section in itself. Divine Inspiration (along with Liquid Courage) determined that two links had to be removed from each side. Now for the fun part. | |
| The left side went fine, just as the manual described. I slacked off the track from the front bogie, then pulled out a two-link section. Reattaching the links was not too traumatic, as Craig was nice enough to let me use the track jack which came with the Australian carrier he has. Adjustment went smoothly too, with lots of room left for future tightening as required. |
Look, Mom, I made it go! Check out the amazingly tight turning circle now that the brakes actually work. Proof positive of the versatility of the carrier. |
| The right side was a bit more of a challenge in that there was no easy way of pulling two links. The manual recommends shearing off a track pin head with hammer and cold chisel, but I opted for an electric grinder. It took only a few minutes, and then, experienced track maintenance guy that I now was, we finished the process as per the other side. | |
| On to the small stuff. Most of this was as a result of long inactivity and storage. All of the sliding view ports had to be oiled and unfrozen. Lubrication of all moving parts was long overdue. Also, the whole carrier was full of pine needles from its Virginia storage location. | |
| Finally, we turned our attention to the right turn problem. After consulting with Bruce Parker, I elected to try the 'easy' stuff first, adjusting the steering linkages. | |
| The steering mechanism in Universal Carriers is both ingenious and complex. Turning the steering wheel left or right first acts upon a cam which slides a central shaft connected to the front road wheel assemblies left or right, in effect serving to 'warp' the tracks in the direction you want to turn. This by itself will generate a drift in whatever direction you're turning, which is enough for minor changes of course, but not enough for distinct change in direction. That is accomplished by turning the wheel farther, which then begins to activate the drum brake on whatever side you're turning. (It should be noted at this point that a carrier doesn't turn like a wheeled vehicle; because of the combination of track warp - at the center line - and braking, it actually slews more or less on the center axis.) | 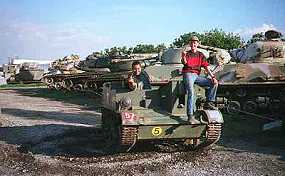
|
| There are lots of adjustment points throughout the mechanism, and one-by-one, we set them all as per the manual. There was noticeable improvement, but the right turn problem still persisted; it was obvious that on that side, we were turning by track warp alone, and that the right brake was ineffectual. | |
| In consultation with Bruce, it was decided that the problem was most likely oil-soaked brake pads from a leaky seal. We broke the track once again, pulled the sprocket/drum assembly, and found that a grease seal was the culprit. Both pads were completely saturated, and the drum itself was even full of grease. The shoes and drum were sent off to a local truck repair facility recommended by Craig, and came back sometime later clean, relined and turned. Replacing the seal was difficult, but reassembly was simple, and finally, the First Great Crisis was solved. |
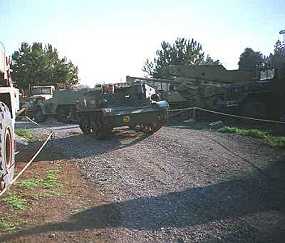
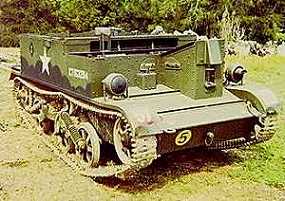
Back to the paddock after a long day on the range... |
| It was amazing! Left or right, 'on a dime'! The internal diameter of turns was now about four feet... what a great toy! | |
| Sometime, let me tell you about getting stuck in a mud bog, throwing a track, and having to be towed out by a National Guard APC which just happened to be lumbering by at the time... :-) | |
|
|
|
|
|
|
|
|
|
| Back to the Universal Carriers Directory | |
|
|
|
| Copyright © Geoff Winnington-Ball , 1999-2000 All Rights Reserved | |