|
#361
 26-04-12, 02:54
|
|||
|
|||
|
Quote:

|
|
#362
26-04-12, 02:57
|
||||
|
||||
|
Quote:
I found 2 sets of NOS cab 12 Ford doors years ago, where Keith used to work . Maybe they were made in two styles  MIKE
__________________
1940 cab 11 C8 1940 Morris-Commercial PU 1941 Morris-Commercial CS8 1940 Chev. 15cwt GS Van ( Aust.) 1942-45 Jeep salad
|
|
#363
26-04-12, 03:25
|
|||
|
|||
|
..others have helped me along the way also.
David the little chromed door insert is from Mac in Niagara Falls NY as per Grant's info ...and would be eternally grateful if you could dig up and photograph your rods against a 1 inch squared paper or with a yard stick next to it...... with dimensions of the rods diam. Mike.... Yes I believe that I have seen.. maybe even have pictures of the Ford doors with and without a inner skin.... but would also suspect that the doors were interchangeable between cab 11 and 12 and Ford to Chev. My cab 11 had a Ford grill instead of Chev.... which apparently was not unusual when parts where in short supplies. Bob
__________________
Bob Carriere....B.T.B C15a Cab 11 Hammond, Ontario Canada
|
|
#364
27-04-12, 03:10
|
|||
|
|||
|
Hi Bob
Yes, I will photo with scale when next out to the truck. In the meantime here are a couple of photos I took the other day. On reflection, I wonder if the rods actually are original as they look pretty crude - the screen itself certainly is. In any case they work just fine. You will see that the main pieces are flat bar with the "square" section fittings welded on.
|
|
#365
27-04-12, 03:12
|
|||
|
|||
|
and here is the other picture (how do you add two pictures at once?)
|
|
#366
27-04-12, 03:35
|
|||
|
|||
|
Will take photos of my NOS side curtains..... I suspect they are identical to yours....... as we have both cab 11 style doors.
Your rod pictures seem to be very similar ....but theirs is different shape.....to what Mac has illustrated in their catalogue but it is a very poor small scale pic. I am realy curious as to their overall shape....... once inserted in the canvas sleeve they must be a bitch to remove...... If I am lucky with your pictures and the outline of the sleeve in my curtain, I should be able to reproduce them. If successful I will post on the forum for future reference of others. Bob
__________________
Bob Carriere....B.T.B C15a Cab 11 Hammond, Ontario Canada
|
|
#367
29-04-12, 00:42
|
||||
|
||||
|
Quote:
 Thats the first time I have ever seen those curtain rod's. I reckon I could make something like that as well. Thats the first time I have ever seen those curtain rod's. I reckon I could make something like that as well.To answer your question - just add your second photo the same way you added your first. Hit the paper clip, hit browse, select your photo and hit upload. Well..... just press your left mouse button.....dont actually hit anything...
__________________
Pax Vobiscum.......may you eat three meals a day & have regular bowel movements.
|
|
#368
29-04-12, 00:46
|
||||
|
||||
|
Good luck with your repro's Bob... interested to hear what your discoveries will be.
Um......and sorry for hijacking your thread David De. Actually... Im keen to see what your fabrication skills come up with as well..
__________________
Pax Vobiscum.......may you eat three meals a day & have regular bowel movements.
|
|
#369
29-04-12, 02:42
|
|||
|
|||
|
Here's some more photos of my original - hopefully showing dimensions and also angle and offset of the rearward one. The flat bar piece lies parallel to the screen.The overall length of each side supprt is approx 18 ins from the top to the bottom of the "spike".
Still only one pic at a time - where's the paper clip Tony? Cant see one anywhere? Completely by the way - my side screen has TS1-276 in red paint on it matching same ID on rear of tarp. Any idea which unit - truck was in Eastern Ontario all of war as far as I know - "training school" at CFB Kingston???
|
|
#370
29-04-12, 02:43
|
|||
|
|||
|
And the next
|
|
#371
29-04-12, 02:45
|
|||
|
|||
|
Finally - the third picture
|
|
#372
29-04-12, 04:47
|
|||
|
|||
|
I was searching in the barn this afternoon for the side curtains but could not find them...... bingo in a special plastic container in a basement room.
Will have pictures tomorrow. Strangely one plastic window is clear and useable... the other has frosted over and the frosting is coming off as plastic flakes....completely opaque and both were stored wrapped in newspaper from Holland in the same air tight container. Pictures will show the details. I may have to carefully remove the deteriorated plastic and resew a new section of modern vinyl using a hand awl and using the same needle holes Now for David...... the rods are just straight flat pieces inserted in the pocket/sleeve provided...... but..... in your pictures you seem to have a 3/8 rod exposed on the top section that would be close to the roof...... am I mistaken....? Can you measure the off set of the front leg.... seems to go from flat stock about 3/4 inch wide ( maybe 7/8 and what thickness ) welded to a round bar then welded or forged into a square section...... am I correct..... ? On the rear rod what are the dimension/length of the rod when it leaves the flat stock to the square section..... A very primitive design..... that could not have been very effective in pouring rain or blowing Canadian Winter....... it is no wonder that all pictures of trucks on manoeuvres or in action rarely shows the side curtain windows in place...... Pictures tomorrow. Thanks for the priceless pictures David. Bob
__________________
Bob Carriere....B.T.B C15a Cab 11 Hammond, Ontario Canada Last edited by Bob Carriere; 29-04-12 at 04:52.
|
|
#373
29-04-12, 04:58
|
|||
|
|||
|
It seems to be the rear rod that is offset with snaps and canvas that wraps around the vertical pillar of the roof with snaps attaching to the wooden frame work.... almost acting as a canvas hinge.
The front rod is angled but other wise has no offset..... I will get it right eventually. Bob
__________________
Bob Carriere....B.T.B C15a Cab 11 Hammond, Ontario Canada
|
|
#374
30-04-12, 00:34
|
|||
|
|||
|
Hi David
Bob is correct your photos add to the knowledge base of the early side curtains. There are some photos of trucks with them in use but most don't. 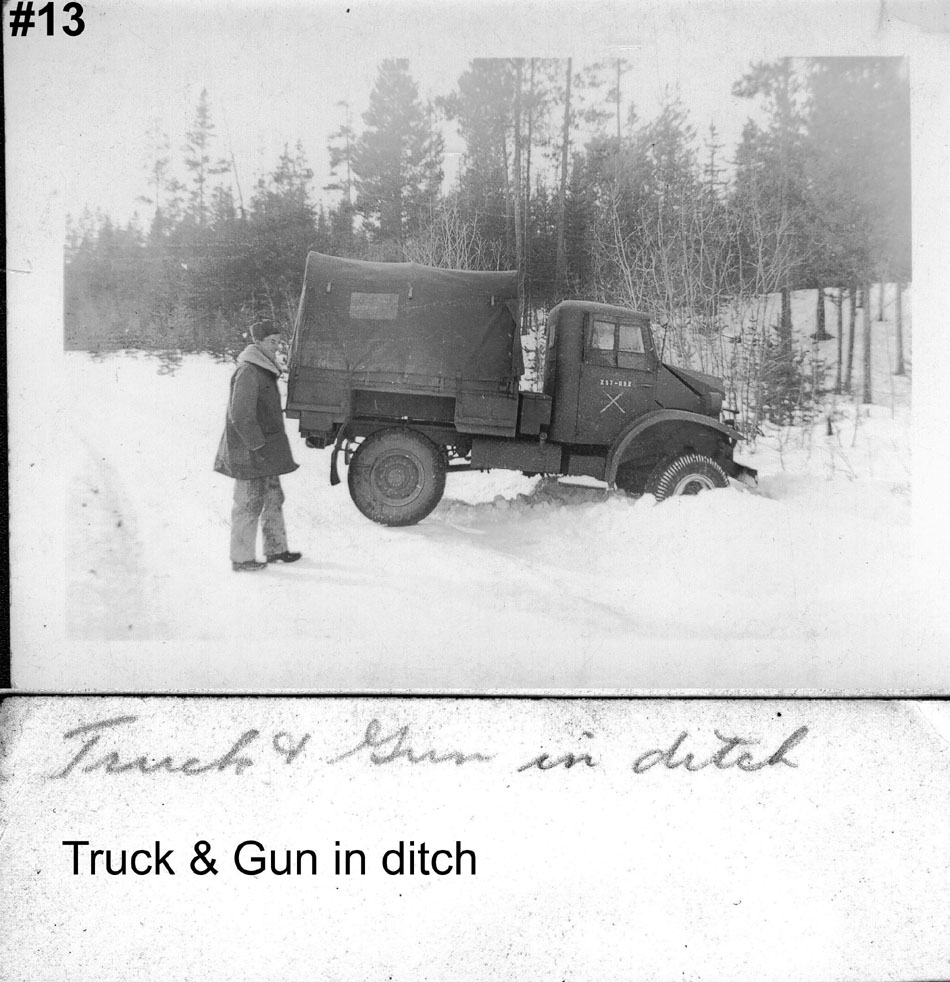 The picture above is from a batch of snaps taken in British Columbia from the pictures is must have been cold because most of them show the side curtains installed on all the trucks. http://canadianmilitarypattern.com/C...20Columbia.htm Driving these trucks with the side curtains in is claustrophobic and greatly decrease the visibility. Now the next question who is going to be first to reproduce the side curtains and take their Pat 11 or 12 out for a spin at -30C? Cheers Phil
__________________
Phil Waterman `41 C60L Pattern 12 `42 C60S Radio Pattern 13 `45 HUP http://canadianmilitarypattern.com/ New e-mail Philip@canadianmilitarypattern.com
|
|
#375
30-04-12, 00:52
|
||||
|
||||
|
Just to remind you, here's a link to an older thread on the subject: Canvas Side Curtain Frame.
HTH, Hanno
__________________
Regards, Hanno --------------------------
|
|
#376
30-04-12, 03:11
|
|||
|
|||
|
Bob - you are right - no offset at the front , just a change in angle. There is an offset at the rear. Not sure why it has to be that way but it seems to work. I'll get dimensions of the flat bar tomorrow but yes, welded to the "spike" which is forged to square (blacksmith-like) not another weld job.
The top bar is round and here is where my example seems very crude; the top bar has holes near the ends matching holes in the vertical struts - they are bolted together with small brass nuts and bolts. Also the top bar has no open slot for it in the canvas - just pushed through ragged holes! Not sure if this is not just a civvy lash up done by post war owner? That round rod system shown in the earlier thread looks much more professional. However, if other people have frames that look like mine, must be a factory job? My screen has poppers along the bottom and up the back on a canvas "hinge". I'll need to check the top but I dont think so as the door couldnt open then. Was there perhaps a top shield strip like the one that goes down the windshield side? I think I recall seeing the remains of such a piece when I got my truck. There are poppers along the top wood I think - again need to check tomorrow- and that extra piece would then make sense.
|
|
#377
30-04-12, 03:18
|
|||
|
|||
|
Guys
Just going back to my truck as-received with the original screen in place. Clearly not attached at the top but no extra weather shield either.
|
|
#378
30-04-12, 03:28
|
|||
|
|||
|
I now see why they have the offset in the rear frame rod - it is so that the rear canvas "hinge" can be attached to the woodwork inside the plane of the door skin so to speak whereas the front frame is actually at the location of the door outer skin. Thus the screen has to "come in at the back a bit" to put it in technical terms! Hope you can see what I mean!
This whole academic discussion must be equivalent to rivet counting amongst modelers! And this is a Chevy thread! But presumably Ford and Chev Cab 11/12's all had the same screen system?......Uh -oh!...that may start another whole new discussion!
|
|
#379
30-04-12, 09:25
|
||||
|
||||
|
Linking that thread has shed new light on the subject
Bob, Phil and David your thoughts??? For what its worth I think the rods set up that Maurice took some snaps of in that thread that Hanno has shown appears to be original set up. When I pulled apart the old set up on my truck it only had press studs running down the B-pillar timber... not across the top.
__________________
Pax Vobiscum.......may you eat three meals a day & have regular bowel movements.
|
|
#380
01-05-12, 04:12
|
|||
|
|||
|
Thanks Hanno for the link to the old thread...... must be getting old as I could not remember them.....Priceless.
Obviously there are at least two similar but different side curtains..... mine have no provision for a top rod but have the 3 bottom "clinch" fastener that fits into the "hat" tabs inserted in the door. And yes there is a seal installed at the underside of the roof top held in place by domed fastener...snaps !!! simply a piece of rubber hose sewn in canvas. There are NO snaps at the top of the curtain....... the factory picture shows a separate piece of canvas seal installed with snaps.... I have a set and will get pictures and dimensions. We're getting there. Now which model came first ......the round tubes with a top brace for more rigidity was probably an improvement over the flat steel bars with no top support. Now let go to my pictures.... One window is completely frosted...... the plastic is flaking off and very brittle ....so brittle one cracked.... almost like a sheet of glass. Compare to the good one which are stiff but very clear. I will no doubt follow Maurice's idea and carefully unstich and replace with a modern vinyl and hand sew back together using a leather awl and trying to use the same sewing holes. The last one is the corner section ...... it has NO provision for a top rod... you can also see the canvass puckered by the shrinking canvas..... remember this is early war time plastic..... not meant to last 65 years. More to follow.. Bob
__________________
Bob Carriere....B.T.B C15a Cab 11 Hammond, Ontario Canada Last edited by Bob Carriere; 01-05-12 at 04:41.
|
|
#381
01-05-12, 04:37
|
|||
|
|||
|
I inserted a 3/4 by 3/16flat steel rod...... almost 14 inches long....same dimension on each front and rear pocket.... but as pointed out by David the rear as a jog in it to allow for the rear offset. When I make them I will heavily sand the square edges of the flat stock to minimize wear.
I would imagine that with the rear of the canvas snapped in place above the hinges...... fairly stiff canvas.... and two vertical rod is would have held in place .... more or less...... but even with the front canvas seal fastened to the windshield vertical post.... it must have had a tendency to open up when moving forward at speed....... what speed he says...!!! If I had my choice I would totally reproduce the curtains and save the originals. But I find two stumbling blocks so far... one is the steel rivets used in stress points.... the other is the "clinch" button ( correction they are called "cinch" )which I could not source for installation in fabric.... at least not yet. The sewing is very crude and even I could do better.... again wartime rush and I suspect the curtains were probably almost disposable... in the parts manual they are listed separately as brown, green, tan, stone, colours and as a kit no rods listed separately. Now for pictures. Interesting discussion.... sure sidetracked David's origianl posting. For David Moore....... can you take a picture of the top corners of your side curtains to see how you top rod is attached.... trying to compare with what Maurice posted..... Bob
__________________
Bob Carriere....B.T.B C15a Cab 11 Hammond, Ontario Canada
|
|
#382
01-05-12, 16:26
|
|||
|
|||
|
Bob - you are correct that there was a canvas seal of sorts attached to the five studs at the top of the cab woodwork above the door. Picture attached of the one surviving in my truck. It is a simple canvas flattened "tube - stitching as shown - overall width 1 and 5/8 inches. No rubber reinforcement in mine. The studs were at about 1/3 of the width leaving the outer 2/3 to droop down and effect the "seal".
|
|
#383
06-05-12, 23:46
|
|||
|
|||
|
Wow, that's a lot of great information on the side curtains! Sure answers a lot of questions I was eventually going to ask...
Getting ready to tackle my wooden roof structure, and had a question: I have two 90-degree angle brackets in the rear upper corners of the window openings, but no brackets in the front where the windshield header wood and upper window opening wood join. Am I missing some brackets, or were they ever there? My roof panel is in bad shape, but still very glad to have it! You can imagine from the photo how bad my original back cab panel was bent to also warp the lower angle iron on the roof. I have only one of the original rear window mouldings so I will use it on the outside. Made an inner one out of 16 gauge sheetmetal that will work, but only gives me about 3/16" gap for a rear window. That's OK as I have some 3/16" Lexan sheet here that will work if I don't use a window gasket. Thanks, David Last edited by David DeWeese; 08-05-12 at 14:15.
|
|
#384
07-05-12, 01:18
|
|||
|
|||
|
My door latches were completely worn out,(no big surprise), and in need of a major overhaul. You could turn the door handles almost 45-degrees before any resistance was felt, so...
Dissasembled the passenger-side latch to reveal a list of problems to repair, but the worst being the square hole where the door handle shaft installs. It has a brass insert that now looked more like a clover leaf than square. Faced with brazing the hole closed, drilling it out, then spending hours with a tiny file to make it square again, here's what a desperate mind came up with... Put one thin layer of masking tape on the square shaft of a door handle, then filled the area to be repaired on the brass insert with a very strong structural epoxy. While the epoxy was still in a semi-liquid state, I installed the piece on the shaft. A few hours later, was able to remove the piece before the epoxy fully cured. After repairing all the other damage to the latch, it seems to work OK. Now on to the the driver's side latch. I's the really bad one!  Thanks, David Last edited by David DeWeese; 07-05-12 at 02:00.
|
|
#385
07-05-12, 02:26
|
|||
|
|||
|
Bob
Here is a picture of how the top cross bar is attached on my original - very crude and home-made I suspect. But I have now worked it all out! Up until at least Nov. 1941 (date of my truck) the side curtains just had the two vertical bar supports. The side pockets were stitched closed at the top and there was no cross pocket at the top. (In mine the side pockets have been cut open and the top bar is wired through the canvas to keep it in place.) The angle of the front bar would be such as to keep the curtain stretched -but still a poor seal and rain/dust would get in. To correct this for replacement curtains (production of the cab 12 had stopped by then I assume) they put in a top pocket and opened the side pockets at the top end - and used the three piece rod and socket frame as per the earlier thread. Better - but still pretty well useless I guess - and you cant see a d*** thing anyway even with clear vinyl! Their only use is to keep some of the rain out when the vehicle is parked! Picture shows my original plus top end of NOS "new" canvas - see sewn up tops to side pockets in both. The studs or "poppers" are 11/16 OD by the way. Picture next reply shows.
|
|
#386
07-05-12, 02:29
|
|||
|
|||
|
Here is the inner view - still dont know how to attach several pictures at once - Help!
|
|
#387
07-05-12, 02:31
|
|||
|
|||
|
The outer view
|
|
#388
09-05-12, 02:45
|
|||
|
|||
|
Thanks David for the curtain pictures.
I believe you are correct when you say the top rod came later after some officer got wet in the rain........ the cab 12 curtains were probably improved or at least they tried to. With a side window made of two sliding steel panel and side curtains made of canvas and plexiglass I always assumed that their intention was to save the crew from the unavoidable glass shrapnel if more than the windshield glass was used. Side tempered safety glass was only beginning to appear on the North American auto scene in the late 30s.... on the other hand laminated windshield glass.... as long as it was flat glass.... had been available for a while...in fact the remaining glass in my cab 11 had the distinctive Canadian "Duplate" trade mark and where made in Oshawa. Now to the other David.....De Weese that is..... Yes your roof door opening has only steel corner brackets at the rear corner.... the front has an overlapping joint....very weak and would soon work loose. I will attempt to install a second flat steel angle on the side of the wood facing the cab sheet metal so it will not be visible from the inside....also use strong modern Gorilla water proof glue and dowel front the two overlapping joints using 5/16 hard wood dowels. I will take pictures of my existing wood frame work and post for you. Typically they would be made of white ash...... careful A-S-H ...... very popular with coachbuilders of the time. Have you considered using a 1/4 thick trailer hitch 2x2 section and large clampsssss to try to straighten out the back bow in the cab angle iron.... maybe with some heat or cut narrow 1/16 knerf in the angle and remigweld the cracks when it is straighter...? Hang in there.... you are an inspiration to our perspiration.... Bob C
__________________
Bob Carriere....B.T.B C15a Cab 11 Hammond, Ontario Canada
|
|
#389
10-05-12, 11:30
|
||||
|
||||
|
Quote:
Hopefully these pictures will help - these are ones I had made as exact copies off the original timber frames from my truck. I was lucky that one end off each of them was in good nick. To answer your question - yes those corner brackets are original and I'd even say the bolts are too from the look of them. I was able to re use all mine but my truck spent nearly all its life in inland down under. Press studs look original too (what you guys call snaps). There were no front brackets, the two timbers join together using bolts and I suggest the very widest washers you can get in there. To spread twisting forces over the timber and avoid them splitting. I havent had any trouble yet and I have done some miles in mine since the resto. Anyway.... some pictures
__________________
Pax Vobiscum.......may you eat three meals a day & have regular bowel movements.
|
|
#390
11-05-12, 03:40
|
|||
|
|||
|
Thanks Bob and Tony for the information and photos!
I can see now why the front wood structure on these trucks failed. I will make some brackets on the corners in that location that goes above the wood so it can't be seen... Tony, what method did you use to make the channel for the angle iron in the front wood piece? It looks to be about 1/8" deep. I studied the bend in my rear roof panel today, and think I came up with an easy solution to repair it. We'll see this weekend... Thanks again! David
|
 |
|
|


 Linear Mode

