|
#1
 18-08-12, 03:48
|
|||
|
|||
|
I have attached here pdf's of drawings and fabrication notes I have made for a Ford CMP type 13 cab battery holder.
These started through posts in the Sergeant's Mess Forum where I originally started my first posting on MLU but I think the Restoration forum is the more approprate place for them now. Cannot add any more files here on this post but there are various photos of holders in my thread in the Sergeant's Mess. I just found how to compress them in pdf format to make them larger for viewing and printing than the 700 pixel width limit for jpeg files so it is another good reason to re-post them here. Thanks again to Ian Fawbert, Tony Baker, and Tony Wheeler for their generous help. Hope they are of good use to all Ford CMP truck restorers. Brgds,
__________________
F15-A 1942 Battery Staff Jacques Reed 
|
|
#2
18-08-12, 11:11
|
||||
|
||||
|
Good on ya Jacques!!!!
 You are more thorough than I am mate, and very talented with the CAD software as well by the look of the plans.  Your truck is going to be a cracker of a restoration. 
__________________
Ford CMP, 115" WB,1942 (Under Restoration...still) Medium sized, half fake, artillery piece project. (The 1/4 Pounder)
|
|
#3
19-08-12, 01:56
|
|||
|
|||
|
Thanks Tony,
It was a good Melbourne winter project when it is too cold and wet to be in the shed. Not exactly Queensland weather! I therefore could afford to put a bit of time into it. I have attached a few more close up photos of an original holder, corner bend, stud plate, and lower retainer plate attachment to help those who may fabricate one from scratch. I could not attach them with the plans due to exceeding uploads. Many thanks again for your help in getting the ball rolling for me on making one of the parts I have been seeking for a long time. Cheers,
__________________
F15-A 1942 Battery Staff Jacques Reed
|
|
#4
22-08-12, 10:03
|
|||
|
|||
|
Have found a great metal fabricator in Cranbourne who is also a car restorer so he knows all about getting things right. Was going to try to bend up my holder myself but he has all the good stuff, pan brakes, folder etc. so he is just waiting for me to mark out the pattern on some sheet steel before he folds it for me. He is reasonable too, so I figure why risk a home made job.
As the battery holder is well under way, my next sheetmetal project is the small toolboxes that fit behind the rear wheels under the GS Body of my F-15A. What I seek is info on the lids. I have two very banged up boxes and despite the attached photo which makes them look OK, I think making new ones would be a better option than "panel beating" the old ones. Both are missing the lids so I have no idea what they should look like. I can see a remnant of a piano hinge spot welded to the box on both so that is a start. I am sure it is a pretty basic design but if anyone out there can supply dimensions, sketches, or a photo of an original lid it would be gratefully appreciated. Have drawn up these boxes also so if anyone is interested I will post them once I get the lid drawing correct. They are a very basic design. FYI: the box shown has been stripped of all rust with the good old molasses and water trick. I see some posts on rust removal using some exotic chemicals but this old method works just as well if you have a bit of time. Brgds,
__________________
F15-A 1942 Battery Staff Jacques Reed
|
|
#5
22-08-12, 10:58
|
|||
|
|||
|
while making the boxes its worth while making an inner tray, so that when you want to put tire chains in there they are already contained in the tray, don,t fall out when you open the door.
__________________
macca C15 C15A
|
|
#6
22-08-12, 12:46
|
||||
|
||||
|
They are a plain door with folded edges - here are a couple of angles on factory fresh vehicles:
Side view: 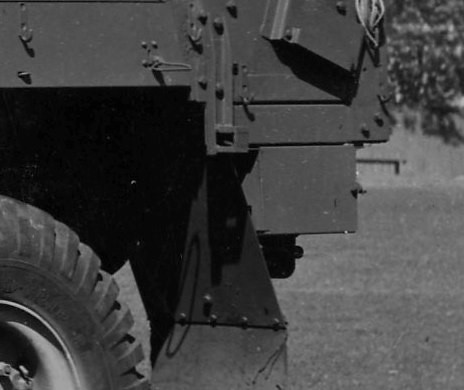 Rear view: 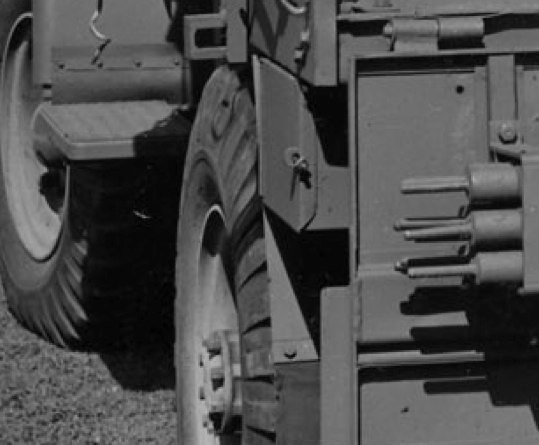 Hope this helps Jacques.
__________________
Film maker 42 FGT No8 (Aust) remains 42 FGT No9 (Aust) 42 F15 Keith Webb Macleod, Victoria Australia Also Canadian Military Pattern Vehicles group on Facebook https://www.facebook.com/groups/canadianmilitarypattern
|
|
#7
23-08-12, 00:52
|
|||
|
|||
|
Hi Bob and Keith,
Thanks for your info Bob. Thought they probably were for tire chains. Haven't got any chains yet but a low priority. One of those nice to have-but items. Thanks again Keith for your help. I thought they would be very basic and the angled edge at the padlock end is good to know. Did not want to take too much "artistic license" with the design. Brgds,
__________________
F15-A 1942 Battery Staff Jacques Reed
|
|
#8
31-08-12, 07:20
|
|||
|
|||
|
Well, after a false start I am ready to finally get the holder folded up for me.
Learnt a few things along the way about sheetmetal work too. I had the fabricator fold up the front retainer bar first to check bend deductions before I cut out the main sheetmetal for the holder. Glad I did, as the deduction worked out to a generous 3/16" (5 mm) using his equipment. I was therefore able to adjust the pattern before cutting. As shown in the photo of the front bar the bottom leg "grew" by 3/16" by keeping the front leg exactly 1" high. The original piece of steel was 1-5/8" wide (moulded width) before folding. When I got back to the fabricator he suggested I use galvanized steel which was 0.049" thick, only 0.002" less than the original. Wish he had suggested it to me before I got the black steel front piece from him. Also experimented with sheet metal drilling before I drill the holes in the holder. As you all may know, when drilling sheetmetal it notoriously creates triangular holes even when done on a drill press with a sharp jobbers bit and clamped tightly as I confirmed. So a bit more reading and off to the local industrial supply house for a 17/64" stub drill, not the kind of item you get at the local Bunnings Warehouse (Home Depot for our North American friends). So a bit more practice on steel offcuts with the new drill bit and maybe a pilot hole before I commit to the important holes. Stay tuned. Brgds
__________________
F15-A 1942 Battery Staff Jacques Reed
|
|
#9
31-08-12, 22:29
|
|||
|
|||
|
Use a tapered sheet metal drill, the ones that look like a christmas tree.
Didn't know that until my son taught the old dog a new trick just a little while ago. 
|
|
#10
31-08-12, 22:50
|
|||
|
|||
|
Thanks for that tip. Looked at step drills or "Unibits". Will go that route if my stub drill bit does not do the job properly. The stub drill was only $2.60, the step drills I priced were in the $40 mark.
It looks like step drills only drill in 1/32nd increments also. Not a major problem though that a round file could not fix. Brgds,
__________________
F15-A 1942 Battery Staff Jacques Reed
|
|
#11
01-09-12, 03:12
|
|||
|
|||
|
As the shed was not a refrigerator today I decided to do a few test drills on an offcut of sheet steel to see how different combinations of drill bits work.
Thought I would post these photos which may be of interest. All holes were made with the sheet metal clamped to the drill press table with a piece of hardwood backing it up. As per the photos, the jobbers drill in the drill press makes a triangular hole. The combination of using a No. 30 panel drill as a pilot with the stub drill makes the best hole. Using the stub drill alone makes a reasonable hole but not as good as with a pilot hole. If you are only going to put a rivet or screw in a hole then this is overkill but if you have occasion to have a visible hole in a panel this method will ensure the hole is round and on tolerance. It works out cheaper than a big outlay for something that you may only use once. I am sure there are many other ways to "skin a cat" but I believe this will work for me. Brgds,
__________________
F15-A 1942 Battery Staff Jacques Reed
|
|
#12
07-09-12, 07:37
|
|||
|
|||
|
Sometimes it pays to procrastinate:
As the guy who was going to fold up my battery holder was away last week I started thinking how was I going to drill the 12 holes for the stud plates accurately? I had originally thought I would drill them after folding the steel but it really makes no difference in what order they were done. Marking out is one thing, and then there is getting the centre punch right on target, and then there is getting the piece right under the drill point on the drill press. Lots of variables. Removed one variable- bought an $8 automatic centre punch. Best $8 I ever spent for the shop. Beats a hand centre punch anyday- and saves fingers! Marking out- to avoid errors working with small distances (3/4"), and laying out 12 of them I had an idea. I layed out the position of the holes on a sheet of paper but at double the scale. Now they were 1-1/2" apart. Ditto for the position from the bottom mould line. I then used my copier and reduced the copy to 50% and checked the distances- all were spot on. Thanks Canon. Glued the copy to the sheetmetal, centre punched the holes, drilled pilot hole, then final hole. Checked holes afterwards and I would say all are within position by less than 0.010". It should avoid having to elongate holes to fit if I ever find original stud plates to rivet to it. Note the other handy hint I use for centering a drill at the punch mark. I use a small Dremel engraving burr to position the chuck at the punch mark. I then remove it and replace it with the drill bit(s). Lot easier for these tired 63 year old eyes! Regards,
__________________
F15-A 1942 Battery Staff Jacques Reed
|
|
#13
15-09-12, 03:10
|
|||
|
|||
|
Here is the almost finished holder. Just got it back from the fabricator.
Next step is getting the hold down studs for it. Have spoken with a blacksmith who thinks he can rough out two for me for a reasonable cost and I will thread, grind and file them to shape. Once I meet him this week and show him an example I will have a better feel for his idea of "reasonable cost". If too expensive, I will just fabricate them from a bolt minus its head welded to a plate. he is a decorative iron blacksmith so I hope his prices aren't to decorated. The other option is I might find a scrapped holder to salvage the studs from, but after 20 years of looking for one I don't like my chances. Can anyone help me out? Brgds,
__________________
F15-A 1942 Battery Staff Jacques Reed
|
|
#14
17-09-12, 11:13
|
||||
|
||||
|
Jacques,
What timeframe are you needing for the sourcing of battery box bolts? I know a fellow who may be able to provide a pair, but I need to go & look for them. I wouldn't be able to go there for another 2 weeks. The above photo shows my step assembly & battery tray, which came from the same place. I had literally tripped over it while searching for another part. It cost me $10 from memory. I'm happy to go see this fellow and look for you. It's been a while since I last saw him, so it's an averdue visit anyway  Not sure if I had posted this photo. Just in case.
__________________
Ford CMP, 115" WB,1942 (Under Restoration...still) Medium sized, half fake, artillery piece project. (The 1/4 Pounder)
|
|
#15
17-09-12, 22:35
|
|||
|
|||
|
Hi Tony,
That would be great if you could find a set for me. I'm in no hurry so any time is OK. One thing I have learnt over the years with the restoration is patience. Good luck with the hunt for me. Brgds, Jacques
__________________
F15-A 1942 Battery Staff Jacques Reed
|
 |
|
|
 Similar Threads
|
||||
| Thread | Thread Starter | Forum | Replies | Last Post |
| Reference: CMP tool box and spare tire holder plans | George McKenzie | The Restoration Forum | 37 | 25-12-22 14:30 |
| Ford cab 13 battery box | Keith Webb | The Restoration Forum | 16 | 27-09-09 15:34 |
| Reference: Plans How to build a tool box for a CMP truck | S. Dafoe | The Restoration Forum | 152 | 06-07-09 00:54 |
| FORD BLITZ Plans Wanted | Plushy | The Softskin Forum | 4 | 01-05-07 14:05 |
| Ford V8 battery.... | Roland Koster | The Softskin Forum | 16 | 26-06-06 19:31 |


 Linear Mode

