
 |
|
#1
|
|||
|
|||
|
I went to another local museum (Elkhorn Automobile Museum) today to pick up a vehicle they de-accessioned and transferred to our museum. It is a 1912 Canadian military ambulance which has been in storage since 1949. Where some could see a forlorn looking vehicle, I only see a gem. The spokes of the wheels are all solid, the lamps are all there, and most if not all the rear military woodwork is still there including two of the three bows still in place and the third in the back of the ambulance.
The engine is reported as siezed, so that may well be the biggest challenge, we'll see. Tomorrow I'll start cleaning out the back and see what all is in there. I am pretty sure I saw the original tarpaulin hiding in the back. The original rad and folding hood are all present, as is the front windshield frame and the top bows. Enough talking, here are some photos. Last edited by rob love; 11-08-15 at 05:45. |
|
#2
|
|||
|
|||
|
Pretty much all the srufaces and boxes have either khaki or hints of khaki paint on them. At some point it was repainted yellow although most of that has flaked off now. There is lettering on the sides which I hoped would reveal some of it's military history, however it turns out it reads "Osbourne Garage phone 2330" or something similar.
Apologies for the dark photos, we just got it to the shop an hour ago, and as it was the end of the day did not turn on the lights. Hopefully we can find some photos of similar ambulances in Canadian service, unless this one was a "one off". |
|
#3
|
|||
|
|||
|
Quote:
You might find that some wealthy person or organization donated their car to the cause and that it was converted to the ambulance you see today. There are quite a few recorded that way in England and many were on Rolls-Royce Silver Ghost chassis as like the Cadillac, the long chassis length was needed to enable stretchers to be fitted behind the front seat. I will watch with interest. Regards Rick
__________________
1916 Albion A10 1942 White Scoutcar 1940 Chev Staff Car 1940 F30S Cab11 1940 Chev WA LRDG "Te Hai" 1941 F60L Cab12 1943 Ford Lynx 1942 Bren Gun Carrier VR no.2250 Humber FV1601A Saracen Mk1(?) 25pdr. 1940 Weir No.266 25pdr. Australian Short No.185 (?) KVE Member. |
|
#4
|
|||
|
|||
|
I just had another look at the photos of this fantastic WWI relic and I wonder if it is in fact not an ambulance but a general service utility. It looks to be a bit short for stretchers and the rear access is limited for the stretchers as well.
There were many Dodge vehicles fitted with a similar body used by the USA forces during WWI. An interesting conundrum. Regards Rick
__________________
1916 Albion A10 1942 White Scoutcar 1940 Chev Staff Car 1940 F30S Cab11 1940 Chev WA LRDG "Te Hai" 1941 F60L Cab12 1943 Ford Lynx 1942 Bren Gun Carrier VR no.2250 Humber FV1601A Saracen Mk1(?) 25pdr. 1940 Weir No.266 25pdr. Australian Short No.185 (?) KVE Member. |
|
#5
|
|||
|
|||
|
The plan will be to bring it to the level of running restoration. Things like the wooden firewall are too far gone to be saves, but 90% of the woodwork in the back just needs some of the extra nails etc removed and some fresh paint. Luckily the two tire sizes are both available, so hopefully it will be rolling within a few weeks. Engine work will come later.
I have heard tale of that one of the small towns bought their unit an ambulance. The signage that was with this vehicle mentioned it was used at camp Hughes, which is just next to Shilo. What the real story is will hopefully come out at some point. |
|
#6
|
|||
|
|||
|
Rob.
A quick look on the web tonight suggests that most ambulance markings on WW1 equipment with canvas tops, were, in fact, on the canvas, so if the original top is still with the vehicle, it may have some answers for you. Nice find! David |
|
#7
|
|||
|
|||
|
I missed Rick's earlier post where he mentioned it could be an early GS. I have to admit the thought crossed through my mind as well when I looked at that narrow rear entrance. Hopefully the tarpaulin will tell me more. Pretty much all the Cdn ambs that I could find photos of had solid bodies, and not hoops and canvas.
Either way I have to admit I am quite excited by the prospect of working on this one. The state of preservation on the wood is remarkable. |
|
#8
|
||||
|
||||
|
Rob,
That truck looks better than I thought it was looking at it in Elkhorn.Shouldn't be difficult to restore with it fairly complete especially if you can save the rims & spokes for the wheels.Wish I was closer to help you with it but have to concentrate on the wedding that's coming up soon! Derk
__________________
1942 Ford universal carrier Mk 1 1943 Ford 60 cwt long CMP ambulance 1943 Ford GPW 1/4 ton stretcher jeep 1943 Bantam T-3 1/4 ton trailer BSA folding airborne bicycle ser#R5325 (early) |
|
#9
|
|||
|
|||
|
I spent the morning cleaning through the treasures and rubbish that had collecCted in the back of the truck. There were a few pleasant surprises.
I can confirm it is a 1912 Cadillac by the serial number. I also found the electric starter in the back. These were supposedly the first autos with an electric starter, which actually startes the engine through the timing gears rather than the flywheel. It also uses a 6 volt system, but by changing the batteries circuitry for start up, provides 24 volts to the starter. While that starter is there, someone has converted it to a more conventional 5 volt starter (still through the timing gears however). The bulk of the woodwork is there for the canopy over the driver. The bulk of the military canvas is also there. No signs of red crosses anywhere, nor any signs that a stretcher would fit into the truck. Amazingly, the canvas for the front still included the plastic (?) windows in remarkable shape for a 103 year old vehicle. I had to leave the job to finish up a carb rebuild on the lynx, but tomorrow I'll vacuum out the dirt and dust, place back into it what belongs to her, and she will have to wait her turn for work. There are one or two other projects that have to be done first. Quote:
|
|
#10
|
|||
|
|||
|
Just a thought, Rob, but it might be worth having a good look at that truck in the dark with an ultraviolet lamp. It would enhance any different paints and might just make any old markings more visible. You have a good sample to work with in the garage stencil, so you could see how well that paint gets highlighted and then check the other areas of the bodywork for anything else that might show up.
David |
|
#11
|
|||
|
|||
|
I was already at it with some various lights today. Nothing new to report. There were a couple of anomalies, but nothing enough to be definite.
|
|
#12
|
|||
|
|||
|
Rob.
With the current flow of 100th Anniversaries relating to the First World War, it might be worth the museum contacting the Brandon Sun to tell them of this find. Two possibilities: any news article might get you leads on the vehicle, and, perhaps their archives have information about it, it it was a local donation during the war. David |
|
#13
|
||||
|
||||
|
Rob, that would have to be privilege to work on such a vehicle and what a great piece of history. 103 years old and quite complete, Wow, just Wow!!
Good luck with the Caddy and I will be watching with interest. Colin. |
|
#14
|
|||
|
|||
|
Colin, there are a great many vehicles at the museum that I consider it a privilege to work on. There are a lot more 1912 Cadillacs out there than say vehicles like the Lynx scout car or the C15TA. But when you talk about a 1912 military ambulance, that would have to be pretty rare.
Had the director in today looking it over. Got approval for fresh rubber for now. Tubes, tires and flaps are going to run about 2K by my estimate. Thankfully the tires are still in production. The harder part is going to come in trying to decide on what do you keep as is, and what do you repair or replace. Overall, I think most of the wood is going to be repaired and preserved. Some of it is a little soft, but complete. For now I'll complete the cleanup. Plenty of mouse droppings and dust to clean out of the box and cab. I'll get the tires done in the next month so that it can be moved, and let the dust settle. I have enough of the tarpaulin to reproduce it quite faithfully, although there are still things to figure out between the end curtains and the cab canopy. We got the signage from the Elkhorn museum where we got the truck. It has a little history on the initial find and recovery of the truck from Winnipeg some 75 years back. Notable is that they call it an ambulance or troop carrier, so they may have realized the box is not long enough for a stretcher. |
|
#15
|
|||
|
|||
|
Rob,
What an exciting vehicle! The original starter is actually a starter-generator, while running it runs as a generator & is driven by the timing gear train, but for starting there is a shifting mechanism that engages a drive gear with the flywheel. The electrical system is amazingly complicated. Be careful in freeing the engine, even though it is a big robust car the castings are very thin & fragile. The transmission also is fragile & can break its case easily if something jams. I can supply a photocopy of the illustrated parts book & maybe the owner's manual for the 1912 Cadillac car if you need them. Jack |
|
#16
|
|||
|
|||
|
Jack
I may take you up on that offer at some point. David Dunlop aent me a PDF of some promotional literature for the 1912 Cadillac which also contained some parts listings for some of the electrical and mechanical. (Thanks Dave  ) I saw that about the starter doing both jobs. As I mentioned someone has replaced the starter/generator with a more conventional generator. A handcrank is on this vehicle and appears to be original including the khaki paint. It would be just like the army to order a cadillac and not have any of the options, although it was my understanding the electric starters were standard that year. ) I saw that about the starter doing both jobs. As I mentioned someone has replaced the starter/generator with a more conventional generator. A handcrank is on this vehicle and appears to be original including the khaki paint. It would be just like the army to order a cadillac and not have any of the options, although it was my understanding the electric starters were standard that year.Just finished vacuuming out the body and boxes, meanwhile saving every scrap of anything bigger than a fly. The tarpulin for the box is quite complete, despite being in many pieces. Thankfully someone had the foresight to leave it all in the box. The canopy for the operators area is 98% missing, and as well I am thinking it may be military as well. The winshield frame is wood, with a neat wooden headboard and a interior mirror the side of a deuce westcoast mirror. It is so heavy I thought it was a step of some kind at first. Tires, tubes and flaps were ordered from Summit racing today, and as I estimated came out to a ltitle over $2K. I don't have my camera at work today, or I woudl show some photos. Anyway, back to work........a civil servant must never rest. |
|
#17
|
|||
|
|||
|
What is the triangular thing resting against the driver's side front wheel?
Is the engine cover off, or missing? I cringed to see the ratchet tiedown on the old axles. I hope the ride didn't do any damage. What a tremendous find! And thanks to the local museum for treating it so well since 1949 too. The good people of Elkhorn must have sensed they had something precious even then. Is there a wagon-maker or wheelwright in the area? Those men know how to build bodies like this one. Species of wood, cut of lumber, seasoning and fasteners are all little details a CF-trained wrench bender won't necessarily know, or have the CFTO for ;-) . (Send me a DIN message. I have a Camp Hughes map sheet that your folks might appreciate.)
__________________
Terry Warner - 74-????? M151A2 - 70-08876 M38A1 - 53-71233 M100CDN trailer Beware! The Green Disease walks among us! |
|
#18
|
|||
|
|||
|
No idea what the triangular thing is.....I take a pretty crappy picture here in the shop. We have some kind of yellow lights which are terrible for photos.
Engine cover and radiator were off. I have them installed in their proper places now. They are Bear traps as opposed to ratchets. By pulling forward and backward and outward more so than downwards, you minimize the load on the wheels. End of the day, it has to be tied to be on the road. No damage occurred. A little moderation and balance can go a long way in life. The Elkhorn museum is quite a large collection of vehicles. It originated from a private colelction and became a town museum. I guess they sensed that if nobody had stepped forward to restore or repair it after 65 years, perhaps it could go somewhere that would. Trust me, we only opened up a tiny dent in their collection of vehicles. It is located right on the trans Canada highway and open during the summer, and I would reccomed it to anyone passing thru Elkhorn. We have a wheelwright not too far away, as well as some wagon makers in Saskatchwewan. Problem is a lot of this kind of work is a dieing art, and the few guys who still do it can be pretty swamped. This wrench bender does know a little about fasteners, and I'll start ordering some of those tomorrow. I'll have to check for depot stock first before I start ordering them commercially. I am itching to make the tarp for it, but I already have more than a few projects on the go now. Will do on the PM. |
|
#19
|
|||
|
|||
|
Interesting about the hand crank capability of this vehicle, Rob. Since the electric starter and the electric lighting system were brand new introductions in the 1912 model for Cadillac, it would be somewhat understandable for the military to be wary of the reliability of the new technology and want traditional hand crank starting capability as part of their purchase. The question would be if the hand crank was an "in stead of item" or an "in addition to" item on the vehicle.
Just looking at your photos again and suddenly realized the old girl is RHD. she's going to feel right at home with the CMP collection!  David |
|
#20
|
|||
|
|||
|
Yes, it is right hand drive. Looking at google images for 1912 Cadillac, it would seem the majority of them were. I don't know it the left hand drive version was an option or later conversions.
|
|
#21
|
|||
|
|||
|
All of the 4 cylinder Cadillacs were RHD. In 1915 they changed to LHD as standard & introduced the V8 engine.
On the starter, in 1912 Cadillac was the first to offer an electric starter as standard equipment . Most cars had provision for a hand crank up to WWII & some beyond. (Ladas came with a crank in the 1980s.) Early batteries were not very reliable. |
|
#22
|
||||
|
||||
|
Dear Rob,
As others have said before, both you and the museum have landed your respective feet, this vehicle just proves that. I admire restoration even though I am a more modern vehicle kind of guy. The tip about the ultraviolet light is inspired. I have a use for that myself Will enjoy following this thread. Robin |
|
#23
|
|||
|
|||
|
Jack: The hand crank on this truck is fixed in radiator support bracket. The khaki paint is quite solid on it, indicating it was there during service. The photos I see of the 1912 Cadillacs do not show the handcrank being there. Was the handcrank an option or perhaps a retrofit?
I have always found the older starting systems to be marginal at best, and could certainly understand the military maintaining the tried and true (and dangerous) hand crank. Had a closer look at the starter, and the casting has been broken off that would have held the pinion gear and shaft. A pulley was installed on the shaft, which would make one think the generator/starter had been converted to a straight belt driven generator on some other application. |
|
#24
|
|||
|
|||
|
Rob, The pre 1912 models had the crank permanently mounted but in 1912, I am sure to reinforce the image of self starting, the crank handle was kept in the tool box. But I agree with you in that the military likely had it permanently mounted in case of emergency. Looking for the loose handle in a combat situation would not be the best situation! There would always be husky men around to swing the crank if necessary.
If you can post a picture of the starter/generator I might have most of one in stock. 12, 13 & 14 all had different starters. If the original battery box is present, do not turn it over. The voltage regulator inside has an open topped container of mercury involved in its operation. |
|
#25
|
|||
|
|||
|
Jack
I am on leave for the next week, but will post more photos once I am back to work. I am certain I will be taxing your knowledge along the way. At some point the vehicle was converted to a conventional battery located in the tool box over the left running board. The tool box is a galvanised add on, likely from the mlitary conversion as it shows signs of khaki paint under the later coat of yellow. |
|
#26
|
|||
|
|||
|
I now have a camera at work. Due to the yellow lighting here, all photos will still have that tinge to them. CE told me that once we burn a few ballasts, they will change them all to LED.
Front right wheel is off. I have sandblasted the components, POR-15d and painted them....they are drying as we speak. I hand sanded the first wooden spoke and painted it to see how it works. The next one I will try simply cleaning the spoke with xylene and see how it looks painted, and perhaps save many hours of sanding. Anyway, a couple more shots to test posting them from the work computer. Well I guess I can't post them directly since there is some missing security token, so here they are off photobucket. 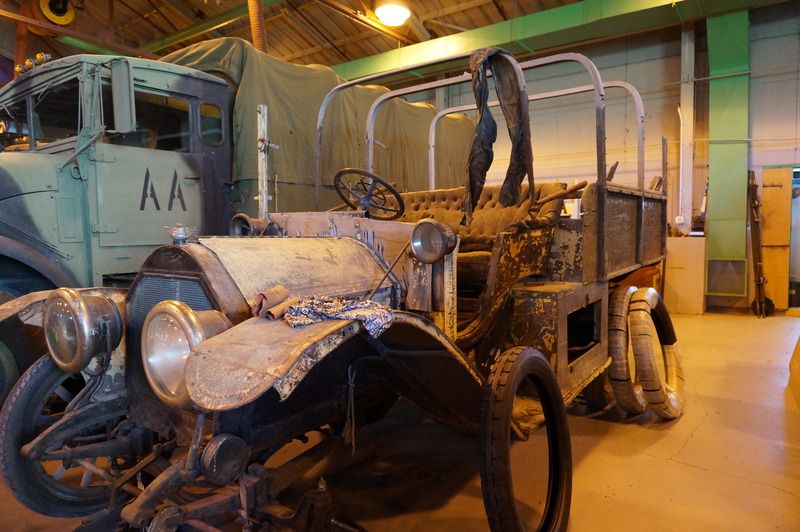 
|
|
#27
|
|||
|
|||
|
Got the first wheel done a couple days ago. Because the wooden spokes would not take well to the sandblasting, I totally disassembled it. Steel parts were blasted and POR-15'd followed by a coat of OD in a close match to the original paint. The spokes were sanded down and given several coats. Only had to replace one nut, otherwise everything else came apart OK and went back together fine. There was a little pitting on one roller of one bearing, but I was warned they were extremely expensive, so it will remain as is. The hub cap, being aluminum, was not sandblasted but rather soaked in some carb cleaner and the numerous chisel marks were smoothed out a bit.
Spent almost 3 days in total on one wheel. This is going to be a slow restoration. 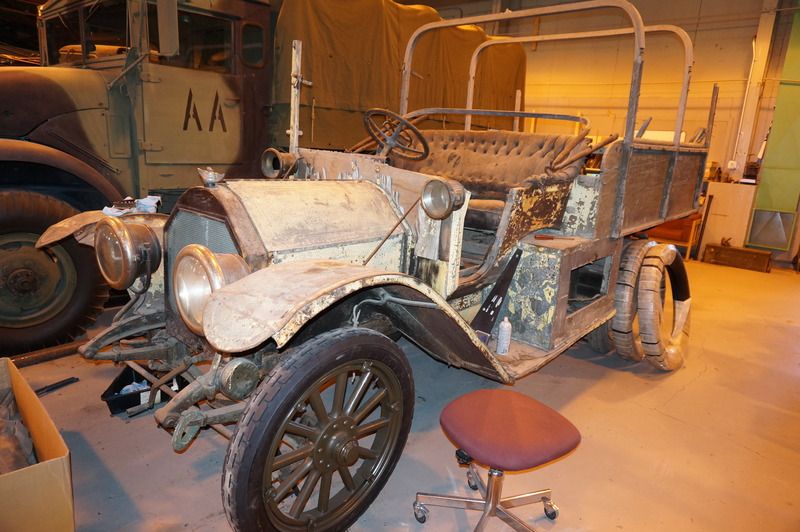 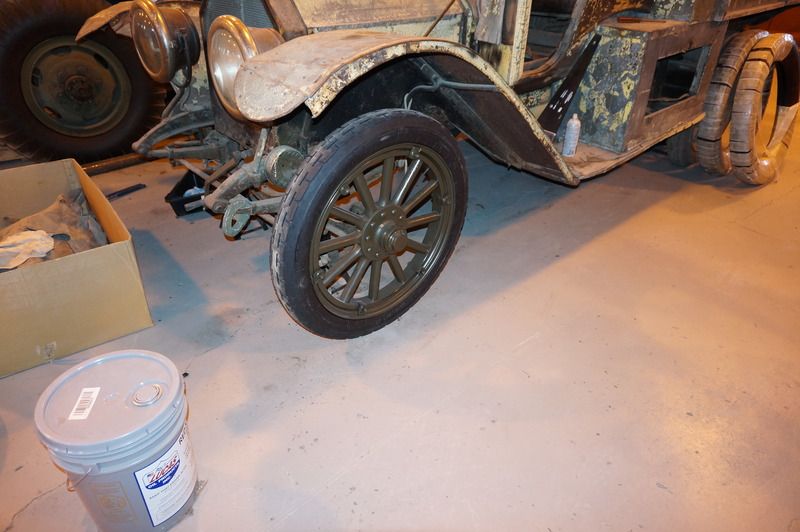 Also, here is a shot of the starter generator. Looks like someone converted it to be pulley driven at the starter end. 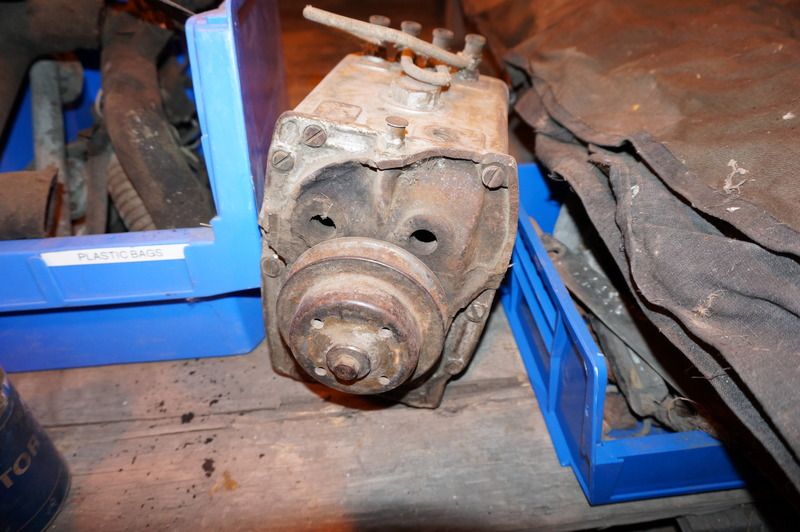 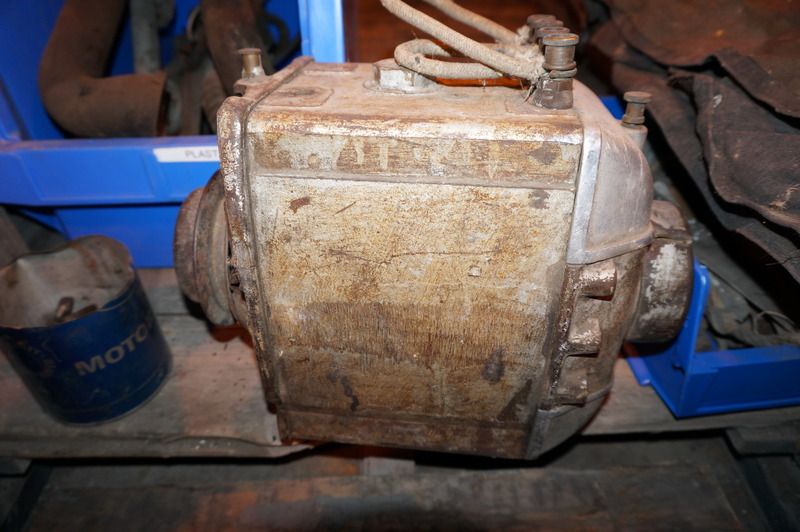
|
|
#28
|
||||
|
||||
|
Quote:
Thanks Hanno
__________________
Regards, Hanno -------------------------- |
|
#29
|
|||
|
|||
|
Hanno
I'll give it a try. Adited to add: Eureka....it worked. Thanks Hanno. Too often I seem to blame the government computer when it is just simple problems. While there are some extra layers of security involved with this computer, it does seem to be the simple thigns that cause the issues. Much like mechanics blaming the onboard computers for car problems these days. More often it is the simple things like spark plugs or connections. |
|
#30
|
|||
|
|||
|
Work is now underway on the Cadillac troop carrier. I am trying not to use the term ambulance as I found nothing on it to indicate that use.
Got the fourth tire together and installed the other day, so it can now roll on the floor. I moved it to a more active area of the shop so I could start working on the cargo box and tarpaulin. The vehicle is to be part of a WW1 display starting on 1 July, so there is no more time for procrastinating. The hope is that we can preserve the original wood, but it has had significant shrinkage (as George Castanza would say) and is now a full half inch less in width than needed to match up with the holes in the metal brackets behind. I removed the 3 bows and today managed to get the right side off the cargo box. We have put a call in to the CCI about the proper methods of preserving the wood. With the amount of material missing, there is going to end up being a choice between moving the holes in the wood to match the metal, or putting new holes in the metal. Personally, I don't like either choice, but lean towards moving the holes in the wood. The other alternatives are to try and add 1/2" onto the boards width, or else get new boards made. The good news is that I was able to remove all the nuts and bolts with no breakage. I did order a bunch of hardware from a place in the us called Blacksmith's bolt and rivet supply who have most of these fasteners available, including the square nuts in about 4 different styles. If I do run into stubborn nuts I can merely split them. Here are some photos of the present state. |
 |
| Thread Tools | |
| Display Modes | |
|
|
 Similar Threads
|
||||
| Thread | Thread Starter | Forum | Replies | Last Post |
| Prairie Command Shilo get-together 13-14 July 2013 | rob love | Military Shows & Events | 7 | 15-07-13 08:57 |
| RCA Shilo 2013 on parade | rob love | Military Shows & Events | 7 | 07-07-13 20:36 |
| Shilo RCA Museum on Parade | rob love | Military Shows & Events | 20 | 07-04-13 09:17 |
| Ferret in shilo? | Steamynachos | Post-war Military Vehicles | 0 | 17-06-11 02:52 |
| Prairie Command/Shilo outing | Rob Fast | Military Shows & Events | 4 | 20-12-03 09:21 |