![]() |
|
|
|
#1
|
||||
|
||||
|
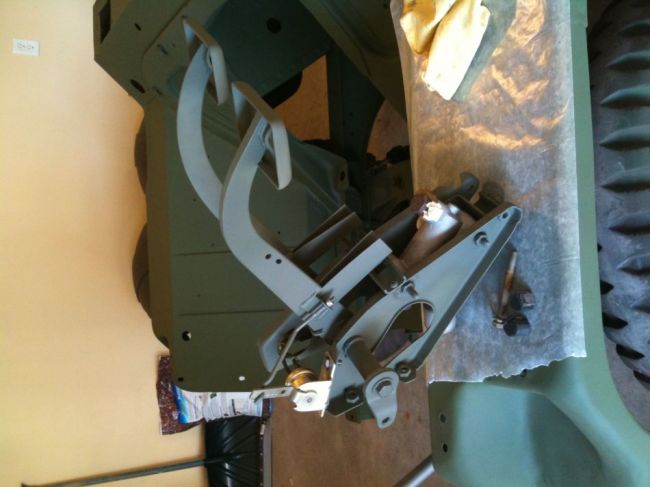
This portion of the resto is proving to be the time consuming part. I spent most of the morning reassembling the Master Cylinder and Pedal Assembly. I'm happy with how it turned out, and everything is cycling much smoother than before:
Fortunately, thats about the only "complex" item of equipment in the interior. The Heater will be next.... |
|
#2
|
||||
|
||||
|
Well, finally wrapped up the weekend.
Lots of time spent sandblasting and painting small parts. I'm sure i'm not the first one who has thought of this, but for blasting my fasteners I used a scrap piece of Fence Board and drilled holes in it for the bolts to drop in to. It may seem strange to go to this effort to save bolts, but I always read about guys and "F" script bolts etc on their GPWs. The AM General built M151A2s all have "D" scripted bolts throughout, so I figured, why not clean them up and reuse them. Time consuming yes, but i'm sure its quicker than trying to inventory all of the correct bolts, grades etc, and then gather them all up at Fastenal, plus save a ton of money in the process. None of these will be exposed to the element without paint, so i'm not too worried: Once I got all of my bolts done, I started installing items inside the dash. This is probably the hardest part of the assembly, and really, its still quite easy compared to a modern vehicle. I'm top coating most of the primed items with Krylon Camo spray bomb. It will all be painted again in 383 Green, but in case a spot gets missed, this will blend much better than Red Primer. The M Series wiring system is brilliant. I bought a NOS harness last year, so everything went together in a matter of minutes: Unfortunately, I can't go any further in the Engine Compartment until I get some Semi-Gloss OD paint. My main effort is to get everything above the "Frame" reinstalled, then move on to the Suspensions, Brakes etc. When its all together, it will get the final coat of 383 Green. I'll start working on the Powerpack while the painted Jeep is curing. |
|
#3
|
|||
|
|||
|
really nice work!
|
|
#4
|
||||
|
||||
|
Looking good, Scotty!
When reassembly time comes, consider hiring these guys - they will have it up and running for you in a matter of minutes ![]() Hanno
__________________
Regards, Hanno -------------------------- |
|
#5
|
||||
|
||||
|
Quote:
|
|
#6
|
||||
|
||||
|
Heater is in... Along with a few other small items.
Finally have a Speaker for the Dash. Thought i'd test fit it. Only the Steering Column, Gauge Panel, Washer Pump, and Choke/Throttle Cables left and the Dash portion is done..... I'm hoping to have the rest of the large parts (Hood, Windshield Frame, Gas Tank) back from the Painter late next week so I can get it back in for the final paint job mid August. The scrap Jeep is really coming in handy as I've officially borrowed some small parts from it now
|
|
#7
|
||||
|
||||
|
Not a huge update, as i'm back to work again, so i'm only able to pick away at this thing when a few spare minutes pop up.
Spent a bunch of time getting the power supply and battery box sorted out. I'm making one deviation from "As Issued" with this thing, and it came in the form of a Master Switch/Battery Cut-Off. The Dash Switch on these things isn't really a Master Switch, as a bunch of things still work when its switched off (Starter, Lights... etc etc), and most 151 Owners complain of the batteries going flat when its been sitting for a while, most likely from a small power draw somewhere in the system. Anyway, I spent nearly an hour trying to figure out where I could mount this thing in manner that looks somewhat correct and is functional. I'm not worried about hiding it, thats what the SWR Cable through the Steering Wheel and Clutch Pedal is for I ended up putting it within the seat riser on passenger side, as this puts the connections right in the battery box and out of the elements, so I don't have to start fooling with running cables all over the place: Lastly, since i'm always worried about wether or not I got the paint right, I finally got some validation today. I took the empty instrument cluster from the old 1 Svc Bn 151 and just gave it a real quick scrub (in the middle) with some soap and water and let it dry..... Not bad at all. I think i'll be able to live with my 383 Green base coat ![]() |
![]() |
| Thread Tools | |
| Display Modes | |
|
|