|
#1
 20-05-10, 17:18
|
|||
|
|||
|
Hi Guys. I have just found this wonderful website and forum and must say that I had no idea there was such a superb resource for Carriers available on the internet. I own a T16 which in fact was bought by my father many year ago and is now in need of re restoration. It was a british vehicle that was sourced from the world famous Pounds scrap yard in Portsmouth in about 1978. It is complete other than the rear tool box which I am trying to locate. Does anyone have one or make them? I would welcome your help and advice as I commence the restoration. I dont seem to have any data plates , mind you I am not sure where to look and where I may find a serial number. Perhaps you could point me in the right direction? Just started by acquiring a set of reproduction manuals to get me started, also just had the distributor rebuilt. Another question , the distributor does not have the original cooil on the front. I have been told that one can make the set up look original but run the ignition off a modern cooil hidden away. Anyway, I am pleased to find you guys.

|
|
#2
20-05-10, 17:37
|
||||
|
||||
|
Rest assured, Andrew... you will find all of the necessary resources you need to complete your carrier here! There's already a wealth of information here in the Carrier Forum, and I'm sure you will receive replies shortly...

__________________
SUNRAY SENDS AND ENDS :remember :support
|
|
#3
20-05-10, 17:45
|
|||
|
|||
|
I cannot believe the quality of the restorations high lighted on here too. Its got me very very keen to get started. Cant wait. My father used to make the Universal Carrier during the war under licence at the Sentinel Works in Shrewbury. He has some fond memories of his time there and its amazing the detail he still recalls. Ours is a T16 but nevertheless he is very keen for me to get it back to pristine condition once more.
|
|
#4
21-05-10, 04:32
|
||||
|
||||
|
Hello Andrew, you have certainly fallen in with the right crowd when it comes to anything carrier related.
I have fond memories of drooling over the pages of Wheels and Tracks magazines in my youth. I used to dream of a shopping trip to Pounds yard where I would have loved to buy a Churchill Tank, T16 etc. I'm glad some were saved. Good luck with your restoration ! Cheers Phill
__________________
Ford GPW Jeep USMC Ambulance Willys MB Jeep Daimler Ferret Mk 1 Daimler Ferret Mk 2 Land Rover S2A Field Workshop Land Rover S3 FItted For Radio x2 Land Rover Perentie GS (SASR) International No 1 Mk 3 2.5 Ton 4x4 International No 1 Mk 4 2.5 Ton 4x4
|
|
#5
21-05-10, 05:40
|
|||
|
|||
|
Andrew:
Earlier this week I warned fellow forum member Gilles, who impulsively and quite (w)recklessly bought a 1953 M38A1 CDN 1, that he needed to find the nearest medical clinic and get a vaccination against 'the green disease'. You too better get the shots before you lose all your spare time to this board poring over other fellow's postings and squandering your youth. Gilles defended himself by saying he already has a yard full of big old green trucks, and that he is beyond redemption because his wife  talked him into the purchase. [I blame it on nationalized health care and poorer quality service delivery outside the main centres.] talked him into the purchase. [I blame it on nationalized health care and poorer quality service delivery outside the main centres.] But ... as a second generation habitue of another hobby, I will agree that perpetuating a family heirloom is a worthy investment. A shooting acquaintance said it very well, 'We don't own these things; we just take care of them for the next generation.'
__________________
Terry Warner - 74-????? M151A2 - 70-08876 M38A1 - 53-71233 M100CDN trailer Beware! The Green Disease walks among us!
|
|
#6
21-05-10, 07:17
|
|||
|
|||
|
Guys, thanks for the welcomes. I can see me being enthralled for months and years on this project. I am going to check out the serial number today and see what that throws up. Will report back all being well. cheers Andrew
|
|
#7
21-05-10, 08:27
|
|||
|
|||
|
So here are the photos of the serial number, 6/44 9514 and it lloks like there has been a hole cut where the data plates would have been . not sure what that would have been. Anyideas?
|
|
#8
21-05-10, 13:08
|
||||
|
||||
|
Quote:
Welcome to this forum! Great to hear you are carrying on with the hobby your dad started. See surviving T16s for some other survivors across the globe. Re. data plates, most of the T16s I have seen do not have them anymore. However, there is a gentleman in Argentina selling reproductions on Ebay: FORD UNIVERSAL CARRIER TRUCK RELIEF DATA PLATE, FORD UNIVERSAL CARRIER TRUCK RELIEF DATA PLATE, FORD UNIVERSAL CARRIER TRUCK WITH RELIEF DATA PLATE. No connection with the seller, and I cannot vouch if these are correct repros. Hope this helps, Hanno PS: other than the thread linked above, these threads might interest you too: Wartime T16 pictures, Carrier, 4.2 inch Mortar (T16), Picture ID challenge: T16's near Caen, A Brief History of the T-16 Carrier.
__________________
Regards, Hanno --------------------------
|
|
#9
21-05-10, 14:20
|
||||
|
||||
|
looks like it was made june 44, i noticed it had a W reg, if you can prove its age, which you can from the number alone i would try and get an age related plate. Speak with David from here (Horsa) his resto is in my opinion the benchmark of a fantastic restoration........ I take it you are keeping the carrier now ?
__________________
is mos redintegro __5th Div___46th Div__ 1942 Ford Universal Carrier No.3 MkI* Lower Hull No. 10131 War Department CT54508 (SOLD) 1944 Ford Universal Carrier MkII* (under restoration). 1944 Morris C8 radio body (under restoration).
|
|
#10
21-05-10, 19:24
|
||||
|
||||
|
Looks like nice clear numbers. Try to find the FS number and the painted census number we talked about in the PMs. The vendor in South America I had mentioned is the same one Hanno posted about. His plate set is pretty good and nobody else seems to be making them due to a limited market.
__________________
David Gordon - MVPA # 15292 '41 Willys MB British Airborne Jeep '42 Excelsior Welbike Mark I '43 BSA Folding Military Bicycle '44 Orme-Evans Airborne Trailer No. 1 Mk. II '44 Airborne 100-Gallon Water Bowser Trailer '44 Jowett Cars 4.2-Inch Towed Mortar '44 Daimler Scout Car Mark II '45 Studebaker M29C Weasel
|
|
#11
22-05-10, 22:58
|
|||
|
|||
|
Guys, thanks for the info. First I am bit slow to respond as I am not getting auto alerts of replies to my e mail address but I can sort that I am sure.
Originally, I was selling this for my father as he had some care issues for my mother who had a stroke. This is now not an issue and so he has asked me to keep it and restore it to its former glory. We did have a little fun in it about 1983/4 when we bought it from a chap called Tony Mansell. Tony was a founding member of the Shropshire and Border Counties MVCH with my father and had bought it in about 1980 from Pounds. Back then, any armoured WW2 vehicle was a rare beast in private ownership, but a tracked carrier was golddust. Tony made a very hasty restoration and when we bought it it was just about runing but not very well. The reason she is on a 1980 registration is that he road registered it back then. I then rebuilt the top end, grinding all the valves in on my fathers ValveMaster machine. I was 21 and did it in my holidays from University. What a job, it took for ever but it sounded really good after. Anyway, with moving away from home and wife and kids the Carrier got neglected and thats pretty much where we are right now. Dad is really keen that we keep it, so thats the project now....get it done correctly. I cannot believe that we have had it for 27 years, but our Jeep we have had since 1952 so I guess the Carrier is relative new comer!
|
|
#12
23-05-10, 18:44
|
||||
|
||||
|
for your box if you contact eden camp they will let you in and you can measure up theyre carriers boxes / tins. That carrier still has good tracks and wheels... They wont let go of the carrier as it is destined to remain a static display however they may let you swap worn track for the good stuff it has (after all it is not going anywhere) the boxes they might even let you take them away to get repro's made but a bit of groundwork would be needed to build trust up first. i was There just the other day crying over it being left outside.
Richie
__________________
is mos redintegro __5th Div___46th Div__ 1942 Ford Universal Carrier No.3 MkI* Lower Hull No. 10131 War Department CT54508 (SOLD) 1944 Ford Universal Carrier MkII* (under restoration). 1944 Morris C8 radio body (under restoration). Last edited by RichardT10829; 23-05-10 at 22:26.
|
|
#13
24-05-10, 12:19
|
|||
|
|||
|
thanks for that. Actually, there is a T16 in a small private collection about 5 miles from me with all the boxes on. I know the guy wil let me measure up, I guess I was hoping to find a usable example...some chance I suppose. Its worth noting about Eden Camp though thx A
Last edited by andrew honychurch; 24-05-10 at 12:27.
|
|
#15
27-05-10, 16:14
|
|||
|
|||
|
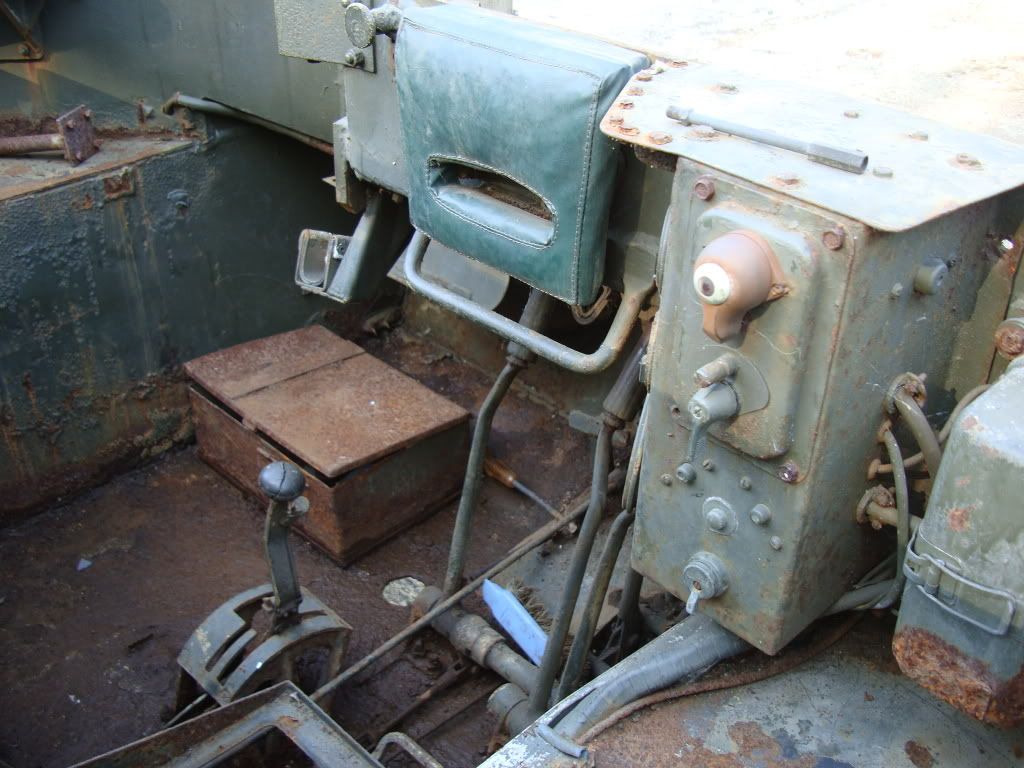
thanks Martyn, he used to have loads of them, I will try him. Meanwhile does anyone know what the large bracket above the left hand side of the gunner is. I know I will show my ignorance here but need to learn!
|
|
#16
27-05-10, 16:49
|
||||
|
||||
|
That horizontal shelf-like bracket is for the 2-inch mortar which was used as a smoke bomb thrower.
__________________
David Gordon - MVPA # 15292 '41 Willys MB British Airborne Jeep '42 Excelsior Welbike Mark I '43 BSA Folding Military Bicycle '44 Orme-Evans Airborne Trailer No. 1 Mk. II '44 Airborne 100-Gallon Water Bowser Trailer '44 Jowett Cars 4.2-Inch Towed Mortar '44 Daimler Scout Car Mark II '45 Studebaker M29C Weasel
|
|
#17
27-05-10, 23:22
|
|||
|
|||
|
If you go directly into the Carrier forum, you can read the older threads, and you will learn a lot. Read through Davids thread (Horsa) on his T16. Its a great thread, and he has done a tremendous job of it.
No questions are dumb questions. We enjoy them, they make us feel great (So clever and all)  By the way, Welcome aboard. Great to see you here enriching the forum. Lynn.
__________________
Bluebell Carrier Armoured O.P. No1 Mk3 W. T84991 Carrier Bren No2.Mk.I. NewZealand Railways. NZR.6. Dodge WC55. 37mm Gun Motor Carriage M6 Jeep Mb #135668 So many questions....
|
|
#18
28-05-10, 11:36
|
|||
|
|||
|
Thanks guys, and thankyou Lynn for the welcome. I find these forums such a great resource and way of learning and meeting new friends. I am a member of quite a few vehicle related boards and really enjoy them. I do get some sideways looks from the dear wife who wants to know what I am doing with the laptop whilst watching tv, but I am sure I am not alone in that!
I have one restoration that I am completing, not an MV, and want to finish that before starting the Carrie. I will pull it completely apart and sandblast the hull. What is concerning me is the highly pitted armour in places which will detract from the look I wish to achieve. i wonder whether good old body filler will do a good job or whether it will eventually crack out ? Any thoughts any one. Short of that, i guess one could look at lead loading ( expensive!) or cutting out the offending pieces and replacing with new metal. I see David put new floors in the sponson sides in the rear. Was that a mammoth job? What did you use to cut out the old floors with David? cheers Andrew
|
|
#19
28-05-10, 13:07
|
|||
|
|||
|
In my AOP I replaced the guards,on each side where they go into the drivers compartment. they were originally welded in with stainless arc rods. (You cant gas cut it) I used an arc air gouger to cut it out. (easy)
Be careful with the rust. You will see what I said in Horsa's thread.
__________________
Bluebell Carrier Armoured O.P. No1 Mk3 W. T84991 Carrier Bren No2.Mk.I. NewZealand Railways. NZR.6. Dodge WC55. 37mm Gun Motor Carriage M6 Jeep Mb #135668 So many questions....
|
|
#20
28-05-10, 15:29
|
||||
|
||||
|
As per lynn's comments, if you are welding bits back in and it is being attached to the armour plate, it will need to be done with stainless, for cutting you can use the thin slitting discs on a grinder you can get them off ebay by the truck load for buttons.... they get worn away fast, but as they are so cheap it does not matter, plus the thin profile of the blade makes a neat job... i dont think the track guards themselves are BP steel. I prefer to weld with a Mig, you could run some lovely seams in there
Horsa did a fantastic job of replacing his rear shelf and track guards. What are you restoring at the minute ?
__________________
is mos redintegro __5th Div___46th Div__ 1942 Ford Universal Carrier No.3 MkI* Lower Hull No. 10131 War Department CT54508 (SOLD) 1944 Ford Universal Carrier MkII* (under restoration). 1944 Morris C8 radio body (under restoration).
|
|
#21
28-05-10, 17:13
|
||||
|
||||
|
The metal in those areas was originally crimped down at 90 degree angles on each of the long edges. During production, they pressed the crimped panel in between the armor sections for welding. I used the thinner cut-off wheels/discs on my 4" angle grinder to remove the old sheet metal. Make the cuts near the welds but stay in the sheet metal to make smooth and fast progress. A cutting torch could be used as an option but you don't want to weaken the old welds or the armor so might be faster but leave more to grind later. After the sheet metal panels are gone, use grinding discs made for stainless steel welds to grind back the remains towards the armor walls. It's a lot of heavy work to be sure. I had used cheaper grinding discs at first and went through them pretty fast. The more expensive discs for stainless will go ten times further. Cost might work out close to the same but you won't be changing discs out every few minutes and won't have as much dust from disintegrating discs.
When replacing the metal, we used flat pieces without the crimps. Figured it wouldn't be in combat anymore and the new metal and welds would be supported by the long welds and old crimped remaining edge that is on the track side. Saves overall grinding and welding that way. And there is no risk of cutting into the armor from working at awkward angles down there.
__________________
David Gordon - MVPA # 15292 '41 Willys MB British Airborne Jeep '42 Excelsior Welbike Mark I '43 BSA Folding Military Bicycle '44 Orme-Evans Airborne Trailer No. 1 Mk. II '44 Airborne 100-Gallon Water Bowser Trailer '44 Jowett Cars 4.2-Inch Towed Mortar '44 Daimler Scout Car Mark II '45 Studebaker M29C Weasel
|
|
#22
28-05-10, 23:15
|
|||
|
|||
|
Again, this is great stuff guys. I will have to see what I am left with when I get the thing stripped and sandblasted. I have used the very thin cutting disc Richard refers to several times in the past. You are right, they disappear before your very eyes! Seem to be picking rusty bits of metal out of my hair for weeks afterwards. I am going to have a really good look around the T16 this weekend and will take some detailed photos. If you are not all bored by it, I will post the photos and you may all have some observations. I must say, I am rather hoping I dont have to grind those valves in again!!!
Andrew
|
|
#23
04-06-10, 19:42
|
|||
|
|||
|
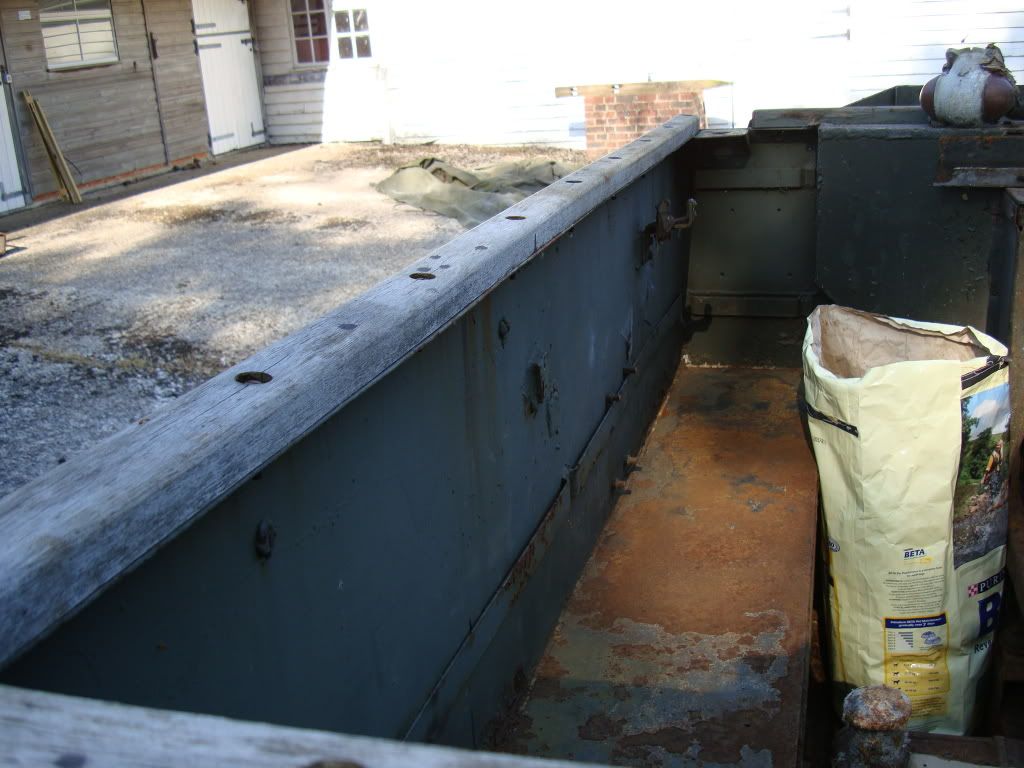
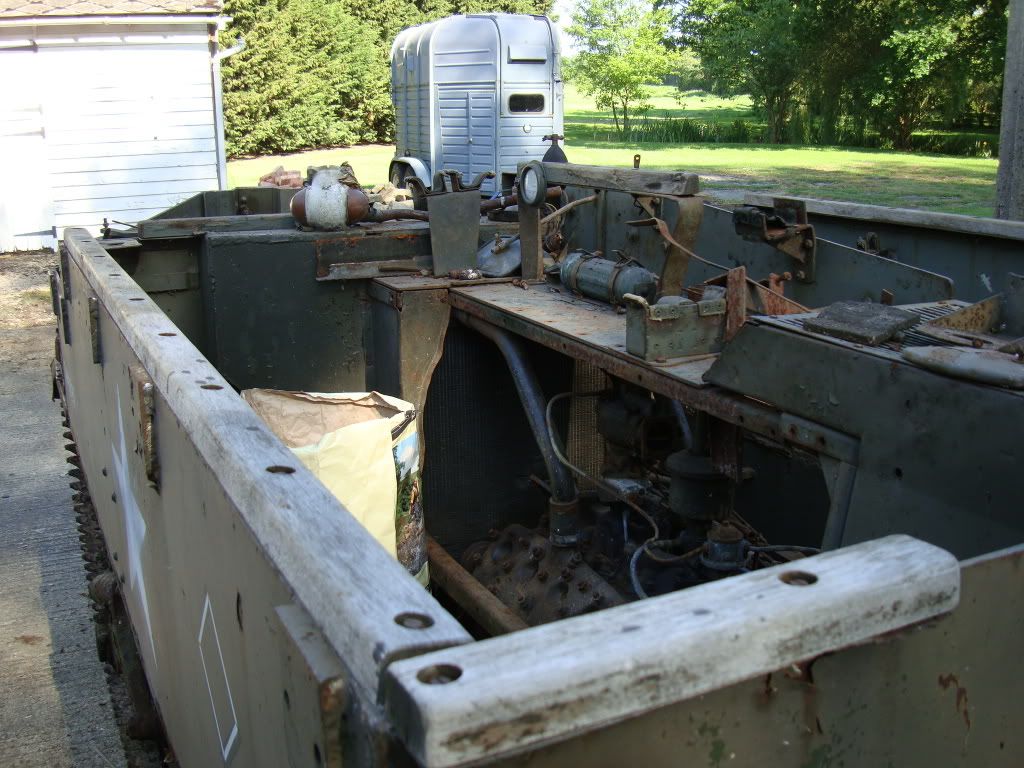
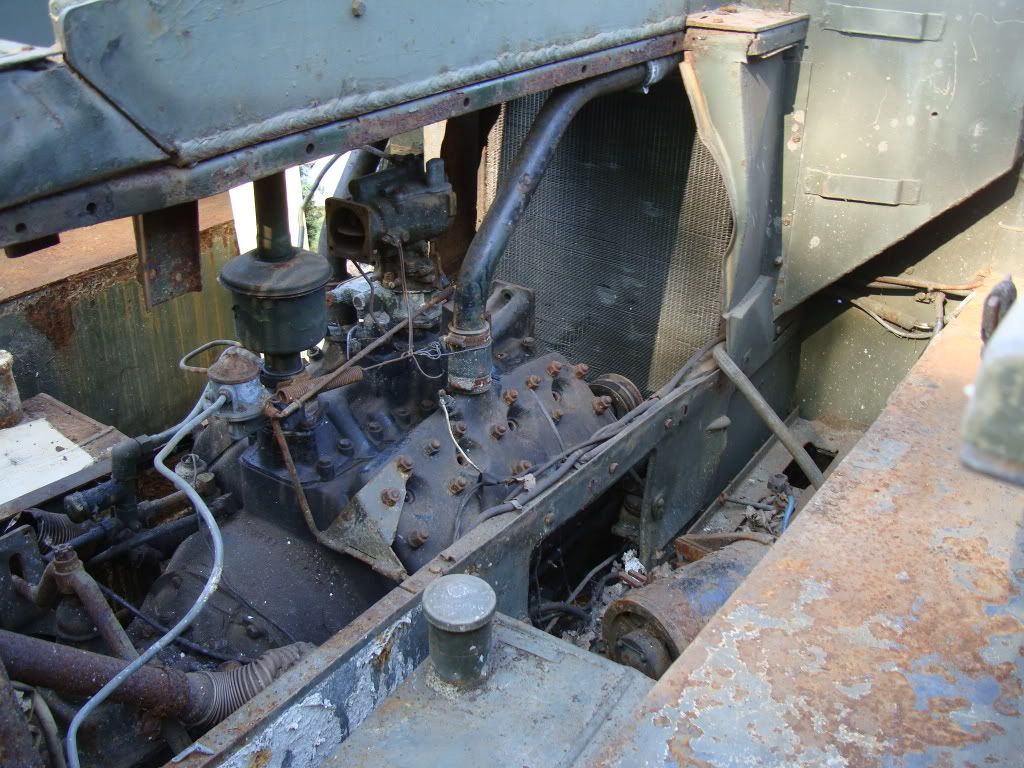
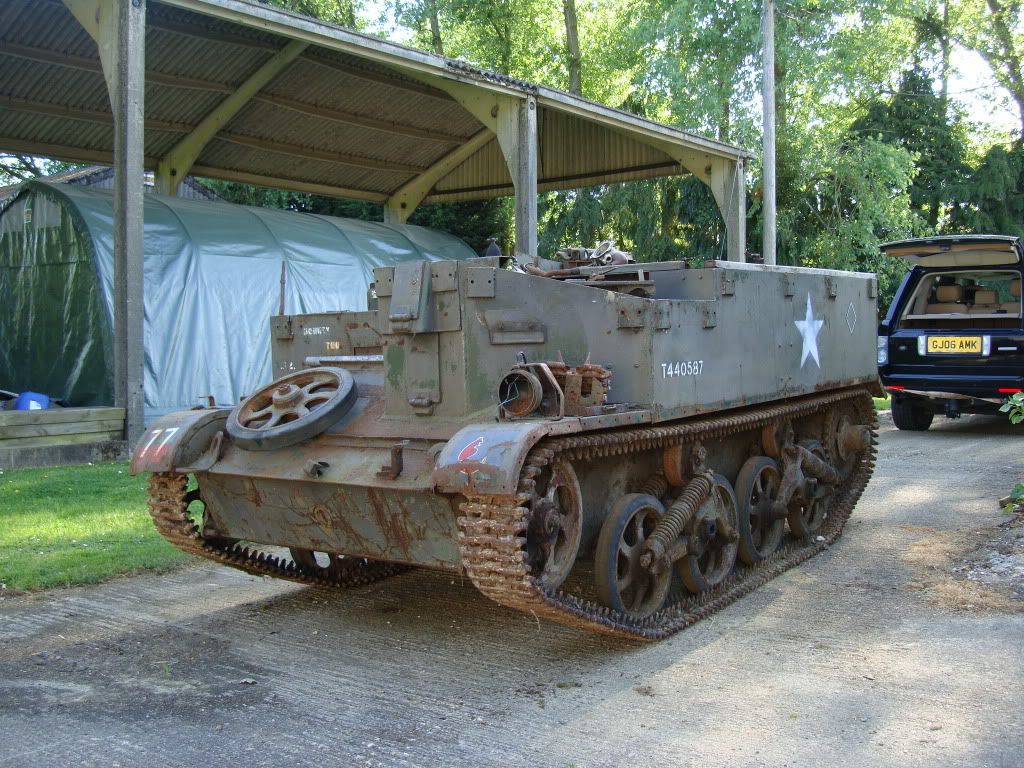
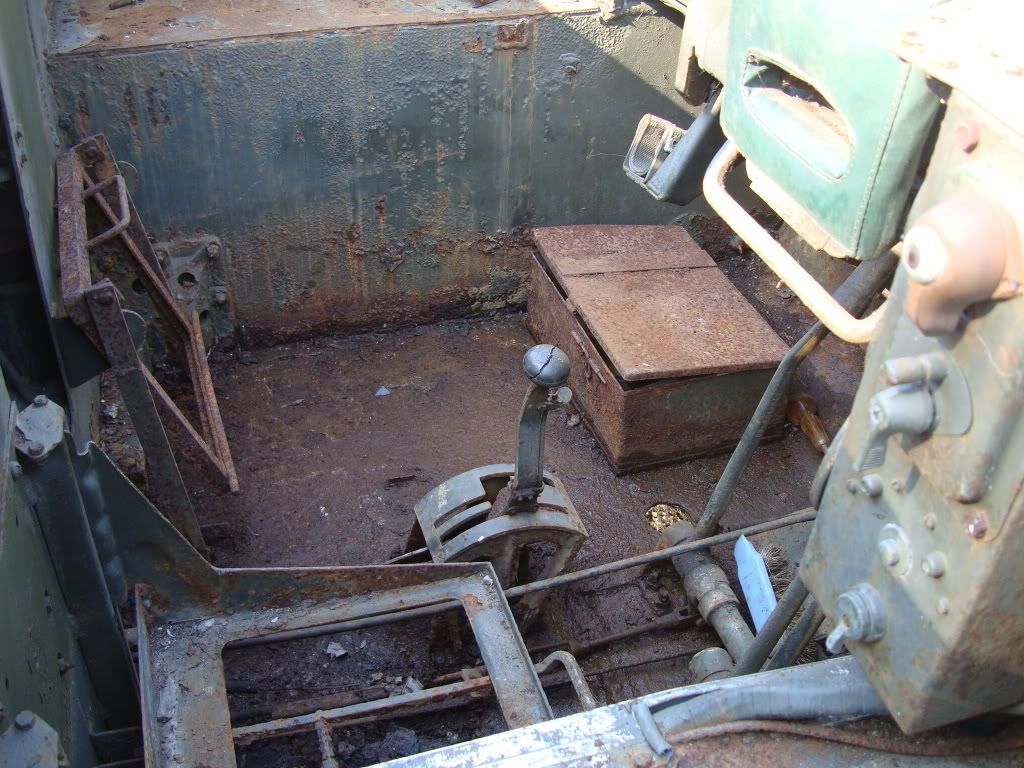
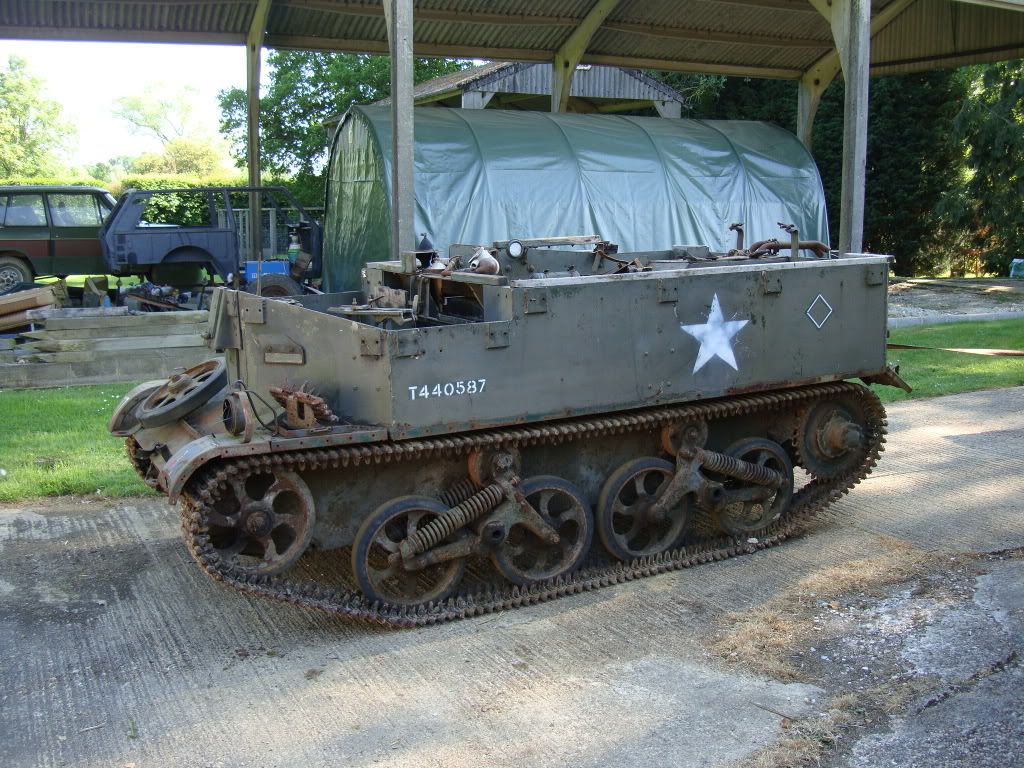
what are days off from the office if they are not for working on vehicles then? Spent 4 or 5 hours today getting to grips with the T16. Its been something like 26 years since I last had a really good look around her and that would have been the last time that I drove it. Time has not done it any favours its fair to say. Unfortunately the garage where it has been stored was damp and did have some leaks so the floors are pretty ghastly but no serious rot. I agree with David that the floor seems to have a laminate which is now coming off. I was forced to speculate what it is, I think its a rubber/heavy painted surface rather than metal. It even looks like paper on one piece I removed. Anyway, the carrier is going to weigh about 1/2 ton lighter when all the loose rust is removed. The good thing is that she is all there, all though I seem to have mislaid a couple of smaller items for the engine. Oil filter bracket and air cleaner elbow. not quite sure how they went but they may turn up yet. Its definitely a full strip down and I can see that it has had new track covers welded in when it left Pounds in about 1978. I will do them again as they are not really that good, and the previous owner has put white silicone sealer in the corner! I am going to post some photos of it as it is, and whilst this is not a record attempt in terms of the time I expect the restoration to take, it may be fun to keep you posted with developments as per Davids marvellous rebuild. Photos to follow. A
|
|
#24
04-06-10, 19:46
|
|||
|
|||
|
|
#25
04-06-10, 19:59
|
||||
|
||||
|
Nice shots. The voltage regulator you have is the much more rare Ford pattern housing so restore it even if you need to put modern guts inside. The other pattern was more common and had a housing like found on half tracks and jeeps.
And there won't be an oil filter on the T-16. Just the pre-filter used when adding oil and you have that on the engine already between the fuel pump and carby. The oil bath engine air filter hangs from the engine top armor so that's probably what you are referring to I guess since the two mounts are visible hanging down. The filter is really large and has two compartments.
__________________
David Gordon - MVPA # 15292 '41 Willys MB British Airborne Jeep '42 Excelsior Welbike Mark I '43 BSA Folding Military Bicycle '44 Orme-Evans Airborne Trailer No. 1 Mk. II '44 Airborne 100-Gallon Water Bowser Trailer '44 Jowett Cars 4.2-Inch Towed Mortar '44 Daimler Scout Car Mark II '45 Studebaker M29C Weasel
|
|
#26
04-06-10, 22:18
|
|||
|
|||
|
Ahah, no oil filter then! someone has been trying to confuse me as there is a US pattern Junior filter sitting loose on the floor! So it seems the brackets for the air cleaner are there and good to hear about the control regulator being early and desirable. Looking at the photos of your Carrier, it seems the oil coolers are located differently to mine? Will go and have another look now.
A
|
|
#27
04-06-10, 22:41
|
||||
|
||||
|
The junior filter is the pattern used on a jeep. I was also surprised that the bigger V8 had no filter since there is plenty of space for one.
Somewhere on my restoration thread you'll see the regular voltage regulator. Both were used on and off throughout production for some reason so not sure if there was a supply problem or two final assembly facilities. Your type with the external strap is taller as it sticks outward towards the driver and less encountered. But it is shown more in the manuals. On the oil coolers, the early hull like mine had them separated and had the fuel filter at the rear over the final drive. The later hull had them together in front of the radiator and the fuel filter was up front with them. To make things more confusing, the oil coolers were a different pattern, and I have the later pattern on an early hull. I had to scratch build all of my oil lines so was able to make it all work. But now that you know about it, I'll have to kill you so you can't tell anyone else 
__________________
David Gordon - MVPA # 15292 '41 Willys MB British Airborne Jeep '42 Excelsior Welbike Mark I '43 BSA Folding Military Bicycle '44 Orme-Evans Airborne Trailer No. 1 Mk. II '44 Airborne 100-Gallon Water Bowser Trailer '44 Jowett Cars 4.2-Inch Towed Mortar '44 Daimler Scout Car Mark II '45 Studebaker M29C Weasel
|
|
#28
05-06-10, 00:46
|
|||
|
|||
|
Ha! right ho. I have been sitting watching TV looking at my manuals and had worked out the fuel filter had moved but cannot see quite where it fits up front. Its not there on mine right now. In fact the fuel pump is connected directly to one fuel tank. I dont think the guys we bought it off were too fussed by doing the job in too much detail, but there again, back then restorations were not of the quality that they are today. To answer an earlier question that I have only just noticed, with apologies, I am restoring a non MV, early Range Rover which is another of my interests. So far, over the years I have restored a Dingo, an M5 Stuart , two Half Tracks , a DUKW, an M8 and a Daimler Armoured Car. I lost interest in the hobby for a while after 20 odd years and sold most of my vehicles. Fortunately, I have kept a few including the T16 which I am really excited by. The first one I saw was owned by Mitch Hickman and came out of packing case! It was subsequently sold to the Budge Collection and then on to a museum in the US I believe. ( did I mention this before? ) I just love the way a carrier glides over the ground with the fabulous deep down burble of the flat head. I do know where there is a Windsor Carrier, straight out of the UK army, and sitting without turning a track for probably 40 years. It has the hood still erected and reputedly is delivery mileage! Sadly, the chap will not sell but its good to know there are still one or two nuggets out there to be found. I recall a friend owning a Windsor but he always struggled with it. It seemed that the engine was not powerful enough to power the tracks when it was trying to turn. Was this a fault of the longer track length or was it just his machine? Sorry, ramble over !
|
|
#29
05-06-10, 11:24
|
|||
|
|||
Nice and complete. Splash of paint and away you go!! 
__________________
1967 Land Rover Plant Repair Vehicle 1941 Matchless G3L 194? Wiles Junior Trailer 1941 Morris Commercial CS8
|
|
#30
06-06-10, 03:10
|
|||
|
|||
|
it even runs now! spent most of today, saturday, which was glorious working through the various items. First checked it was still free.........it was! Cleaned all the plus and gapped them. had already poured in some diesel into the bores. I had the dizyt restored a few months back and fitted that as well. Was concerned that the valves had stuck but they all seemed fine. Anyway, after cleaning everything and arranging a temporary fuel supplu, guess what? after 26 years and with the least ammount of trouble she ran like a swiss watch! dead chuffed. cant run it for long as the fan is not on and dont have any water in her,but good to know she is still alive!!
|
 |
| Thread Tools | |
| Display Modes | |
|
|


 Linear Mode

