MLU FORUM  

Go Back   MLU FORUM > MILITARY VEHICLES > The Restoration Forum

Notices

Reply
 
Thread Tools Display Modes
  #1  
Old 07-08-07, 06:08
Plushy's Avatar
Plushy Plushy is offline
James Plush
 
Join Date: Apr 2007
Location: Miners Rest, Victoria, Australia
Posts: 411
Default 1943 F15A restoration

Hi to everyone ,
i decided to start a new thread with the actual resoration work as my other thread has turned into a research thread .
Other Thread

Well the work has started i decided that the first thing that needs to come off is the roof. That stopped me pretty quick , how do you get the rusted flathead screws out ??? .... so while i thought about that i decided to remove the sunshine roof patches .


10 minutes later job done after that i removed the Drivers seat and cleaned up the interior .


Looks like all the floor plates are there and should be reuseable . i did notice that on the rear lower wall where the W braces are the bottom sections are rusted out .

These are the Engine covers i have .
Reply With Quote
  #2  
Old 07-08-07, 14:43
Alex Blair (RIP) Alex Blair (RIP) is offline
"Mr. Manual", sadly no longer with us
 
Join Date: Feb 2003
Location: Ottawa ,Canada
Posts: 2,916
Default Temperature guage

Hi James.
Great job on the truck so far..I see the line that goes from the dash to the engine compartment is still intact..It is the line with the protective coil casing around it that runs between the floor pedals ...(It could be your speedometer cable also)
If that is your temperature guage sensor line that runs from the temperature guage to your engine block..(I see that the engine is missing but look for that sensor line..They may have taken it out of the block in one piece..)It is a mercury filled sensor bulb and if you are lucky it will be in one piece...with the bulb still intact...DO NOT CUT THIS LINE to remove it..or else ,not withstanding environmentally bad mercury things,that will be the end of the temperature guage...and don't heat it with a torch...that too will destroy it...
There is a section in the manuals on the care and feeding of this beast..
Looks good so far..
I see the butt plate holders for the rifles on the floor of the truck and the floor looks in great shape..
Great work..

__________________
Alex Blair
:remember :support :drunk:

Last edited by Alex Blair (RIP); 07-08-07 at 14:52.
Reply With Quote
  #3  
Old 07-08-07, 15:39
Plushy's Avatar
Plushy Plushy is offline
James Plush
 
Join Date: Apr 2007
Location: Miners Rest, Victoria, Australia
Posts: 411
Default

Thanks Alex for pointing that out . i am still scrounging the money up for the manuals i will let you know as soon as i have sent it .
Reply With Quote
  #4  
Old 07-08-07, 16:09
Tony Smith's Avatar
Tony Smith Tony Smith is offline
No1, Mk 2** (I'm back!)
 
Join Date: Feb 2003
Location: Lithgow, NSW, Australia
Posts: 5,042
Default Re: Temperature guage

Quote:
Originally posted by Alex Blair
Hi James.
Great job on the truck so far..I see the line that goes from the dash to the engine compartment is still intact..
If that is your temperature guage sensor line that runs from the temperature guage to your engine block..(I see that the engine is missing but look for that sensor line..They may have taken it out of the block in one piece..)It is a mercury filled sensor bulb and if you are lucky it will be in one piece...with the bulb still intact...DO NOT CUT THIS LINE to remove it..or else ,not withstanding environmentally bad mercury things,that will be the end of the temperature guage...and don't heat it with a torch...that too will destroy it...
There is a section in the manuals on the care and feeding of this beast..
Not in the Ford manuals, there won't be. Ford used an electric temp sender, while Chev used the Bulb and tube type.
Reply With Quote
  #5  
Old 23-08-07, 05:55
Plushy's Avatar
Plushy Plushy is offline
James Plush
 
Join Date: Apr 2007
Location: Miners Rest, Victoria, Australia
Posts: 411
Default

Well i have been busy so heres some updates .

I removed the roof after much swearing at the flush mount screws on the front of the cab .


Then i cut out the welded in sheet metal on the sunshine roof .


And removed the headlights ready for removing the nose


Then i went and picked up some of the other original parts for the truck that have surfaced . Radiator, Front Grille and rusted Passenger side door .

Reply With Quote
  #6  
Old 23-08-07, 05:58
Plushy's Avatar
Plushy Plushy is offline
James Plush
 
Join Date: Apr 2007
Location: Miners Rest, Victoria, Australia
Posts: 411
Default

A couple of days after that i went and picked up a new spare cab from a new friend named Rowan .


Reply With Quote
  #7  
Old 23-08-07, 05:59
Plushy's Avatar
Plushy Plushy is offline
James Plush
 
Join Date: Apr 2007
Location: Miners Rest, Victoria, Australia
Posts: 411
Default

also managed to score a gallows mount from him as well .
Reply With Quote
  #8  
Old 23-08-07, 06:11
Plushy's Avatar
Plushy Plushy is offline
James Plush
 
Join Date: Apr 2007
Location: Miners Rest, Victoria, Australia
Posts: 411
Default

Then it was off for a quick 400 kay round trip to horsham to pick up a motor soon as i got it home i did a quick check and its
3 3/16ths bore and so far the numbers tell me its a 1942 motor but the heads are mismatched one is from a truck the other is from a bus but they both look the same so go figure .
Anyway got it home and started stripping it down .
60 years of bad filtration .

Heads are off .


Flywheel and clutch and water pumps .

All the bolts and nuts are kept and labelled .

Pistons are out .

Next it was time for the crank .

My little work area near the heater .

I must say the crank is a heavy son of a b%$#h

Cheers Plushy
Reply With Quote
  #9  
Old 30-08-07, 13:25
Plushy's Avatar
Plushy Plushy is offline
James Plush
 
Join Date: Apr 2007
Location: Miners Rest, Victoria, Australia
Posts: 411
Default

Can anyone tell me the best way to knock out dints in the Cab panel work ? i have been having small sucess with knocking out the dints with a 10 pound hammer . Is there a better way ??

cheers Plushy
Reply With Quote
  #10  
Old 30-08-07, 15:50
Gunner Gunner is offline
T' Guns thank God t' guns
 
Join Date: Sep 2004
Location: Near Ottawa, Canada
Posts: 776
Default Dry Ice

Plushy:

Check this out: http://www.metacafe.com/watch/494805..._with_dry_ice/

Mike
__________________
Mike Calnan
Ubique!
("Everywhere", the sole Battle Honour of the Royal Regiment of Canadian Artillery)
www.calnan.com/swords
Reply With Quote
  #11  
Old 30-08-07, 16:15
Tony Smith's Avatar
Tony Smith Tony Smith is offline
No1, Mk 2** (I'm back!)
 
Join Date: Feb 2003
Location: Lithgow, NSW, Australia
Posts: 5,042
Default

Quote:
Originally posted by Plushy
......and so far the numbers tell me its a 1942 motor but the heads are mismatched one is from a truck the other is from a bus but they both look the same so go figure .

Cheers Plushy
Those heads look like a pair, both seem to have C81T part numbers?!?! 6049 is the Ford Part No for a RH head, 6050 is LH. C81T is the right series for a Blitz.
Reply With Quote
  #12  
Old 30-08-07, 17:11
Plushy's Avatar
Plushy Plushy is offline
James Plush
 
Join Date: Apr 2007
Location: Miners Rest, Victoria, Australia
Posts: 411
Default

Thanks for the Info Tony i thought i might have misidentified the heads .

Mike looks like and interesting technique but someone mentions below the video that it doesnt work on large Dints
Reply With Quote
  #13  
Old 31-08-07, 22:48
Gunner Gunner is offline
T' Guns thank God t' guns
 
Join Date: Sep 2004
Location: Near Ottawa, Canada
Posts: 776
Default Large dints

Thats when you have to start using a dolly and a hammer... a good panel basher can do amazing things... I'm mediocre at best but would happily fly over to Oz on your ticket to give it a 'bash'!

Ask at an old established garage and they'll be able to recommend a good panel basher who may even do the work for beer and a local newspaper article to drum up business.

If you go at it yourself practice on some old scrap parts first... remember to put the dolly on the peak of the hill and use the hammer on the other side. Work in circles!

Mike
__________________
Mike Calnan
Ubique!
("Everywhere", the sole Battle Honour of the Royal Regiment of Canadian Artillery)
www.calnan.com/swords
Reply With Quote
  #14  
Old 01-09-07, 03:39
david moore david moore is offline
Registered User
 
Join Date: Jun 2003
Location: Kingston, Ontario
Posts: 360
Default V8 valve guides

Did you succeed in getting the old valve guides out? Mine were welded in real good!
Reply With Quote
  #15  
Old 01-09-07, 03:59
Plushy's Avatar
Plushy Plushy is offline
James Plush
 
Join Date: Apr 2007
Location: Miners Rest, Victoria, Australia
Posts: 411
Default

Thanks for the suggestion Mike i have a set of hammers and dollys for panel beating but the thickness of the panel is making it hard to make any progress .

David the first few valve`s were a pain in the butt but after awhile i worked it out and with a bit of persuasion [the hammer] they came out .
I started by removing the bottom retaining clip first then pushed all the valves right up the i used a long thin punch and a brass hammer to knock the guides down a bit so i could remove the crows foot clip at the top then used my home made valve removal tool too push the spring ,valve,guides out as one unit .
Reply With Quote
  #16  
Old 02-09-07, 03:55
Tony Smith's Avatar
Tony Smith Tony Smith is offline
No1, Mk 2** (I'm back!)
 
Join Date: Feb 2003
Location: Lithgow, NSW, Australia
Posts: 5,042
Default

Quote:
Originally posted by Plushy
Then it was off for a quick 400 kay round trip to horsham to pick up a motor.
Anyway got it home and started stripping it down .

Pistons are out .

Cheers Plushy
If this engine has not been disassembled since leaving the factory, the Conrods will be marked L1, L2, L3, and L4 and R1, R2, R3, and R4. Good idea to keep the caps on and nuts in place as it is easy to damage the threads, and the INNER surface is machined as a bearing surface, so you want to keep the same orientation and same caps on the rods.
Reply With Quote
  #17  
Old 02-09-07, 04:00
Tony Smith's Avatar
Tony Smith Tony Smith is offline
No1, Mk 2** (I'm back!)
 
Join Date: Feb 2003
Location: Lithgow, NSW, Australia
Posts: 5,042
Default

Nice Sunshine Cab available up this way for sale. Tin sheet has been screwed over the opening, so all the support metal is still in place around the edge:
Attached Thumbnails
img_4463.jpg  
Reply With Quote
  #18  
Old 02-09-07, 04:03
Tony Smith's Avatar
Tony Smith Tony Smith is offline
No1, Mk 2** (I'm back!)
 
Join Date: Feb 2003
Location: Lithgow, NSW, Australia
Posts: 5,042
Default

Teaser:
Attached Thumbnails
img_4462.jpg  
Reply With Quote
  #19  
Old 02-09-07, 06:09
Plushy's Avatar
Plushy Plushy is offline
James Plush
 
Join Date: Apr 2007
Location: Miners Rest, Victoria, Australia
Posts: 411
Default

Got a photo of the back of the cab and interior ?
Reply With Quote
  #20  
Old 05-09-07, 13:16
Plushy's Avatar
Plushy Plushy is offline
James Plush
 
Join Date: Apr 2007
Location: Miners Rest, Victoria, Australia
Posts: 411
Default

More Progress on the Blitz i now have the cab almost totally disassembled . The Floor screws are the hardest thing i have had to deal with so far .


and Keith was right i found the engine number on the Gearbox today and it is 3G43136F
Reply With Quote
  #21  
Old 05-09-07, 14:03
Grant Bowker Grant Bowker is offline
Registered User
 
Join Date: Jul 2006
Location: Ottawa, Canada
Posts: 2,321
Default Heated work area

Quote:
Originally posted by Plushy

My little work area near the heater .
I like your idea of a "little work area". That heater looks suspiciously like spare parts, or are they civilian parts?
Reply With Quote
  #22  
Old 05-09-07, 15:18
Plushy's Avatar
Plushy Plushy is offline
James Plush
 
Join Date: Apr 2007
Location: Miners Rest, Victoria, Australia
Posts: 411
Default

Civvy parts, i work for a large Food company in Distribution so its easy to get parts from trucks in this case 3 x 20 inch rims welded together to make a shed heater . You might have heard of the company i work for its McCains Foods .
Reply With Quote
  #23  
Old 14-09-07, 16:21
Tony Smith's Avatar
Tony Smith Tony Smith is offline
No1, Mk 2** (I'm back!)
 
Join Date: Feb 2003
Location: Lithgow, NSW, Australia
Posts: 5,042
Default

Quote:
Originally posted by Plushy
Got a photo of the back of the cab and interior ?
Back:
Attached Thumbnails
img_4481.jpg  
Reply With Quote
  #24  
Old 14-09-07, 16:25
Plushy's Avatar
Plushy Plushy is offline
James Plush
 
Join Date: Apr 2007
Location: Miners Rest, Victoria, Australia
Posts: 411
Default

Tony can you pm me what they are asking pricewise for it ?
Reply With Quote
  #25  
Old 14-09-07, 16:28
Tony Smith's Avatar
Tony Smith Tony Smith is offline
No1, Mk 2** (I'm back!)
 
Join Date: Feb 2003
Location: Lithgow, NSW, Australia
Posts: 5,042
Default

All the tie downs are in place:
Attached Thumbnails
img_4482.jpg  
Reply With Quote
  #26  
Old 14-09-07, 16:30
Tony Smith's Avatar
Tony Smith Tony Smith is offline
No1, Mk 2** (I'm back!)
 
Join Date: Feb 2003
Location: Lithgow, NSW, Australia
Posts: 5,042
Default

Cab is square and straight:
Attached Thumbnails
img_4483.jpg  
Reply With Quote
  #27  
Old 14-09-07, 16:33
Tony Smith's Avatar
Tony Smith Tony Smith is offline
No1, Mk 2** (I'm back!)
 
Join Date: Feb 2003
Location: Lithgow, NSW, Australia
Posts: 5,042
Default

Quote:
Originally posted by Plushy
Got a photo of the ......interior ?
(*Gets up, walks out with camera...*)

James, PM Me with your E-mail or Phone No and I'll get the owner to contact you direct.
Reply With Quote
  #28  
Old 15-09-07, 03:57
Ken Hughes's Avatar
Ken Hughes Ken Hughes is offline
Registered User
 
Join Date: Jul 2003
Location: Dunedin New Zealand
Posts: 374
Default

plushy have you found a panel beater?
if you want the truck in top order when finished i would suggest get a tradesman to do your roof, otherwise if you are not fussed do have ago yourself,just remember you see both sides of a panel on these trucks,now if you were just down the road,i would do the job for you!
look forward to your progress updates cheers.
__________________
kenney
Reply With Quote
  #29  
Old 26-09-07, 12:46
Plushy's Avatar
Plushy Plushy is offline
James Plush
 
Join Date: Apr 2007
Location: Miners Rest, Victoria, Australia
Posts: 411
Default

Hi Ken sorry for the Slow reply ,
I will be doing the panel beating myself as i do most of my rally car panel beating so this should hopefully not be too much harder .

Here`s the current stage of progress .


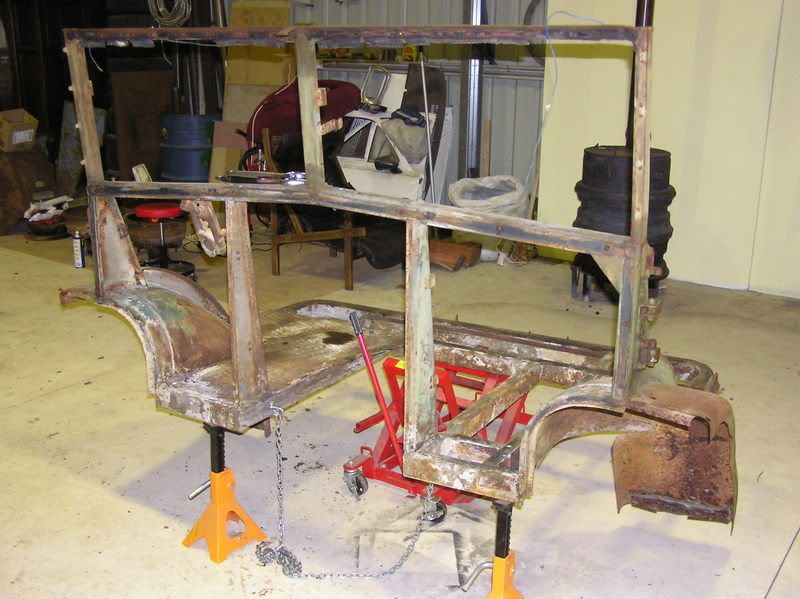
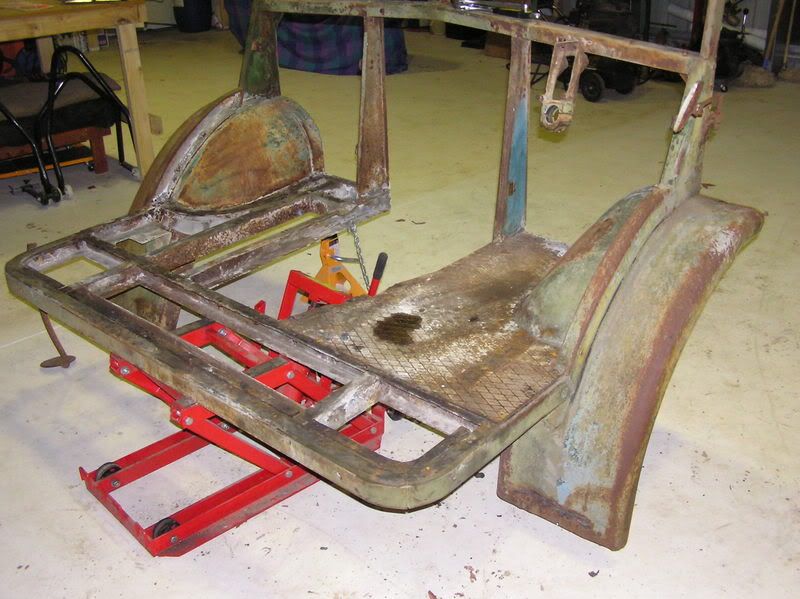
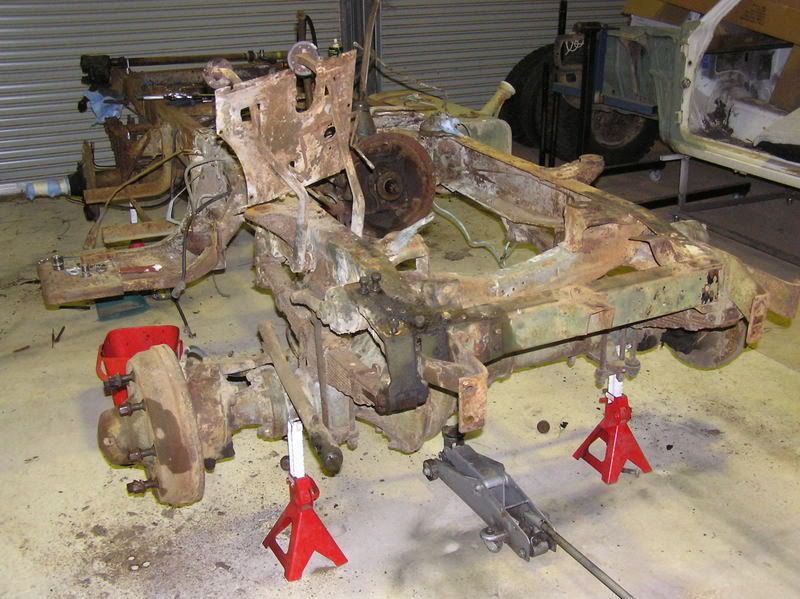
I am currently rebuilding the rear brakes and i have managed to get a whole new set of timken bearings for the wheels and steering box via my father [who used to work for them] for free !. . Then it will be time to tape up anything not to be sandblasted then wheel it outside and sandblast ready for paint .

Cheers Plushy
Reply With Quote
Reply


Posting Rules
You may not post new threads
You may not post replies
You may not post attachments
You may not edit your posts

BB code is On
Smilies are On
[IMG] code is On
HTML code is Off

Forum Jump


All times are GMT +2. The time now is 10:01.


Powered by vBulletin® Version 3.8.4
Copyright ©2000 - 2025, Jelsoft Enterprises Ltd.
Copyright © Maple Leaf Up, 2003-2016